Introduction
Facebook has more than 2.6 billion active users, and Facebook Ads also give you access to Instagram and Messenger users. Furthermore, they enable highly targeted marketing based on user interests, behaviours and interactions with your business. This makes it a powerful tool for every stage of the sales funnel, from raising brand awareness to converting warm leads into customers, and an invaluable advertising platform for Shopify store owners.
In this article:
- Step 01: Setting Up Facebook Ads For Shopify
- Creating A Facebook Business Manager Account
- Creating An Advertising Account
- Creating A Facebook Pixel For Your Shopify Store
- Installing The Facebook Pixel To Your Shopify Store
- Step 02: Creating Facebook Audiences
- Step 03: Creating Facebook Ads Campaign
- Step 04: Designing Facebook Ads For Shopify
- Step 05: Measuring Facebook Ad Success
Step 01: Setting Up Facebook Ads For Shopify
The first step to creating a Facebook Ad campaign is setting up your Facebook Business Manager account. This is the account you will use to manage your business’s page and access ad campaign tools. Once you have created an account, you will need to set up an advertising account and link it to your Shopify store by installing the Facebook Pixel.
The Facebook Pixel is a few lines of code that go on your website to track Facebook Ad click-throughs and conversions, among other metrics. These will then be displayed in your Facebook Business Manager. You don’t need it to run a campaign, but without it you will have no idea how effective your campaign was or how to improve it.
Furthermore, the audience data the Pixel provides enables targeted ads based on visitor activity.
01. Creating A Facebook Business Manager Account
Go to Facebook Business and click Create Account.

You will then provide your name, business name and email, as well as the details for your business page on Facebook. You need to have one of these, so set one up first if you haven’t already.
Read more: How iOS 14 Affects Facebook Ads: Read this Before running Facebook Marketing Strtegy
02. Creating An Advertising Account
In the Business Manager menu, click Business Settings, then Accounts and Ad Accounts.
Click Create a new ad account and provide the requested details.
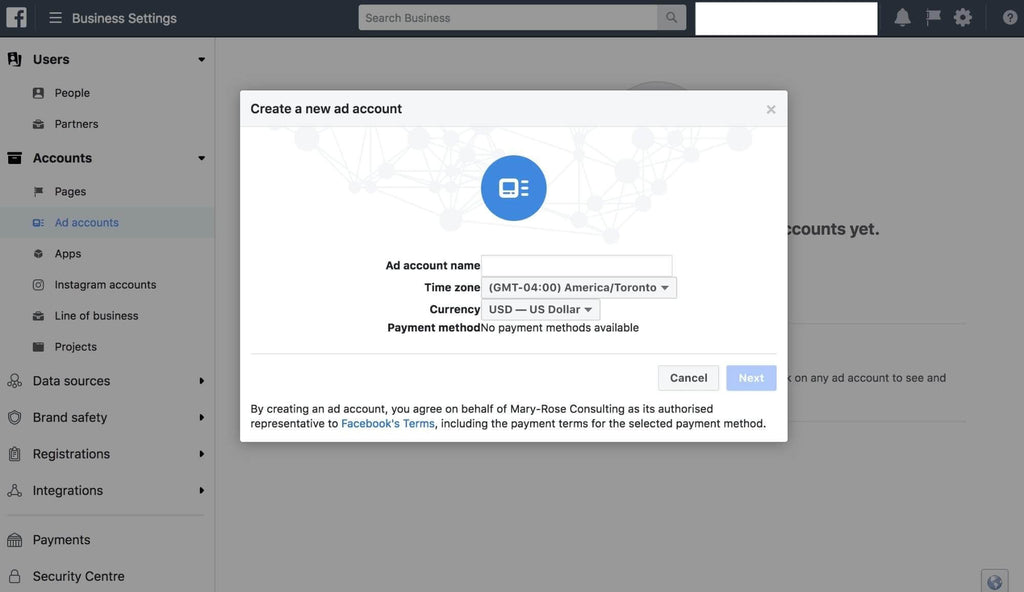
You will be asked for a payment method during this process. You don’t need to add one now, but you will need to add a payment method before you can run any ads.
03. Creating A Facebook Pixel For Your Shopify Store
Create a Facebook Pixel by going to the Event Manager and clicking Connect a new data source.
Select Web and enter your website URL, then choose Use a Partner Integration when asked how to install the code.
On the next step you will be asked to choose the events that you want to track. You can also create your own events in the Custom Conversions tab in Events Manager.
The next page will show you the Pixel ID you just created, which you can also find in the Event Manager in the Data sources tab.

04. Installing The Facebook Pixel To Your Shopify Store
On a Shopify store, installing the pixel is easy. Log into your Shopify Admin and go to Online Store, then Preferences.
Find the Facebook Pixel section and paste in the Pixel ID you created, then click save.

The Pixel can take anything up to a couple of hours to come online, so don’t be surprised if nothing happens straight away. Eventually, you will start to see visitor activity for the events you chose to track.
Learn more about How To Install Pixel To Your Shopify Store HERE
Step 02: Creating Facebook Audiences
The Audiences section of the Facebook Business Manager is where you decide who to target with your ads. There are many ways to define these lists and specify audience groups to target, but Facebook audience lists can be split into two basic groups:

01. Prospecting
With billions of active users, Facebook is one of the most effective ways to reach new customers online. It also offers many tools to help pick your target demographic out from the crowd. This is vital to narrow down your list and ensure your ads are only shown to potential customers.
You can filter your audience by their interests, behaviors and demographics, and create Lookalike Audiences based on your existing customers.

Interests
Interests categorize the pages and content a user views and interacts with. This can be useful to find people within specific hobbies or industry niches.
Behaviours
Behaviours are usually events in a user’s life that they recorded on Facebook, such as graduating, celebrating a birthday or moving to a new town.
Demographics
This covers information shared in user profiles such as their job title, age or education level.
Lookalike Audiences
A Lookalike Audience finds new leads based on the interests, behaviours and demographics of your past customers and website visitors.

This is great for reaching more of the same type of customer.
02. Retargeting
Retargeting ads are used to target customers and leads that have already visited your site or contacted you. Retargeting audiences can be created using the Website traffic, Customer file and Engagement sources.
Website Traffic
You can define retargeting audiences based on any of the events tracked by your Facebook Pixel, such as viewing product categories or adding items to the cart.
Customer file
Click the Customer file option to add a list of contact information for your existing customers and leads, such as email addresses and phone numbers. Facebook will match these with their Facebook profiles to show them your ads.
Engagement
Choosing Engagement lets you target people who have interacted with your previous Facebook ads or one of your business pages. You can target an audience based on specific engagement types such as likes, comments or shares, and also based in interaction with specific events, posts or videos.
Step 03: Creating Facebook Ads Campaign
To create ads on Facebook, you will need to set up a campaign made of ad sets. Each campaign you create targets, specific audience groups, in order to achieve a chosen objective.
1. Campaign Objectives

Campaign objectives are chosen from three categories: Brand awareness, Consideration or Conversion. In other words, you can choose between creating an ad campaign for the top, middle and bottom of the marketing funnel.
Facebook will charge you differently depending on your objectives, so it is important to pick the right objective in order to optimize who they are shown to.
Learn more about Facebook Campaign Objectives:
- Choosing The Right Facebook Ads Campaign Objectives
- Facebook Campaign Objectives: Everything You Need To Know
2. Ad Sets
Once you have chosen an objective, you can create multiple ad sets. Each ad set lets you decide which audience to target, your budget for impressions and how your ad will be placed.
Depending on the campaign objective, you might be asked for more details such as the type of conversion event you are aiming for.
3. Budget
You can choose between setting a daily maximum spend and a lifetime budget over the course of the campaign. Deciding your budget takes consideration of your overall marketing budget, but also your target audience.
The cost per 1,000 impressions (CPM) is heavily influenced by the demand for advertising to a particular group. This requires research into your own audience but as a general rule, audiences for more expensive products cost more to reach.
Learn more about Facebook Budgeting:
4. Audience
In the next step you can choose the audience for each ad set. You can use the custom or Lookalike audiences you created earlier, or add new interests, behaviours and demographics to target.
You can also target people based on their engagement with your page, ads or content.

5. Ad Placement
The placement step lets you decide how and where your ads will be shown. You can choose to have your ad shown alongside specific types of content such as Stories or Instant Articles, as well as reach users on Facebook-owned platforms such as Instagram.

Unless you already know exactly where to find your audience, automated placement will produce the best results once it has had time to optimize itself.
Step 04: Designing Facebook Ads For Shopify

Now it is finally time to create the ads themselves. Go to Facebook Ads Manager and select Create Ad. You will have 5 ad formats to choose from:
1. Single Image Ads
Single image ads are as simple as they sound, just upload an image along with the ad copy. These are great for increasing brand awareness by introducing your landing page or headline product.
2. Video Ads
Video ads can be a great way to quickly explain your business to a new audience, or introduce a new feature or product to existing customers.
3. Carousel Ads
Carousel ads let you upload a collection of images that users can scroll through inside the ad. These are ideal for showing a group of related products currently on sale.
4. Dynamic Product Ads
Dynamic product ads match the product show in the ad to each user individually. These can use your Facebook Pixel to show users products they already viewed on your store, or to let Facebook decide which product to show based on user profile data.
5. Collection Ads
Collection ads are similar to carousel ads, as they let users browse between a collection of images and videos. Besides showing collections of products, collection ads can also be used to let users explore your business or tell your company’s story.
6. Lead Ads
Any of the above formats can also work as a lead ad with the addition of a sign up button. Facebook is ideal for generating leads for your SMS campaign, as most of its users are on mobile with their phone number already attached to their profile. As a result, they can simply tap the button to opt-in without needing to fill out any forms.
This makes it easy to separate your most interested leads and communicate more directly with them to send personalized recommendations.
Step 05. Measuring Facebook Ad Success
Your work isn’t done once the campaign goes online. Facebook ad campaigns need to be monitored and optimized over time to get the best conversion rate from your spending.
Remember that Facebook takes some time to optimize your ads for the best results. Because of this your campaign will be less cost-efficient in the beginning, but should improve over time. Don’t cancel or change a new ad immediately if you don’t like the results. Instead, allow the campaign to reach 1,000 impressions before deciding whether to continue or make a change. This will give Facebook’s algorithm time to find the right people to show your ad to.
01. Tracking Conversions in Facebook Business Manager
In Facebook Ads Manager, select the campaign, ad set or ad you want to view. You will be shown a table of the available metrics. Use the Columns menu to choose which tracked events you want to measure, then click Apply.
Besides showing how effective the ad is at achieving its conversion goal, this can uncover useful information about how users are interacting with your ad which you can use to refine your custom audiences or optimize future ad design.

02. Tracking Conversions in Shopify
You can see the amount of traffic and sales generated by each of your marketing sources in the Marketing section of Shopify Admin.
Here you can view the top traffic sources bringing leads to your site, as well as which sources lead to the most conversions. Checking your Facebook Ads metrics against this will help you see their impact in context with the bigger picture.

Shopify and Facebook won’t always update their metrics at the same time, so there will often be small discrepancies between the two.
Further reading: Everything You Need To Know About Shopify Conversion Tracking
Conclusion
Facebook has a huge audience and a very broad range of demographics. It also offers the tools and data to find your potential customers amongst this crowd, and track your impact in reaching them. Integrating a Facebook Ad campaign with your Shopify store is simple and makes it easy to create and maintain a highly effective marketing campaign.

![How To Find Shopify Stores? [Here’s How Experts Do It]](http://pagefly.io/cdn/shop/articles/how-to-find-shopify-stores.jpg?v=1713316349&width=1640)
