Shopify local delivery is one of the most accessible ways for nearby customers to acquire goods from your online store.
This isn’t just beneficial for customers; it can also help businesses save on fees associated with international shipping rates. Furthermore, it opens opportunities to cater to an immediate local market.
Shopify Delivery vs. Shopify Shipping
Listed below are some crucial differences between local delivery and shipping that merchants must know.
Aspects | Local delivery | Shipping |
How does it work? | At checkout, local delivery requires customers to add their number and, as an option, provide specific delivery instructions. This information is paramount to couriers, especially if you’re expecting a successful delivery. | Shipping only requires the customer's shipping address at checkout. |
Expected order arrival time | Local deliveries don’t require orders to sit in sorting centers and warehouses. Since they’re delivered directly to the customer, local deliveries arrive sooner, usually within the day or the following day. | Depending on where the customer is located, shipping can take some time before arriving at the customer. Very rarely within the day. This is because overseas parcels need to go through local sorting centers before finally arriving at their destination. |
Requirements | Local delivery requires you to verify your location with Shopify and have a means to deliver the customer’s order. | Shopify shipping doesn’t require you to verify your pinpoint location. You simply need to print a packing slip and hand the customer’s order to a courier service or logistics partner. |
Throughout this guide, we won’t be using the terms ‘delivery’ and ‘shipping’ interchangeably.
When we mention ‘delivery’ we mean specifically an order fulfillment method relating to Shopify’s local delivery option.
With that said, be mindful when encountering these words throughout the guide. We’ll be discussing Shopify local delivery only.
Who is Shopify Local Delivery for?
Now that we’ve distinguished local delivery from Shopify shipping, it’s crucial to discuss which businesses can benefit from which particular order fulfillment method.
Businesses that can benefit from local delivery include:
- Physical retail stores with a local market.
- Restaurants that serve hot meals.
- Wholesale businesses whose partners are a single truck drive away.
- Any business with a nearby customer base.
- New businesses that want to sell their products to customers within their area.
If you’re a business that caters to customers within the area, there should be no reason for your customers to wait days before their order arrives. That goes double for restaurants—your customers’ orders should arrive still hot, as if fresh off the stove.
Setting up Local Delivery on Shopify
With that said, you ought to provide local delivery if you plan to sell to your immediate geographic market.
Requirements for Shopify Local Delivery
But first, there are three crucial requirements you must have before setting up a local delivery system. These requirements include payments, verifying your business location, and acquiring a local delivery service partner.
Set up payments
Give customers a way to check out their orders before proceeding to set up local delivery.
That way, you’ll be able to receive orders, which you may then fulfill using the local delivery setup that we’ll discuss in this guide.

To set up payments, navigate to Shopify Settings > Payments.

Choose a provider, then follow the instructions necessary to get your store’s payment capture up and running.
Verified business location

Shopify users who enter their address into Shopify Settings > Locations will automatically have their address verified by Google, provided it exists.

If, for any reason, Google couldn’t verify said address, it may recommend a different address format.
You’ll need to add a location to Shopify for every branch or outlet you want to deliver from.
So if, for example, you have a store in New York and Albany, you’ll need to add each of them to Shopify’s location management.
A local delivery service
Lastly, you’ll need a means to deliver your customers’ orders. You may do this either through local delivery services or your in-house delivery solution.
If you’re catering to a reasonably nearby area, perhaps your business’ district, it may make sense to have one employee dedicated to delivering orders.

But note that if you plan to expand your fleet of delivery vehicles, you’ll need to incur maintenance and repairs for those vehicles as well.
It can help to partner with local delivery services. Your options include:
- FedEx. Trusted shipping partners, such as FedEx, UPS, and DHL, may also provide same-day delivery to customers, apart from the international shipping services they're known for. But they aren't necessarily the most instantaneous option.
- Uber Connect. App-based courier services let merchants send parcels on demand to customers, similar to how Uber takes people to their desired destination. They make delivery nearly instantaneous. You might want more scalable options as you take in more orders, though.
- Own local delivery service. One motorcycle and a delivery boy can be a reliable in-house courier system. They do especially well for restaurants that cater to a neighborhood.
How to Set Up Shopify Local Delivery
Once you have all the requirements ready, you can set up local delivery for your Shopify store by following this three-step guide.
Step #1: Enable Local Delivery from Select Locations
After you’ve added your business’ locations to Shopify’s system, you’ll need to enable local delivery from each location you want to deliver from.

From the Shopify admin, go to your Shopify Settings > Shipping and delivery.

Scroll down to Local delivery and click Set up.

Select a location from the list and tick on the checkbox labeled “This location offers local delivery.”
After you tick it on, more options will appear, allowing you to set a serviceable delivery area.
Step #2: Set Your Delivery Location
There are two primary ways to set your local delivery location on the Shopify platform — use postal codes and set a delivery radius.
We’ll go over both methods.
Use Postal Codes
The postal code approach lets you set your serviceable delivery area using postal codes.

To use this option, make sure the Use postal codes option is ticked.

Click on the three dots on the lower right of the Delivery Zones section to start adding serviceable postal codes.
Click Edit.
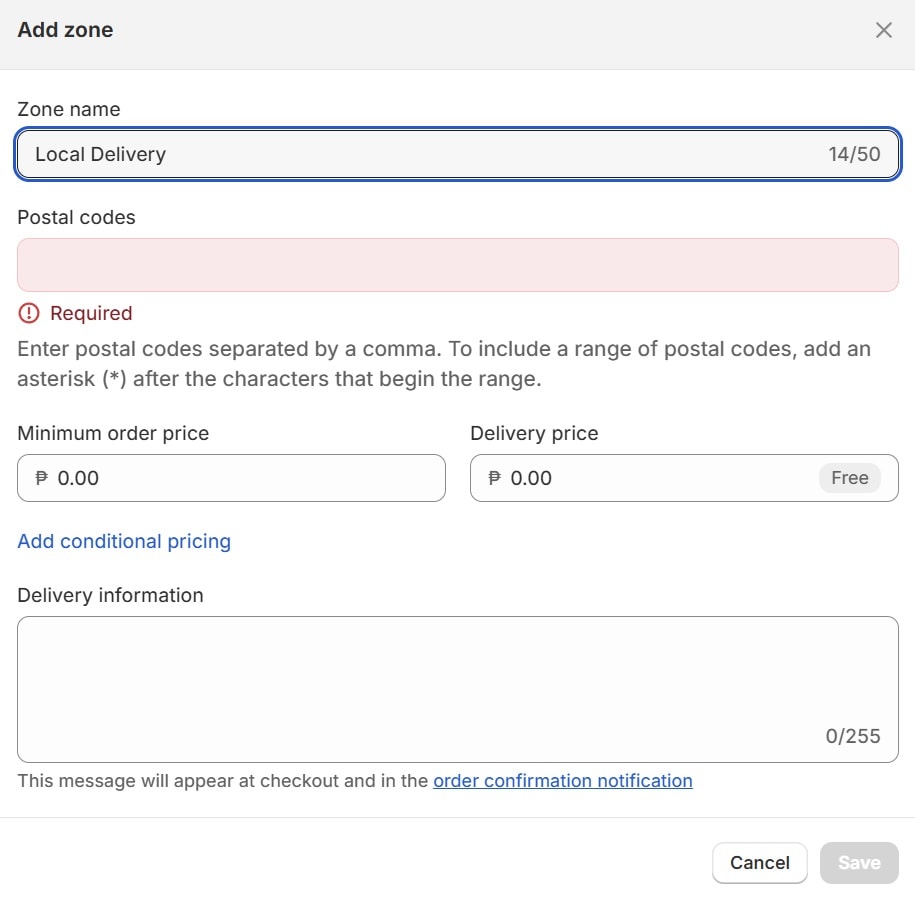
While in the editing window, you should:
- Give the zone a name.
- Input your postal codes.
- Add a delivery price (we’ll discuss this in more depth in ‘Step #3 Set Your Delivery Rates’)
- Fill out the delivery information. This will be the local delivery option’s description shown to people within the postal codes you placed.
Learn more about Shopify Printing Labels
Click Save once you’re done.
Pro tip: You can utilize delivery zones to segment your serviceable zip codes. This distinction will be important if, for example, you want to provide different delivery prices to select postal codes. Or if you want to display different delivery information for various zip codes.

To add a delivery zone, click on + Add Zone.
Then fill out its fields just as you did with the previous one.
But with this new zone, you may want to display different pricing (we’ll discuss delivery rates later) and different delivery information from the previous one you set up.
Then input the zip codes that you want these new rules to apply to.
Click Save.

Source: RedistrictingOnline
Keep adding new zones, repeating the process for every set of zip codes you want distinct shipping costs and instructions for.
Set a Delivery Radius
Another option for marking your serviceable delivery area is a delivery radius.

To use this method, click on the Set a delivery radius radio box. You may tick the checkbox Include neighboring states or regions if you choose.

Click on the three dots on the right side of Local Delivery and click Edit.

You may then input the desired radius distance in the Delivery radius up to field.
Then input your rates and delivery information in the succeeding fields. Remember, the content you input in the Delivery information field will appear to customers at checkout.
Click Save.
Pro tip: Just like using postal codes, you may also set multiple delivery zones with the radius approach.

Click on + Add Zone then fill out the fields, just as you did earlier.

Source: RedistrictingOnline
But be mindful of the radius. The succeeding zone will always continue where the previous zone ends. So, if your first zone has a delivery radius of 15 miles, the next zone will start at the 15-mile mark.
If your first zone has a 15-mile radius and your next one is a 5-mile radius, the total radius of your delivery area is a 20-mile radius—a 1257-square-mile area.
Your Delivery Zones and Shipping Profiles Should NOT Conflict
If a location is in both your delivery zone and shipping profile, customers in said location will see two options for order fulfillment at checkout — a delivery rate and a shipping rate.
This could make things confusing for customers, especially if you have price-based and weight-based rules for your shipping rates.
So don't include your delivery zones in your Shopify shipping profile. That way, nearby customers will only see delivery as an option.
It's simpler and easier that way, making for a less clunky checkout experience.
Step #3 Set Your Delivery Rates

Online customers don’t generally like paying for shipping. That goes double for local delivery since customers know you’re nearby.
Listed below are three ways to make your local delivery rates seem more appealing:
- Offer free delivery once a minimum purchase amount is reached.
- Account the delivery rates into the products’ prices.
- Have a fixed fee regardless of the delivery’s distance.
Important note: You’ll need to set your minimum order price to zero (or to a value lower than your lowest-priced item) if you want the local delivery option to appear for all orders. Otherwise, the local delivery option won’t show up for some nearby patrons, leaving a sour taste in their mouths.
For example, if your minimum order price is $20 and a nearby buyer only has $15 worth of items in their cart, they won’t see the local delivery option, despite being nearby.
Fixed Pricing
Fixed pricing means you’ll provide a fixed delivery fee regardless of the order’s price, weight, or distance.
This can help with consistency, setting better expectations for customers.
To set up fixed pricing for local delivery, use just one zone for your local delivery. Then set your desired rate for that zone.
Conditional Pricing
Local delivery’s conditional pricing is based on zones and order price.
To set it up, click on the three dots next to the zone you wish to edit.
Click Edit.

Then select Add conditional pricing.
This will add a new set of fields. Here, you’ll input the purchase order's upper limit price on the left field and the corresponding range’s delivery price on the right field.

So from the example shown above, an order costing between $0 and $1000 will fetch a delivery fee of $50.
Each time you fill out a set of left and right fields, a new set of conditional fields is added.
You can place up to three conditional pricing sets. The third set is fixed at a “No Limit” upper limit.

A good tip for conditional delivery pricing is to provide increasingly affordable rates as customers amass higher order prices. Also, set a price range for which you will offer free delivery.
Note that conditional pricing for delivery is different from conditional pricing for shipping.
Shipping has more fine-tuned conditional pricing options. These options include price-based and weight-based rules. We won’t dive deep into shipping in this guide.
How does Shopify Local Delivery Work on the Customer End?

After a customer adds their desired items to their cart and proceeds to checkout, they’ll be prompted to type in their name and shipping address.
Since the recent Shopify Summer 2024 update, Shopify now verifies the shipping addresses that customers input at checkout.
It’s up to the merchant's discretion on how to handle these issues. If a non-existent city is just a typo, a merchant may easily correct it. However, if there are deeper issues with the address, merchants may contact the purchasing customer for clarification.
The validation only works in select countries, though.

If the shipping information they’ve provided makes them eligible for your local delivery service, they’ll have the option to choose local delivery as an order fulfillment option.
But unlike a shipping option, customers will see a field where they need to type in their mobile number. This will be the number the courier will call to coordinate delivery with the recipient.
Customers also have the option to type in delivery instructions (e.g., leave it at the door, ring the doorbell, make a right after this landmark, etc.).
Depending on how quickly you attend to and fulfill Shopify orders, customers can get their orders on the same day they’ve placed the order.

Customers will also get Shopify emails, updating them when their order has been delivered.
Fulfilling Local Delivery Orders
Fulfilling local delivery orders takes four easy steps.
Note that fulfilling Shopify orders placed with a local delivery request will appear different from orders placed with a shipping option.
Step #1: Go to Your Store’s Order Management

From your Shopify admin panel, click on Orders.
Here, you’ll see all the orders made through your store.

Pay attention to the Delivery method column. Orders with the label Local Delivery are orders placed with the local delivery option.
Step #2: Select an Order
Click on an order to view more details.

Instead of the typical “Fulfill item” button that you’d see with shipping option orders, for local delivery orders, you’ll see two buttons—mark as delivered and prepare delivery.
Clicking on Mark as delivered will fulfill the order on your Shopify order management.
But you may want to select Prepare Delivery first.
Step #3: Prepare the Order for Delivery

Doing so lets you print a packing slip and mark an order Ready for delivery.
Ideally, you’d want to mark orders Ready for delivery after they’ve been cooked (in the case of restaurants), prepared, and packaged.

Properly marking orders can be beneficial to your delivery system. For example, you may want to collate Ready for delivery orders first before heading out.
That way, you’ll minimize your trips and optimize your route for the day.
The same applies to a third-party delivery service.
Pro tip: We highly suggest printing packing slips, especially if you have a lot of orders. You can easily confuse parcels with each order when they’re not marked properly. As you scale and outsource delivery, you'll want to make a habit of printing packing slips.
Step #4: Fulfill the Order

After your delivery service confirms the delivery, you may fulfill the order.
Simply click on an order marked as Ready for delivery and then select Mark as delivered.
This will fulfill the order on your Shopify order management.
Great! Keep repeating the local delivery fulfillment process, and you’ll eventually have a standardized system for completing orders.
Conclusion
When you offer local delivery, you open up your store to potential local customers, expanding your reach.
In addition to offering local delivery, you may also want to look into local pick-up.
The combination of the two will optimize your business' sales within your locale.
Having a local service area can also be beneficial for starting businesses since establishing a high-converting market (i.e., the local community) is an excellent way to acquire testimonials, drive loyalty, and build a solid customer base.
Also, it can be less daunting for starting entrepreneurs since they're likely quite familiar with the area, as opposed to learning about shipping and logistics.
Learn more: Best 15+ Shipping Policy Templates For Your Shopify Store (+ Crucial Takeaways)
