A Shopify refund is an excellent guarantee of stellar customer service.
Your customer may not have appreciated your product in the way that you hoped, but at the very least, you can salvage the remaining customer satisfaction with a quick and prompt Shopify refund.
Issuing these refunds can improve customer satisfaction, so they will come back to purchase again instead of feeling completely ripped off.
By the end of this guide, you’ll know how to issue refunds and do so in a way that’s smooth and consistent for your business’s day-to-day operations.
Types of Refunds
The different types of refunds on Shopify include partially refunded, fully refunded, returned and refunded, and refunded but not returned.
Shopify Partial Refund

Partially refunded orders happen when a customer orders multiple items, but only one or part is refunded.
For example, if Amy orders a jacket, jeans, and a shirt but only requests a refund for the shirt, she’s asking for a partial refund.
Partial refunds happen when everything else is to the customer’s satisfaction, except for one item.
Partial refunds also happen when the refunded amount is only part of what the customer paid for the returned item.
Full Refund

Fully refunded orders happen when all the items in an order are refunded.
If Amy requests a refund for the shirt, jacket, and jeans, she’s asking for a full refund. Even single-item orders are considered fully refunded if the item has been processed for a refund.
A fully refunded order is also any order that is refunded the full amount of the sale price, tax, and shipping.
Returned and Refunded
Most stores will require customers to return the item before they process the refund. Under certain conditions, of course (e.g., the returned item must be in good condition).
After the merchant processes a refund for a returned order, the order would then be ‘Returned’ and ‘Refunded.’
Refunded but not Returned
Sometimes, an item may have a factory defect or be damaged during shipping. In these cases, merchants may not want the item back in their stock.
Merchants may issue a refund without requiring customers to return the item. These orders are considered refunded but not returned.
You may issue refunds based on the unique circumstances of the order.
But we recommend you set rules in stone before offering refunds to your customers.
Shopify Refund Policy: An Overview
A Shopify Refund Policy is a crucial document that can prevent you from dealing with irate customers.
But what is a Shopify Refund Policy and what goes into making one?
What is a Shopify Refund Policy and Why Do You Need It?

A refund policy is a set of rules and conditions that must be met for a customer to receive a refund.
A “no refunds” policy is also a refund policy. It tells customers that you don’t accept refunds.
We highly suggest having this policy in place. Its benefits include:
- Protects your sales and inventory. You may indicate in your refund policy that you only accept certain item conditions valid for return. That way, you won’t be getting worn, unsellable stock returned to you.
- Sets customer expectations. A refund policy also sets customer expectations, ensuring optimal satisfaction (provided they read it). This makes them more informed buyers and less likely to fault the seller for a declined refund request.
How to Write a Shopify Refund Policy?
You’d want a complete and organized refund policy that includes all your conditions and clauses. This will protect you from disputes that may cost your company time and money.
Step #1: Indicate the Return Period

Source: Brooke Lark on Unsplash
Determine a period during which the return will be valid for a refund. You may want to be reasonable with the length of this period since you’d want the customer to properly assess, appreciate, and try out the product first.
A 30-day return period is standard, but you may opt for periods longer than this.
Step #2: Provide Clear Return Instructions
You also ought to provide clear and detailed return instructions, indicating things such as:
- To where should the item be sent?
- Should the customer provide photo/video proof of their reason for return? (e.g., damage)
- Who will shoulder the return’s shipping costs?
- Do you need the buyer to list down their order number?
- Would the seller send out a courier to retrieve the item from the returning customer?
This will make returns smooth and hassle-free for both you and the customer.
Step #3: List Down Your Conditions for Accepting Refunds
You’d also want to enumerate the conditions for accepting refunds. These will include clauses such as:
- The item must be in the same condition as when you bought it.
- All included tags, accessories, manuals, and documents should be returned with the item.
- The item must be returned in its original packaging.
Your conditions may look different from those listed above.
Step #4: Indicate How the Refund will be Credited to the Customer

Source: CardMapr.nl on Unsplash
Inform the customer how they will receive their refund.
Would it be credited to the payment method they used (e.g., bank account, credit card, other payment methods), or will it be converted to store credit that the customer may use in your store?
Whatever way you decide to refund the customer, indicate it in the policy.
Step #5: Tie Them All in a Cohesive and Readable Format

Source: Christin Hume on Unsplash
Once you have your return period, return instructions, refund conditions, and refund crediting method, you may tie all these together into readable and understandable content.
You may want to number steps and bullet lists, though, for better comprehension of the policy.
Now that you have your refund policy, place it on your Shopify website where buyers can see it.
Shopify also has a free refund policy generator that entrepreneurs may use for their store if they don’t want to do it themselves.
How to Place the Refund Policy on Your Website?

From the Shopify admin, go to Shopify Settings > Policies.
Underneath Written Policies, choose Return and refund policy.
If you’ve already created a written refund policy, you may paste it into the rich text editor. You may also add images and links here if you please.

Alternatively, you may click Insert template and Shopify will fill in a policy for you. You may edit this template as you see fit.
Click Save once you’re done.
Adding the Refund Policy to Checkout

After you click Save, Shopify will automatically place your refund policy at the footer of your store’s checkout page.
However, most customers may overlook the placement of this refund policy.
Adding the Refund Policy to your Store’s Menu

For a more prominent refund policy, you may place it on your store’s header menu. That way, customers will see you have a refund policy, regardless of what page they are on your site.
To do that, go to Online Store > Navigation.
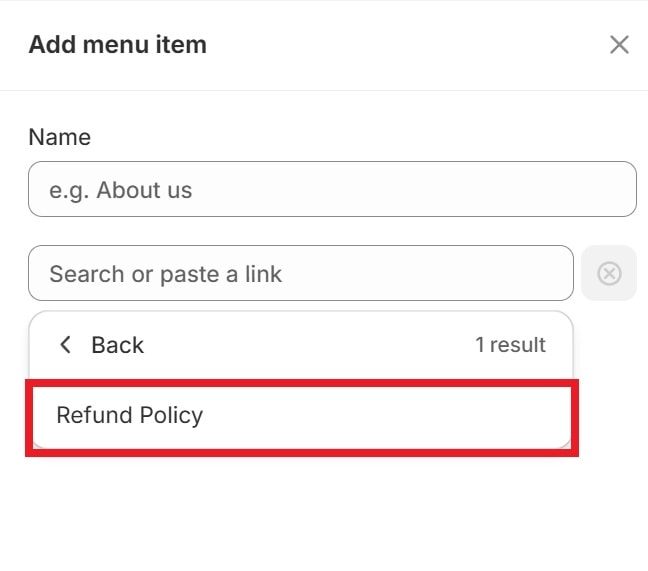
Click on Main Menu, then + Add menu item.
Select the bottom field, then choose Policies - Refund Policy.

You may edit the name of this menu item from the top field if you wish.
Click Add, then Save menu.
Quick read: 7 Tips to Improve Your Shopify Store Navigation
If your store’s header is currently the ‘Main Menu’, you should see the refund policy on your store’s header.
Great! Your store now has a refund policy.
How to Refund Shopify order
Customers will likely email you directly, through your Contact Us page, or through whichever method you indicated in your refund policy, if they wish to return an order.
Once that happens, you’ll need to fulfill refunds to eligible shoppers.
Step #1: Provide the returning customer with a return label
Go to your Shopify Orders.
Click on the order you wish to process a return and refund for.

If you need the customer to return the item, click on Return. Otherwise, you may proceed immediately to Step #3 if you don't want the item back.
In the screen that follows, select the return items. Fill in their weight, and a drop-down field will appear. Indicate the reason for return from the drop-down.
You may also provide exchange items for instances where a customer bought the wrong size (e.g., returning a Large, or exchanging a Medium). This is optional.
Then in the Return shipping options section, upload a return label.
Customers can print this return label, making the return process easier for them. They simply have to print it and attach it to the return parcel.
Review the details you’ve input and click Create return.

At this point, the return label will be emailed to your returning customer.
The order will also have the tag Return in Progress.
You may see this under the Return status column. If you can’t see the column, click on Edit columns (the three-column icon) and hit the eye icon on the Return status column to toggle visibility.
Step #2: Restock the returned item
Wait for the returning item to get back to your store (or the location indicated on the return label.)
Once it arrives, click on the returned order then select Restock.
This lets Shopify know that the item has successfully been restocked in your warehouse.
Step #3: Process the refund
From the product details screen, click Refund.
Enter the amount you wish to refund.

The shipping fee is refunded separately. Enter an amount for this as well.
We highly suggest ticking on Send a notification to the customer before clicking Refund [amount]. This will send a notification email to the customer once the refunded amount is processed.
If you have an exchange item pending to be fulfilled. You’ll need to fulfill the exchange in addition to the refund.

This changes the order status from Return in Progress to Returned and the payment status from Paid to Refunded.
Excellent! You now know how to refund Shopify orders. Your team must be trained on this process as well, especially if you want to build satisfactory customer service.
But perhaps this wasn’t the refund-related information you were looking for. In that case, keep reading.
How to Get a Refund From Shopify: Refunding a Shopify Subscription
You probably want to know how to get a refund from Shopify instead of performing refunds on Shopify.
If Shopify determines that a merchant is eligible for a subscription refund (e.g., overlooked subscription), Shopify allows merchants to process a refund up to:
- Seven days from the charge if it’s a monthly subscription charge and
- 30 days if it’s an annual subscription charge.
The entire subscription refund process takes three easy steps.
Step #1: Connect with the Virtual Help Center Assistant
Go to Shopify’s Help Center and speak with the chatbot.
Type anything in the chat to initiate the conversation.
Step #2: Ask to be Connected with a Support Advisor
Let the AI know that you want to speak to a human. It will connect you with an advisor from the support team immediately.
It may take some time to connect with an advisor. So hold tight and wait for a response.
Step #3: Describe your Issue
Once you’ve connected with an advisor, let them know your concern.
Your refund should be credited to the same payment method you’ve used.
It may take some time for the refunded subscription's funds to be debited to your bank account. Be patient since this could take up to a week.
Conclusion
Giving customers back their hard-earned money can be a tough pill to swallow. But if your product didn't meet their expectations, it's the proper thing to do, especially if you don't want to seem like a scummy business.
Having a proper return and refund system in place can improve buyer satisfaction and uphold customers' loyalty towards your business.


