Stores made with Shopify typically turn out to be ecommerce stores.
While Shopify offers robust features for B2B operations, businesses looking to scale or require advanced customization might consider Shopify Plus. Shopify Plus provides features like unlimited staff accounts, priority support, and seamless integration with multiple sales channels, making it ideal for high-volume merchants and enterprise-level businesses.
Shopify offers a suite of native B2B features that allow businesses to sell wholesale directly through the Shopify admin and online store. This includes the ability to personalize the buying experience for each B2B customer, manage company profiles, and offer customer-specific catalogs and pricing.
With just a few tweaks, retail merchants can sell wholesale on Shopify—no coding or additional development and integration are required.

Source: Green Paper Products
Notice how the product page above, courtesy of the wholesale store Green Paper Products, contains quantity-based variants. Something like this could easily be implemented in Shopify B2B.
Shopify is also an excellent choice for selling printers, office chairs, copiers, stacks of paper, and other office supplies online.

Source: Staples
Staples Canada is an office solution distributor—from paper to technology to break room necessities. Their website is powered by Shopify Plus, Shopify’s most premium plan.
Shopify Plus enhances B2B operations by offering features such as blended and dedicated stores, organization management, and draft orders. These features streamline complex B2B transactions and provide a more personalized experience for wholesale customers.
Do You Need Shopify Plus B2B?

Shopify Plus is touted as the Shopify plan for B2B merchants. But is it something you absolutely need to sell B2B?
Shopify Plus provides exclusive features beneficial for B2B operations, such as unlimited staff accounts, priority support, and access to Shopify Plus Partners. It also supports up to 50 markets, allowing for global expansion with customized catalogs and pricing for each market.
Some of the biggest Plus users include Converse, Mattel, Sony, and Staples.
Shopify Plus also supports global expansion by allowing businesses to manage up to 50 markets, each with its own catalog, pricing, and language settings. Additionally, it offers custom B2B solutions through integrations with third-party systems, making it suitable for businesses with unique operational needs.
Below are some of Plus’ exclusive features.
- Shopify Plus Partners Access. Shopify Plus Partners are reliable developers, marketers, consultors, etc. vetted and tested by Shopify. Only Plus users have access to these Shopify Plus Partners.
- Exclusive Access to Shopify Courses. Plus users have access to an entire collection of courses that aren’t accessible to non-Plus merchants.
- Priority Phone Support. Plus users can ring up a Shopify support representative at any time, 24/7.
- Add up to 50 markets. Shopify lets merchants provide a unique catalog to each market, display different prices and shipping costs, and use different website languages. Having 50 markets gives Plus merchants room for global expansion.
- Unlimited Staff Accounts. An unlimited number of employees can access Shopify Plus, providing tremendous room for business scaling.
- More Advanced Tools. Shopify Plus boasts headless commerce, allowing for tailored API integration. This results in better store system customization. Shopify Plus also provides a sandbox environment where users can test transactions and other functions.
All these features are befitting an international DTC/B2B brand.
However, all the features listed may not be what you need for your wholesale business. Unless, of course, your business can maximize these features.
But if you have about 10 or 12 loyal companies purchasing your paper stock, then you won’t need these massive features yet.
Shopify’s Basic, Shopify, and Advanced plans also have the features, functionality, and capacity to provide a stellar B2B wholesale store. However, if your business is expanding rapidly or requires advanced features like multi-channel selling, data-driven insights, or dedicated customer support, Shopify Plus might be a better fit. It offers scalability, robust API integrations, and personalized shopping experiences, which are crucial for large-scale B2B operations. You may rely on any of these plans and not immediately jump on the Plus plan which can cost 2,500 USD a month.
You simply need to follow the steps below to sell wholesale efficiently—with a system befitting tall orders and tailored prices.
For businesses that require more advanced features and scalability, Shopify Plus offers a comprehensive solution starting at $2,000 per month. Alternatively, third-party apps can provide similar functionality at a lower cost, starting around $30 per month.
How to Build An Online B2B Store with Shopify
Here’s a step-by-step guide to building a blended store (retail and wholesale) with Shopify B2B. Shopify Plus won’t be necessary to accomplish the guide below.
Add your Products/Offerings

From the main dashboard, click on Products.

Click on “Add Product.”
Fill in the respective fields. Add a name and description.
Be sure to add photos of the product as well.

If you’re selling wholesale, you must tick on “Track Inventory.”
That way, you’ll keep tabs on how much you have in store. You’ll know when you need to restock.
Furthermore, if you have other physical warehouses signed on to Shopify, they’ll be informed as well of the other warehouses’ current stock.
Once everything looks good, finalize it by clicking “Save.”
Do this for every catalog item you have.

Note: Make sure you assign inventory staff to update the stock quantity whenever a shipment arrives, especially if you acquire goods outside the Shopify platform. Select a catalog item from Products then scroll down to the Inventory section and edit the “On Hand” value.
Design your B2B website
Shopify has a site builder with extensive design features and capabilities, allowing B2B companies to create an online storefront befitting their brand and brand values.
Here’s how you can design and build a compelling B2B website.
Find a Theme

An excellent free theme for B2B ecommerce is Trade.
Its layout is ideal for what wholesalers and B2B suppliers need. It includes a partner logo section and its product page is configured for volume purchases.

You can also use Shopify’s default theme—Dawn. 20% of Shopify-powered office supply stores (source: storeleads.app) use this theme.
The Dawn theme is clean, sleek, and non-cluttered, sufficient for what most businesses need, even B2B wholesalers.
Use PageFly
Using a free drag-and-drop page builder can help your company stand out from the competition.

PageFly lets users drag-and-drop elements onto their page of choice, moving them around as they please. Furthermore, PageFly offers an extensive customization suite, allowing users to edit fonts, font color, page color scheme, and animate on-screen elements according to customer action.
No coding knowledge needed. There’s no limit to what merchants can design on PageFly since users aren’t hindered by theme restrictions (e.g., a font being unavailable for a certain theme).
PageFly offers one free custom page for Shopify merchants. We highly suggest maximizing this free resource to highlight your value proposition.
Create Catalogs for Shopify B2B Wholesale
Creating catalogs will allow you to show select products and provide custom pricing to different wholesale customers.
For example, you might want to display lower volume pricing to smaller wholesale customers and higher volume pricing to larger organizations.
Plus, you wouldn’t want DTC customers to see your wholesale pricing.
If you’re a B2B wholesale and retail store, you might have a wholesale catalog and a DTC catalog.
Here’s how you can set up catalogs for your Shopify store and offer custom pricing.
For this example, we’ll be creating a wholesale catalog that business customers can access.

From the Shopify admin panel, navigate to Products > Catalogs.

Click “Create Catalog.”

You can choose between “All Products” or “Specific Products.” Select the one you prefer and click "Continue."

Give the catalog a name. Something like “Wholesale Catalog.”

Underneath products and pricing, you may specify the products included in the catalog and the pricing change. Say, 10%.

You may immediately apply this catalog to your companies of choice in the “Company locations” section. Simply click the pencil icon and select the locations where you wish to display this catalog.
Note: At this point, you won't have any locations saved yet. Later in this guide, we'll discuss adding company locations in the "Add your Companies to Shopify" section.
Finalize by clicking “Save.”

After you save the catalog, you may tweak the “Products and Pricing” section further. Click on Manage > Manage products and pricing.
You’ll be taken to a page where you can better specify pricing rules—which will be critical for your B2B store.
Add Quantity Rules
We can add minimum order quantities for each of our catalog products. This will enforce an MOQ for the discount indicated on the catalog.

Under the Quantity rules column, click on + Add on the row of the product which you wish to add rules for.

Set the minimum order quantity under the Minimum field

Furthermore, you may specify your increments. Under “Increment,” indicate the amount of units that wholesale customers should purchase at a time.
Add Volume Pricing
You may also set volume pricing to give B2B customers better rates the more they order.

To enable it, click on “+ Add quantity price breaks.”

Set your quantity breaks on the left side.
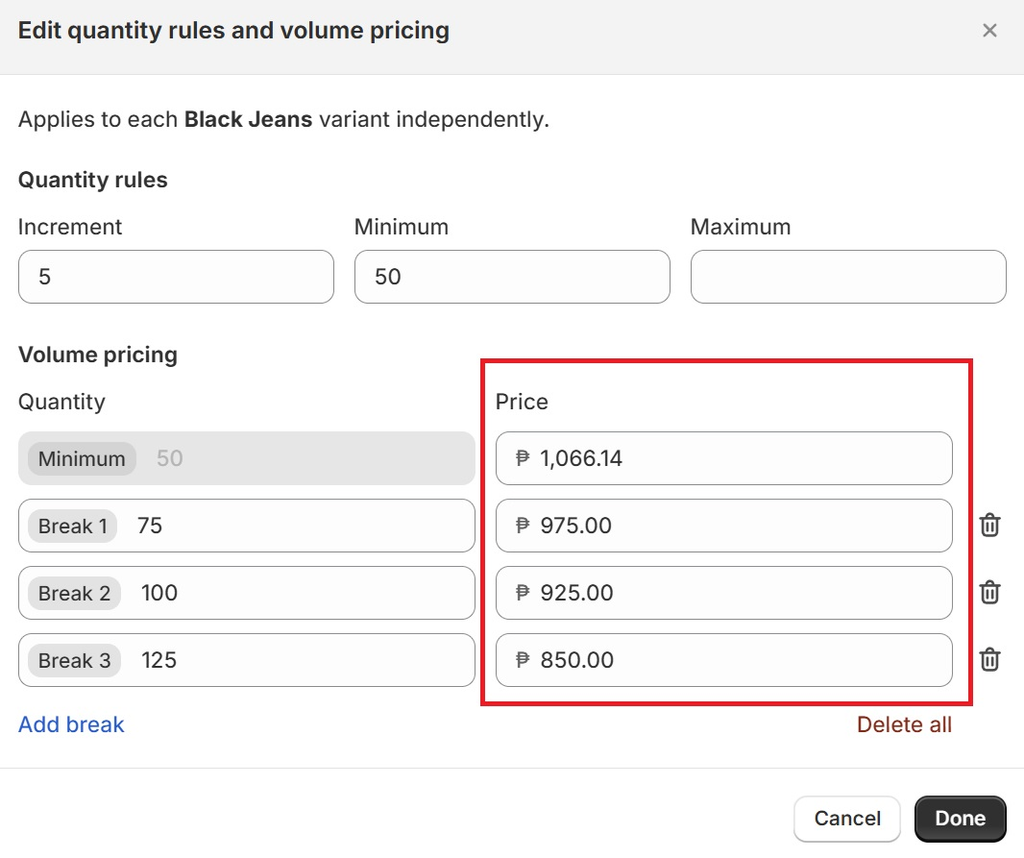
When an order for the respective item exceeds the quantity indicated on the quantity break, the customer will get the per-item price on the right.
Set a price for each break.
Setting price breaks will display a note on your store, indicating that an item has volume pricing available.

Once you've set up your catalog and custom pricing, your product page should look like the image above for qualifying businesses.
Quick read: 6 Best B2B eCommerce Examples to Check Out in 2024
But how do you determine businesses that qualify to see your wholesale pricing? We’ll discuss that below:
Add your Companies to Shopify

If you already have existing clientele, you may import your customer information to Shopify—allowing it to act as a CRM.
You can see which wholesale customers have been around longer, which bring more value to your store, the respective contact representatives for each company, and company addresses, among others.
Furthermore, Shopify also allows you to show different catalogs and pricing to different B2B customers.
There are two ways to add company info to your Shopify. Adding them manually and setting up customer log-in.
Adding Companies Manually

From the Shopify admin panel, click on Customers > Companies.

Click “Add Company.”
There are some crucial fields you’ll need to take note of.

Fill in the Company Name.
The Company ID is optional, but if you have an internal database with loads of customer accounts, it can be useful to have this.

The Main Contact will be your primary contact person for the company. Click on the field and select “+ Add New Customer” if you don’t see the corresponding rep from the dropdown.

Then fill in the contact person’s details.
This is a crucial field since it allows a company account to make B2B orders from your store.

Next, fill out the company's Location with correct and verified information.

After that, you can set payment terms underneath the “Payment” section.
- “No Payment Terms” means that a customer pays for their order as it’s placed. Just like your typical Shopify DTC store.
- “Due on fulfillment” means a customer can place an order and pay after the B2B merchant fulfills it. As a B2B merchant, you have the autonomy to mark an order “fulfilled,” depending on how you see fit. This allows customers to pay after they’ve received the shipment.
- “Net 7,” “Net 15,”... “Net 90” refer to the number of days payment is due after your store sends an invoice.

Lastly, fill in the customer’s tax information. This includes potential tax exemptions.
Finalize by clicking Save.
Repeat this process for every company's account.

Note: Every company account manually added will automatically have the “Approved” status, allowing B2B customers to immediately place orders.
Provide Potential B2B Customers with a Form
The above process can be tedious. Luckily, there’s a more passive alternative.
Note: Entries made through this method would still need to be approved by your Shopify store managers.
Create a Wholesale Form
As a B2B store, you’ll need to provide a way for aspiring B2B customers to sign up for your wholesale services.
So, let’s make a wholesale form page that will allow prospective clients to provide their details and create an account with you.

First, install the “Shopify Forms” app. It’s a free app developed by Shopify that’s primarily used in gathering emails for marketing purposes. But it can also be used to acquire necessary company data.
Open the Shopify Forms app.
Click on “Create Form.”

Since we’d want to embed this form on a page, select “Inline.”
Name the form. This would be an internal name.

You’ll be taken to the form editor.
Fill in the “Title” and “Content” fields. This will be displayed to the customer.

Underneath “Fields,” choose “Company and customer.”

This will immediately provide you with a form template that gathers the company name, first name, last name, and email.

Click “+ Add New Field.”
We’d want to add a few more fields to this form so that the information we gather is complete.
Add in:
- Phone
- Tax ID
- Company Billing Address
- Company Shipping Address
If you’re looking for specific information from the customer, perhaps you want to add a file upload field for some company registration documents for proof of authenticity, you can add custom fields.

To do that, click + Add New Field > New Field.
Feel free to tweak the form as you please.
We suggest adding tags for this form so you can immediately see which entries are from your wholesale form.

In the “Tags” field, type something like "B2B," "Wholesale," or “Company.”
Once you’re satisfied with the form you’ve made, finalize it by clicking “Save.”

Scroll up and click More Actions > Copy Form ID. Make sure this is saved to the clipboard so we can paste it later.
Add the Form to your Shopify Site
First, make a wholesale template in the Shopify theme editor.

From the theme editor, click on Home page > Pages > + Create Template.

Name the template “wholesale.”
Then generate a page from the Shopify admin.

To do that, go to the admin panel. Click Online Store > Pages.

Click on “Add Page.”

Give it a title.

Then from the “Theme template” dropdown, select the template we’ve created earlier—in this case, “wholesale.”

Edit the page’s SEO, if you wish.
Click “Save.”
Now, add it to the main header’s navigation.

Go to Online Store > Navigation from the admin panel.

Click on the Main Menu. (or whichever menu is on your site’s header.)

Click + Add Menu Item.

Name it “Wholesale” and in the field below, select Pages > Wholesale.
Click Add.

Finalize by selecting “Save menu.”
Now, go back to the theme editor.

You’ll see that you now have a “Wholesale” navigation on the page’s header. Click on it.
You may customize this section as you please—add copy and images as you see fit. But the meat of this page would be the wholesale registration form we created earlier.

In the left panel, click on either + Add Block or + Add Section underneath the Template section.

Then select Apps > Forms.

In the right panel, paste the Form ID we copied earlier.

The Shopify theme editor will then place your form on the page.
Continue editing to spruce up the page with branding and personality.
Then, click “Save.”
Great! You now have a customer form on your Shopify store. Prospective clients may fill it out to sign up for your wholesale catalog.
Seeing Responses

You may see responses underneath Customers > Companies.

Any new entry from this form will be marked “Not Approved” by default. This means they can’t access your wholesale catalog yet.
Approving New B2B Customers
To mark new responses as “Approved,” click on any company marked as "Not approved."

Click “Manage Permissions.”

Tick on the checkbox and choose between “ordering only” or “location admin.”
An “ordering only” customer can make purchases for a specific location, but they can only see their own order history.
A “location admin” customer can review all orders that all B2B customers have made for a specific location, in addition to their own.
Click Next.

You may choose to notify the customer via email that they may now make purchases in your store.
Click Save.
The company would now be approved.
Give B2B Customers Access to the Wholesale Catalog
Now, you just need to grant companies access to the wholesale catalog.

Click on the three dots on the upper right, next to the company name.
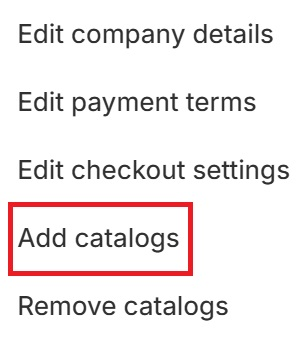
Click “Add Catalogs.”

Select the catalog you want to give them access to.
Finalize by clicking “Save.”
Great! The form filler now has access to your exclusive wholesale catalog.
Set Up B2B Customer Log-In
Shopify's B2B checkout can be customized with discounts, payment options, and shipping rates tailored to each customer's workflow. Additionally, automation tools like Shopify Flow can streamline B2B operations by automating tasks such as sending invoices and managing company accounts.
The customers you’ve granted access to the wholesale catalog would still need to verify their identity before making orders.

From the main Shopify dashboard, go to Settings > Customer accounts.

Underneath the “Accounts in online store and checkout” section, click “Edit.”

Then tick on “Show login link in the header of online store and at checkout.”
You’ll then be presented with two radio boxes—New Customer Accounts and Classic Customer Accounts. For this guide, let’s select “New customer accounts.” This allows customers to sign in using a one-time code sent to their email.
Save changes by clicking “Save.”

Your Shopify B2B store should now have a profile icon on the upper right where visitors can sign in to verify that they’re making purchases on behalf of a company under your account.
In 2025, B2B ecommerce is expected to focus on personalization, sustainability, and customer-centricity. Trends include self-service buyer journeys, increased use of social media, and the importance of order fulfillment and shipment tracking. Shopify supports these trends with features like customized buying experiences, company profiles, and flexible payment options.
Optimize Your Shopify Store for B2B
At this point, you should now have the necessary site functionality built for B2B.
But we can optimize the site further with content additions.
Create a Contact Us Page
Add a “Contact Us” page to your website.

Source: Green Paper Products
While it’s common practice for any business, whether B2C or B2B, it’s all the more crucial for the latter.
Partnerships, collaborations, tall orders, business inquiries, invitations to corporate events, personal letters to directors and key employees, and special requests can all be communicated through the “Contact Us” page.
This page is common for such communications, so make sure you open more B2B opportunities by having one.
Write a Blog

Source: Staples Canada
A blog improves a business’ SEO—providing them with a digital traffic channel via search engine results pages.
However, blogs are all the more crucial for B2B companies, such as wholesale businesses.
Not every consumer may be expected to research their consumer options. But practically every business client is looking for ways to improve various aspects of their business. This means acquiring insightful information through webinars, courses, and blogs.
Shopify continues to evolve its B2B features, offering businesses a robust platform for wholesale operations. Whether using the basic Shopify plans or upgrading to Shopify Plus, merchants can leverage these features to enhance their B2B strategy and stay competitive in the market.
Conclusion
B2B on Shopify is entirely possible without shelling out for Shopify Plus. The Shopify e-commerce platform is an excellent wholesale channel that can reach out to online prospects starting at $29/month.
Shopify offers wholesale features that provide businesses with complete control of their own store and operations--including catalogs, volume pricing, and customer groups.
Shopify also provides wholesale business clients with their own shopping accounts, allowing customers to see previous purchases and an exclusive catalog. They can also easily make repeat orders. A personalized wholesale shopping experience!
Note, however, that you still need to keep your B2B store afloat with ideal practices, such as providing quality service, maintaining consistent communication, and investing in customer support.
Shopify B2b FAQ
Certainly! Shopify Plus is well-suited for certain B2B operations due to its array of advanced features, including customizable wholesale pricing, dedicated account management, advanced automation tools, and ERP system integrations. Nonetheless, it's crucial to assess your current and future needs against Shopify Plus features and custom pricing to ensure it aligns with your business objectives and warrants the investment.
Shopify Plus is an excellent choice for extensive Shopify B2B operations. Its scalability, customization features, seamless integrations, and tailored B2B functionalities make it a top contender. Despite a higher cost, its benefits often outweigh the investment for businesses aiming for growth and efficiency in B2B transactions.
Shopify Plus streamlines B2B order management through its wholesale channel, custom pricing, bulk ordering support, and seamless ERP integration. These features enable businesses to efficiently manage wholesale transactions, personalize pricing, facilitate bulk orders, and synchronize data across systems, ultimately enhancing operational efficiency.




![27 Best Shopify General Stores + Complete Strategy Guide [2025]](http://pagefly.io/cdn/shop/articles/Best_Shopify_General_Stores_2f9d09f2-7c38-4da9-a495-e9f4898ddd68.jpg?v=1757271936&width=1640)
