In 2024, According to Statista, the worldwide online shopping cart abandonment rate accounted for 70.19%. But, have you ever wondered why customers abandon their orders during the checkout process? Statistics from Statista show that in the United States in 2024, a staggering 22% of customers abandoned their carts due to a lengthy checkout process.
Thus, choosing an easy and convenient payment method is crucial for any online store. Both sellers and customers are keen on preventing payment fraud and ensuring a smooth transaction experience.
This is where Apple Pay comes in. Apple Pay can simplify and secure the transaction process, especially on the mobile device. It is an attractive option for both merchants and shoppers.
This article will discuss what is Apple Pay and the benefits of using it. Plus, we will walk through the steps to add Apple Pay to your Shopify store.
Ready to streamline your checkout process? Let's get started!
What is Apple Pay?

Source: Apple
Apple Payis a digital wallet service by Apple that lets you pay easily with your iPhone, Apple Watch, Mac, and iPad.
As a payment method for Shopify store owners, Apple Pay works both online and in physical stores, making it a breeze for your customers to complete their purchases. With a simple tap or a quick glance, your customers can buy from you without any hassle.
Setting it up is straightforward. Add your preferred cards to the Wallet app, and you’re all set to use Apple Pay for quick and easy payments. This can make checkout faster and more convenient for your shoppers, enhancing their overall experience on your Shopify store.
The Benefits of Using Apple Pay

Source: Envato elements
No additional cost:
Unlike some payment gateways that charge extra fees for transactions or setup. Integrating Apple Pay into your Shopify store doesn't come with any additional costs. This is especially beneficial for small businesses and startups.
Without those extra fees, you can put more money into marketing strategies to boost your sales. Thus, you can grow your business without worrying about hidden costs cutting into your profits.
Fast and easy checkout process
Apple Pay will definitely speed up the checkout process, making it quicker for your customers to complete their orders. With just a touch or a glance, your customers can finalize their purchase in mere second. No more fumbling with credit cards or typing in billing information.
Payment security and better data protection
Apple Pay shines in this area by using encryption and tokenization to protect your customers’ privacy. So, when a transaction is made using Apple Pay, the customer's card numbers and identity are never shared with merchants and aren’t stored on their devices. Each transaction is authorized with a one-time unique dynamic security code.
This robust security framework not only protects your customers but also significantly reduces the risk of payment fraud. Knowing that their personal and financial information is secure, your customers can shop with confidence.
Mobile friendly
Now more and more customers are making purchases directly from their smartphones. Apple Pay is perfect for this trend. It’s designed with mobile users in mind, offering a payment option that’s smooth and seamless on mobile devices.
By making the checkout process as easy as a swipe or a tap, you’re ensuring a hassle-free shopping experience that keeps your customers happy.
Prerequisites for Adding Apple Pay to Shopify

Source: Envato elements
Supported Payment Gateways: You need to confirm whether the payment gateway they are using supports Apple Pay. Common payment gateways that support Apple Pay include: Shopify Payments, Stripe, Authorize.net, Braintree, Adyen
Supported Devices: To test the setup of Apple Pay, you need to ensure you have access to an Apple device. This could be an iPhone, iPad, or Mac. These devices will allow you to verify that Apple Pay is functioning correctly on your Shopify store.
SSL activated: Apple Pay requires you to activate SSL on your store domain for security reasons. SSL encrypts the data transmitted between your customers and your store. This ensures payment information is kept secure.
Note:Apple's acceptable use guidelines outline what is and what isn't allowed when using Apple Pay to make a deal. You must follow these guidelines. Otherwise, Apple would disable Apple Pay transactions on your store.
How to Set up and Activate Apple Pay on Shopify?
Step 1 Navigate to Shopify Payment Settings
1. Log in to your Shopify admin panelto get started.
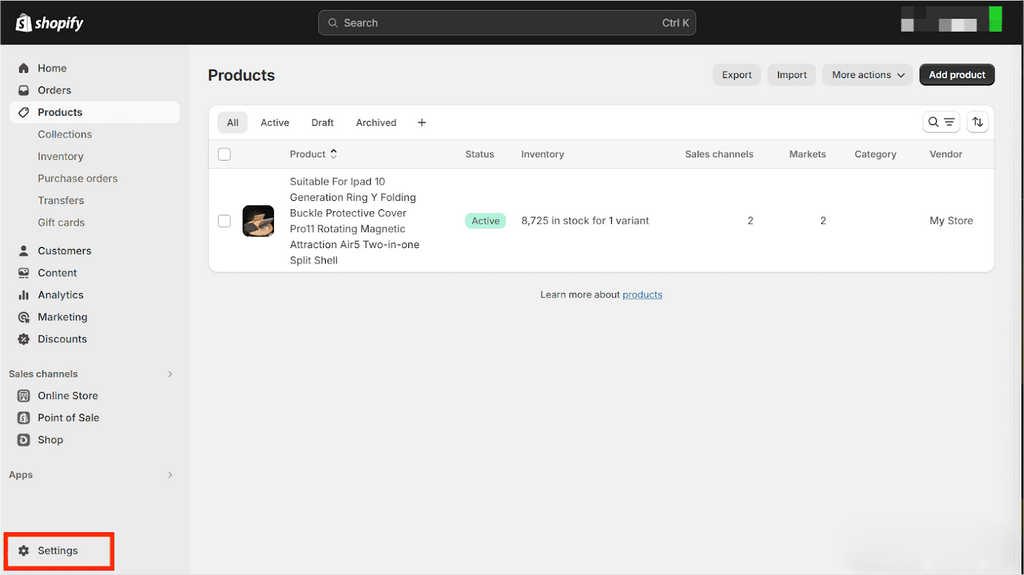
2. Go to Settings in the bottom left corner of your admin dashboard.

Source: Shopify
3. Click on Payments>manage

Source: Shopify
Note: If you haven't set up Shopify Payments yet, you'll need to click Complete account setup and follow the on-screen instructions to fill in the blanks.
Recommended read: What Is Shopify & How Does It Work in 2024?(Complete Guide)
Step 2 Enable Apple Pay
1. Under the Shopify Payment section, find the Wallets subsection.
2. Look for Apple Pay and ensure it is enabled.
3. Click the save button.

Source: Shopify
Step 3 Filter Third-Party Payment Providers (if needed)
1. If you're using a third-party payment provider, go to the Third-party payment providers section.
2. Use the filter to find Apple Pay and enable it according to the instructions provided by your payment provider.

Source: Shopify
Note: Make sure to save any changes you've made to ensure Apple Pay is activated on your store
Step 4 Test Apple Pay
Once everything is set up, Don't forget to test Apple Pay to ensure it’s working correctly.
1. Go to your Shopify store using a supported Apple device. ( iPhone, iPad, Mac)
2. Add a product to the cart and proceed to checkout. You should see the Apple Pay option at checkout.
3. Select it and follow the guide to make a purchase. If the test is successful, congratulations! You’ve successfully added Apple Pay to your Shopify store.
How to Display the Apple Pay Option on the Product Page?
Some store owners may find that there is no Apple Pay option on the product page.
To ensure the Apple Pay button, you need to meet two conditions: activate Apple Pay and enable dynamic checkout buttons on your product page.
In the previous section, we covered how to activate Apple Pay. Now let's walk through how to display dynamic checkout buttons on your Shopify product page.
1. Log in to your Shopify admin panel.
2. Navigate to Online Store in the left-hand menu, click on Themes
3. Find your active theme and click on Customize

Source: Shopify
4. In the theme editor, navigate to the product page template. Then locate the Buy Buttons section. Look for the dynamic checkout button and click it.
5. Save your changes by clicking Save at the top right of the screen.

Source: Shopify
By following these steps, the Apple Pay option should be displayed on your product page.
Alternative Methods to Accept Apple Pay
Apple Pay in person
If you have a brick-and-mortar store in the United States, You can facilitate transactions using Shopify POS and an Apple Pay-supported reader card, such as POS Go, WisePad 3 card reader, the Tap and Chip reader, or the Chipper 3X BT card reader.
The customers can simply double-click the side button on their device and authenticate with Face ID, just like when shopping online. They can also tap their device near your reader to make a purchase. No need to enter credit card numbers or payment details. However, be aware that if the transaction amount exceeds a certain limit, your customers may not be able to complete the payment through Apple Pay.
Apple Pay Cash
Apple Pay Cash is a digital card within the Wallet app that lets customers send and receive money through Messages or Wallet. Users can spend their Apple Pay Cash in stores, online, and within apps using Apple Pay, making transactions quick and seamless.
To make the most of Apple Pay Cash, ensure that your region supports it. While it is available in the United States and other regions, it's essential to verify its availability in your area. Integrating Apple Pay Cash into your Shopify store offers your customers added convenience, enhancing their overall shopping experience.
Apple Pay in mobile apps
If your store has an iOS app using the iOS Buy SDK, integrating Apple Pay can streamline the purchasing process for your customers. The iOS Buy SDK allows you to create custom storefronts within your mobile app.
Common Troubleshooting

Source: Envato elements
Even with the best setup, you might encounter issues with Apple Pay. Here are some common problems and how to solve them:
Apple Pay Button Not Showing:
- Ensure dynamic checkout buttons are enabled on your product page.
- Verify that your store is using a compatible theme that supports dynamic checkout buttons.
- Make sure you’ve activated Apple Pay in your Shopify Payments settings.
Transactions Not Going Through:
- Double-check your SSL certificate and ensure it’s active. An inactive or expired SSL certificate can block Apple Pay transactions.
- Verify that Shopify Payments is set up correctly. Ensure your account is in good standing and that all necessary information is up to date.
- Check for any restrictions or limitations placed by your bank or payment provider that might affect Apple Pay transactions.
Customer Complaints About Errors:
- Make sure customers are using supported devices (iPhone, iPad, Apple Watch, or Mac) and that their operating systems are up to date.
- Verify that the customers' cards are properly added to Apple Pay. Sometimes, re-adding the card can resolve issues.
- Encourage customers to check their internet connection. A poor or unstable connection can lead to transaction errors.
- Advise customers to restart their devices if they encounter persistent issues.
Payment Declines
- Advise customers to contact their bank or card issuer if their payment is declined. Banks might flag large or unusual transactions for security reasons.
- Ensure that the billing address and shipping address match the information on the customer's card. Mismatched details can lead to declined transactions.
Conclusion
Integrating Apple Pay into your Shopify store can significantly enhance the checkout experience for your customers. It’s fast, secure, and convenient, helping to reduce cart abandonment and boost sales. By following the steps outlined in this guide, you can easily set up and activate Apple Pay, providing a smooth and efficient payment option for your customers.
Explore more: Shopify Payments vs PayPal: Which Is Right for Your Business?
How To Add Apple Pay To Shopify FAQ
Handling refunds for Apple Pay transactions on Shopify is straightforward. When you initiate a refund through your Shopify admin, your customer will receive a notification about it. Keep in mind that the refund will be marked as pending for about 3-5 business days. This is the time it usually takes for the funds to return to the customer’s account. During this period, it’s good practice to inform your customers about the pending status and when they can expect the funds to appear.
Apple Pay is supported on a range of devices:
- iPhone models with Face ID and Touch ID (except iPhone 5s)
- iPads with Face ID or Touch ID
- Macs with Touch ID
- Apple Watches
- Apple Vision Pro
Apple Pay supports a wide range of credit and debit cards, making it convenient for your customers. They can use Visa, Mastercard, American Express, and Discover cards. To see a full list of participating banks and cards, you can visit the official Apple support page.


![27 Best Shopify General Stores + Complete Strategy Guide [2025]](http://pagefly.io/cdn/shop/articles/Best_Shopify_General_Stores_2f9d09f2-7c38-4da9-a495-e9f4898ddd68.jpg?v=1757271936&width=1640)


