Can you sell music on Shopify?
Yes, you can!
Shopify is a flexible platform that can accommodate a diverse range of businesses—music included. A Shopify music store isn't just possible; it's also effective.
Shopify for music
Solo artists, bands, merchandisers, and guitar stores, among many others, can use Shopify for their online growth. Listed below are just a few applications:
Music
Record labels and musicians, whether indie or platinum, can sell their singles and albums on a Shopify platform.
Shopify has features that allow merchants to sell digital goods, such as songs.
A huge chunk of this guide is dedicated to showing you how to sell music online.
Licensing
Label producers who choose to sell their music rights may do so through Shopify.
The Shopify store has apps that allow merchants to lease and sell their music rights.
Sell merchandise
In addition to selling music, artists may also sell their merchandise on Shopify via retail or print-on-demand.
Shopify has been an excellent platform for selling brand merch. The same applies to musicians and world-renowned personalities.
Musical instruments and recording equipment
Music retailers may sell their guitars, keyboards, mixers, amplifiers, and other music equipment on Shopify. This allows them to sell online in addition to their physical stores.
Vinyls, collectibles, and other physical products
Music enthusiasts are avid collectors of memorabilia and items such as vinyls. These collectibles may be sold in a Shopify-powered store.
How to Sell Music on Shopify
Here’s a quick step-by-step process for building your Shopify music store and growing your online music business.
This process will differ depending on whether you’re selling digital goods (i.e., singles and albums), physical goods (i.e., guitars and amplifiers), or print-on-demand.
First, we’ll get started with selling digitally downloadable music.
This process involves building an online store and adding your songs to Shopify’s system. You’ll also need a digital downloads app, an audio preview app, and a drag-and-drop page builder—all of which can help optimize your store for selling music online.
Create a Shopify account
If you don’t have a Shopify store yet, you must first create a Shopify account.

A Shopify account is free to create and gives you access to a ton of ecommerce learning resources, courtesy of Shopify. So, even if you don’t end up using Shopify, you’ll still benefit from having a Shopify account.
Furthermore, Shopify offers a three-day free trial for new users. Head over to their website and click "Start free trial" to get started.
Choose a Plan
After this free trial period, merchants must choose a plan
You may begin selling on Shopify for 29 USD/month (Annual Billing). In return, you’ll get Shopify support, a robust page builder, an automated and hassle-free store system, inventory tracking, access to third-party apps, and everything else needed to start and grow an online business.
All of Shopify’s plans, except Shopify Plus, give merchants their first month for only $1.
There are four main plans to choose from:

- Basic (39 USD/month for Monthly Billing; 29 USD/month for Annual Billing).
- Shopify (105 USD/month for Monthly Billing; 79 USD/month for Annual Billing).
- Advanced (399 USD/month for Monthly Billing; 299 USD/month for Annual Billing).
- Plus (2500 USD/month for One-Year Term; 2300 USD/month for Three-Year Term).
Note that during your free Shopify trial, you can begin building your online music store. So that when you eventually need to choose a paid plan, you will have already been set up for business before you’re billed your first month.
Read more: Shopify Starter Plan: Best Plan for Beginners?
Add your digital products
You’ll need to add the digital products you wish to sell—in this case, music files—to the Shopify system before you can sell them.
Add the digital product to Shopify’s System

First, click on “Products” from the admin panel.

Click “Add Product.”

Input the Title, Description, and Pricing.
Provide images as well in the Media section. Typically, artists place the song/album cover here; a common music industry practice.

Since this is a digital product, deselect “Track Quantity” and “This is a physical product.”

Then, in the “Search Engine Listing” section, edit your page title and meta description to properly reflect your song or album. This will improve its SEO.

Repeat this process for every single and album you’re selling.
Install a Digital Downloads Shopify app
Search ‘digital downloads’ in the Shopify App Store.

Any of these results can help your customers download purchased songs from your store.
For this guide, we’ll be using Sky Pilot.

Its free plan allows for unlimited orders. Other digital download apps’ free versions have a limit to how many orders they can process.
Upload Files using the Digital Downloads App
Open SkyPilot.

Navigate to “Products.”

Choose the product you want to add a file for. Make sure the music file you’ll add corresponds to the proper product.

Drag the music file onto the “Add Files” section. Then wait for it to upload.
That’s it!
Now, every time someone purchases your song, they’ll be directed to a download page where they can listen to and download it.
Create your Music Website
As a musician, you likely have a personality you want to project onto the world.

Source: Lady Gaga
Your website should reflect that.
Creating the right music website starts with selecting the right theme.
Shopify’s default theme, Dawn, is free and one of the most reliable out there. Its non-cluttered look and Shopify support make it ideal for a wide range of businesses, the music industry included.
However, if you feel you need a different stylistic approach to convey your musician/artist personality, you may opt for other themes.
To search for a theme, go to the Shopify theme store.

Go to Online Store > Themes from the admin panel.

Then select Add Theme > Visit Theme Store.
In the theme store, scroll through the selection and find the one that you feel best suits your brand.

After you’ve chosen a theme for your store, click on it, then select "Try Theme." This will download the theme for your Shopify store.

You'll see your new theme in your theme library. You may choose either "Publish" to make it your online store's theme, or "Customize" to tweak it further.
We suggest choosing "Customize" first before "Publish."
This lets you build your website to your heart’s content using Shopify’s page builder.
However, the outcome of the page will still depend on the theme you’re using. So, unless you have money to shell out on developers, you won’t exactly be getting “what your heart desires.”
Use PageFly
Drag-and-drop builders, such as PageFly, allow merchants to easily build any page as they wish without coding knowledge or developer help.

Online stores can place and move elements on the page without worrying about messing up the layout.
PageFly also has a high degree of flexibility, so you can shape your online store exactly as you desire.
PageFly provides one free section/page in its free plan. If you want to sell music online and increase your digital downloads, level up your online store with this free utility.
Build your music’s product pages
Shopify will automatically generate product pages based the product information you input into the Shopify system (refer to “Add your digital products” section).
But to sell music, musicians need more than just the default product page.
Something that can tremendously help increase customer confidence is an audio preview of the song you’re selling.
Provide an Audio Preview of Your Track
An audio preview allows potential customers to hear what they will be getting. It also provides an auditory element to your brand experience.

Here’s how you can provide an audio preview for your music.
Provide the Sample Audio
You wouldn’t want to use the full song in the preview. You’ll leave it prone to screen recorders, letting them retrieve the song without actually downloading (or paying) for it.
There are two ways around that.
- Put in 10 or 15 seconds of the song.
- Put audio watermarks. Customers would have to purchase it if they wanted the clean, un-watermarked version.
Once you have your preview sample, you’ll then need an audio player to play it on the corresponding song’s product page.
Create a Page Template for Each Song In Your Catalog
Shopify assigns all products to the same product page template, displaying them in a uniform manner.
However, each song in your catalog will need a different playback. This means you should have a unique template for every song. Hence, Song A will need Template A; Song B - Template B; and so on.
To do that, go to your theme editor.

Click on the “Home Page” drop-down at the top of the theme editor.

From the drop-down, click Products

Then “+ Create Template.”

Provide a name.
We suggest naming a template for each song on your catalog. This will make it easier to match them later.
Then, on “Based On,” select “Default Product.”

Repeat and do this for every song in your catalog.
Now, in another browser tab, go to your “Products” section from the Shopify admin.
Click a product.

In the “Theme Template” drop-down, assign the corresponding template to each product.
Do this for every song and its corresponding template.
Use Widgetic Audio Player (Free Option)
Widgetic provides a handful of free widgets for Shopify stores.
Among these widgets is an audio player that can be placed anywhere on a Shopify website—even the product pages.
Search for “Widgetic Audio Player” in the Shopify App Store.

Install it.

Open it and click on “+ New App”

Select the type of audio player you want to have on your product page.
Once you’ve selected a player, you’ll be brought to a customization page where you can tweak how the player looks. There are presets to choose from as well.

Pro tip: Make sure the background color of the player blends well with your product page’s background color. Copy the hex code (e.g., #FFFF00) of your product page’s background and paste it onto the "background" field of the audio player customization screen.
Once you’re satisfied with your edits, click “Next.”

In the screen that follows, drag the audio file that you wish to use as a preview onto the media box. Do NOT drag the actual song that paying customers get to download.
Once the track is uploaded, click on it to select it. Make sure there’s a check over it.
Click “Next,” then “Publish.”
Give the new audio player a name then click “Done.”
Click the back arrow button and repeat this entire process for every song you wish to make a preview of.

You should end up with something that looks like the image above.

Click on the three dots at the bottom of each player you’ve created, then click on “Copy_ID” for each one. This ID will correspond to a particular audio player. So, have these codes pasted on a note somewhere.
Now, go to your Shopify theme editor.
Remember, we assigned each product its own template earlier. So, these templates will look exactly like each other, with one small difference—the media player for each template will play different songs.

Click on the “Home Page” drop-down at the top of the theme editor.

Click Products > [Template Name].
This will allow you to edit the corresponding template.

For this example, we’ll add the preview player above the “Add To Cart” button. Hover at the top line of the “Add To Cart” button until you see a “+.” Click on it.
Select the “Apps” tab and choose the Widgetic Audio Player.
Click on the new block you've created.
Underneath “Composition ID,” paste the corresponding Copy_ID that you copied earlier. Make sure it has the correct preview track.
Repeat this process for every template you’ve created.
At the end of this process, every song in your catalog should now have its own preview function.
Use Osaria Audio Player (Paid Option)

Widgetic is free, but some users report poor customer service. Plus, it tends to slow down.
Osaria Audio Player is a reliable and excellent alternative. Higher rated too on the Shopify App Store. It costs 3.99 USD/month, but you get a free 15-day trial.
Set up payments
Setting up payments will allow site visitors to purchase from your online store.

From the main dashboard, click Settings > Payments.

Click "Choose a Provider."

Select your desired payment provider and follow their setup process. This will involve downloading the providers' respective apps.
Note: You need to be subscribed to a Shopify plan to begin taking payments.
Market your Shopify music store
The best ways to market your music store will depend on the kind of service you’re providing.
If you provide tracks, royalty-free music, and sell beats for films and creative use, you may benefit from a standard digital marketing approach.
This means using a combination of targeted social media ads, SEO, PPC, content marketing, and affiliate pushes.
However, if you’re an artist or music producer, your website traffic will gain traction as your name does.
This means performing at events, getting record label deals, uploading your own YouTube videos, collaborating with other artists, and even good old-fashioned busking in the park.
Just be sure your store’s domain name is similar to your performer name. Or, at the very least, can be navigated to by performing a Google search for your performer name.
Selling Physical Music Goods
Customers can’t just download a vinyl.
Here’s how you can sell physical items:
Adding Physical Products to Shopify
First, add your physical products to Shopify’s system.
Do exactly as you did with your digitally downloadable songs. (Refer to "Add the digital product to Shopify’s System")

But this time, you’d want to tick on “This is a physical product” and indicate its weight.
Also, add more product photos, ideally capturing the item from different angles.
Whether or not you’d want to track quantity will be up to you.
Once you’re satisfied, click “Save.”
How to Ship Out Physical Items to Paying Customers
Whenever customers place an order, their orders appear in the “Orders” section of the Shopify admin panel.

Click on “Orders.”
Select the order you wish to process and fulfill.

Click on More Actions > Print Packing Slips.
Print the packing slips and attach them to their respective parcels.
Then, acquire the assistance of a postal service to ship the item for you.
The postal service (e.g., UPS, FedEx) would likely give you a tracking number. Take note of it.

Click on “Fulfill item.”
This will take you to a new screen wherein you can place your tracking number and courier. Make sure to provide those details. Then finalize by clicking “Fulfill item” again.
Selling Print-On-Demand
Print-on-demand, or POD, is an easy and efficient way to sell pop culture merchandise. It functions similar to dropshipping wherein you won't be keeping inventory or packing orders.
Your Shopify music store takes orders, and a supplier prints, fulfills, and then ships the orders out to customers for you.
POD is great for providing eager fans with your official merchandise, considering that as you gain a wider audience, you won't need to lease out more warehouse space to meet demand.
Acquire Designs
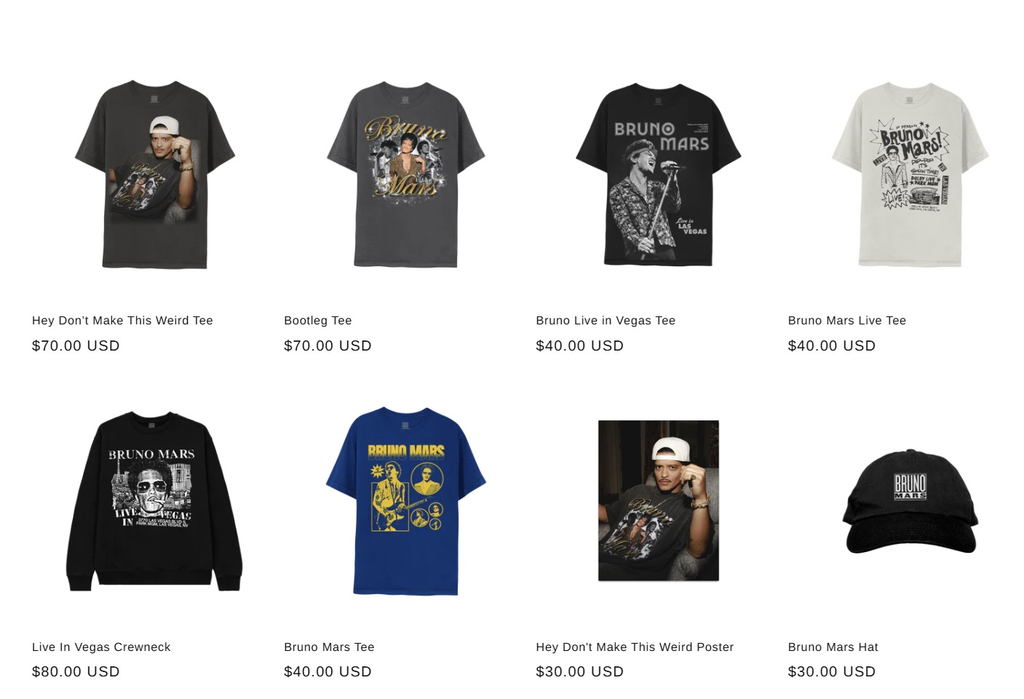
To start, you'll need a bunch of designs and logos that you'll want to print on t-shirts, hoodies, tank tops, etc.
Some popular design tools to help you with that include:
- Canva
- Pixlr
- Gimp
- Photoshop
If you're not too confident in your design abilities, you can always outsource graphic designers. Great places to look include LinkedIn, Fiverr, and UpWork.
Rule of thumb, make sure to export high-quality images. It's always easier to shrink a high-res image than it is to enlarge a low-res image.
Install a Print-On-Demand App
Once you have your designs, install a print-on-demand app.
A popular one among Shopify merchants is Printify.
Printify

Install Printify then launch it.
For this guide, we'll be creating a band shirt.
Creating the POD Product

Click on “Catalog” from Printify’s main dashboard.
Select T-shirts.

Select the shirt you'd want your print to be on. Select the one that works best for you.
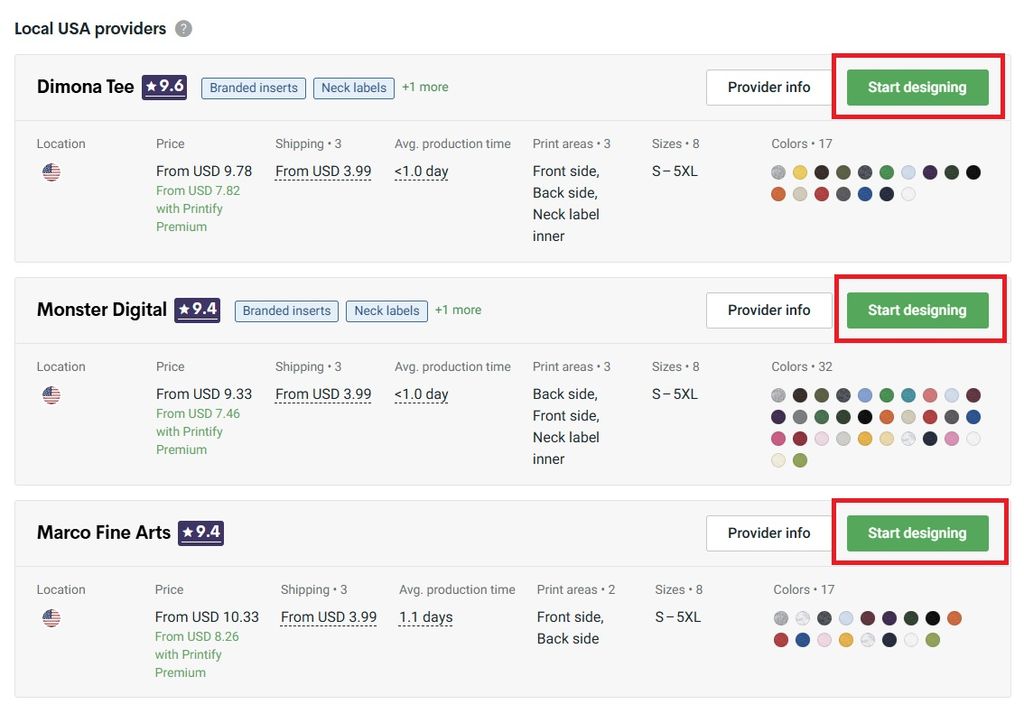
Then, click "Start Designing" next to your desired printing supplier.
You can use Printify's editor, or you may use the design you've previously created. Take time to explore the editor and then finalize a design.

Once you're done, click "Save."

Underneath "Mockups," choose the mockup images you want to display on your Shopify store.

Fill out the "Listing Details."

Under "Pricing," check all the sizes you wish to provide and their prices.
Finalize by clicking "Publish."

You should now see your Printify product in Shopify's "Products" section.
Go to your theme editor and add these products to your Shopify store.
Whenever someone purchases the POD products from your store, Printify will fulfill the orders. At this point, the Printify app would have already made the proper changes to your shipping settings.
At the base level, that's how you can provide print-on-demand
Shopify Music Store Examples
Some well-respected and popular artists have their own Shopify music store. Listed below are some of them:
Taylor Swift

Source: Taylor Swift
Tay Tay's store's design is far from a Blank Space.
The 14 Grammy Award-Winning recording artist boasts an on-brand Shopify music store. It contains official merch such as shirts, hoodies, and even jewelry.
Swift's online store also sells digital downloads, vinyl, CDs, and cassettes.
My Chemical Romance

Source: My Chemical Romance
The American Rock Band sells music and merchandise on their official ecommerce site.
An image is on the background of the entire page, seamlessly blending with the white color scheme. This allows MYC's dominantly dark products to stand out more.
Haworth Guitars

Source: Haworth Guitars
The Australian music retailer uses a Shopify store for their online presence.
They sell guitars, keyboards, drums, audio and recording equipment, and stage lighting, among many others. They have a catalog of over 12,000 but gave every item a place in their user-friendly interface.
Haworth Guitars also publishes blog articles on their site for that extra SEO kick.
Conclusion
Selling your songs on iTunes and Spotify can be enticing, but they may not give you the best margins. Also, you can’t sell physical products on those platforms. Not that we’re discouraging you from selling music there, though.
However, creating a Shopify music store gives you more website flexibility and better margins. It’s well worth having your very own Shopify music store if you wish to maximize your music career.
Read more: Sell Digital Products on Shopify Like A Pro In 2024 (Bonus Section Included)







![27 Best Shopify General Stores + Complete Strategy Guide [2025]](http://pagefly.io/cdn/shop/articles/Best_Shopify_General_Stores_2f9d09f2-7c38-4da9-a495-e9f4898ddd68.jpg?v=1757271936&width=1640)

