Introduction
It's exciting and stressful to launch a new online business. Though there are many things about eCommerce that you are unaware of, you have great expectations for your products and want to have a significant impact. As Shopify offers multiple tiers, some of which are relatively basic, many people have chosen it as their starting point as a result of these difficult obstacles.
We'll walk you through the process of creating a profitable online store step-by-step so you can get going swiftly and simply. You'll quickly have your store up and running by the end of this Shopify guide!
What is Shopify?
Popular eCommerce platform Shopify gives retailers all the tools they need to launch and maintain a profitable online store. Businesses are using Shopify for their eCommerce solutions because it is user-friendly, scalable and offers a great deal of features and integrations.
It's a platform for anyone who wishes to launch an online store. Shopify's extreme user-friendliness makes it ideal for startups. You can easily set up your online store and create a website.
Shopify lets you manage inventory and sell products whether you're just starting out or own a physical store.
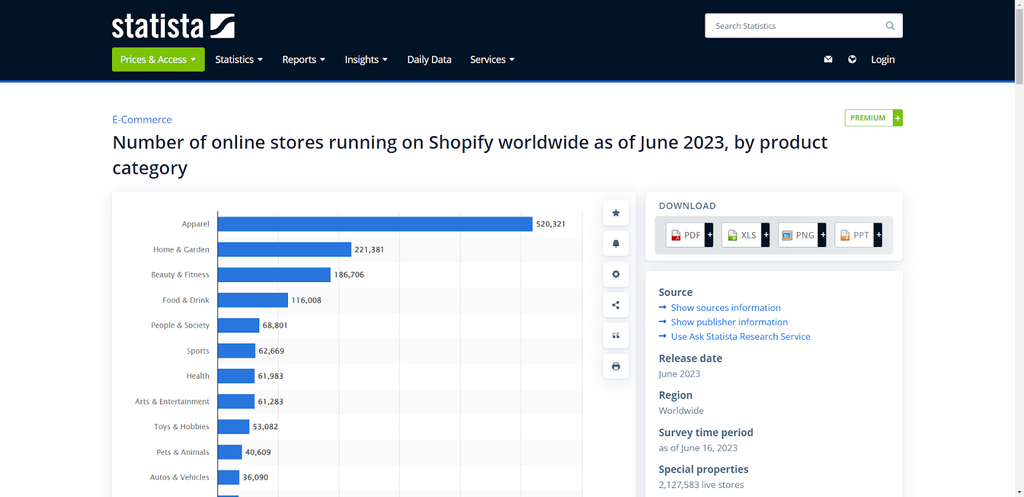
Source: Statista.
Shopify has 2.1 million daily active users on average. 4.8 million online stores use Shopify.
Some key reasons for utilizing Shopify include:
- User-Friendly Interface
- Comprehensive Feature Set
- Seamless Integrations
- Scalability for Growth
- Round-the-Clock Support
Shopify Guidance on How to Create your Store
Adding products, configuring the store's settings, and setting up payment options and shipping costs are all part of starting a Shopify store. It may take some time to add more products and optimize search engines for the online store once the store is up and running.
1. Decide on a target audience

Source: Start Ups
Understanding your ideal customer base is essential when launching an eCommerce store. It makes it simpler for you to locate potential consumers and draws in prospective customers to your website, increasing conversion rates and revenue.
- Demographics. Includes characteristics such as age, gender, occupation, education, and income.
- Location. Groups that divide the market based on geographic location so that you can provide better service in a particular area.
- Interests. Built around psychographics and includes attitudes, personality, opinions, and the lifestyle of your audience.
When writing the copy for your website and marketing campaigns, ask yourself: Who purchases my products and services? How old are they? Create a buyer persona with that data and incorporate it into your business plan.
2. Find a business idea and choose your products
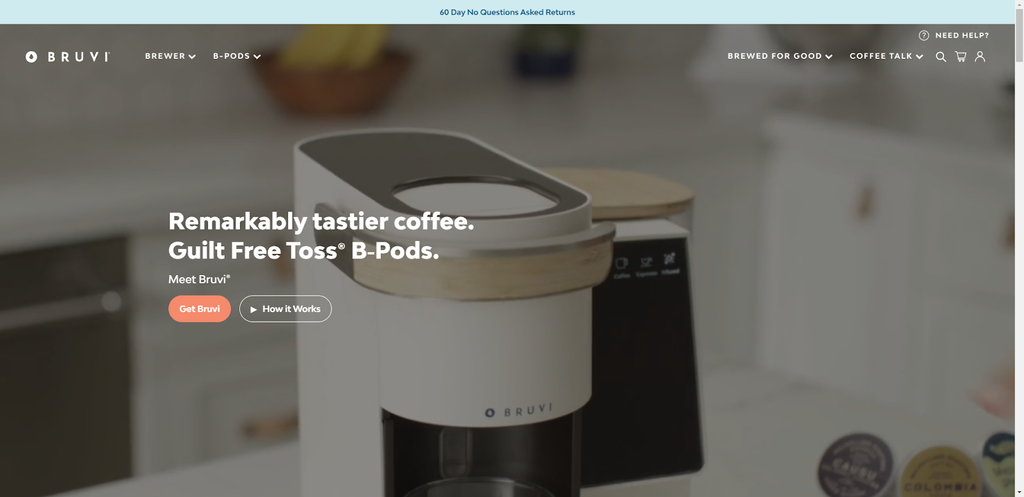
Source: Bruvi
You can find profitable products to sell online in a number of ways:
- Appeal to enthusiastic hobbyists
- Go with your personal passion
- Capitalize on trends early
- Look at what’s trending in online marketplaces
3. Create an account with Shopify
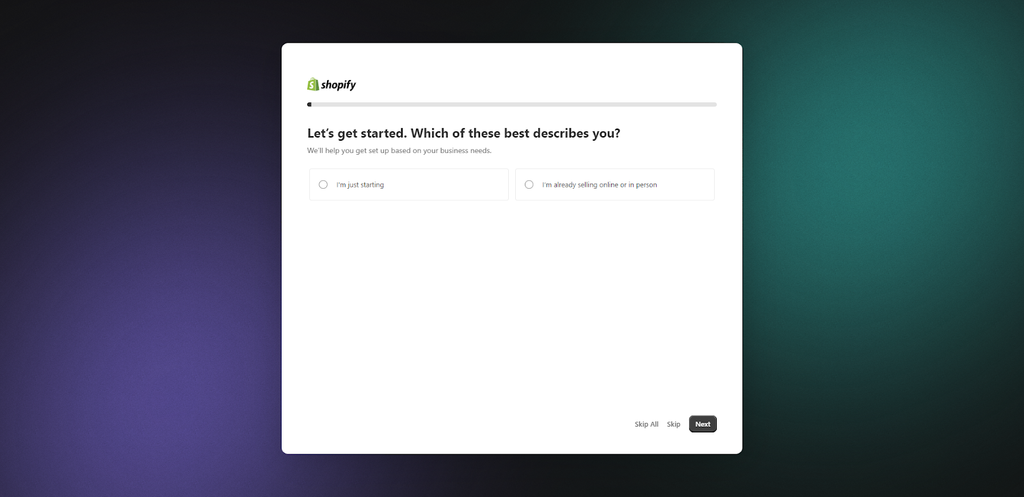
If you haven't already, create your Shopify account before you start. At this point, all you'll need is an email address and password.
Fill in a few more personal details about the items you intend to sell after that. As a result, Shopify can set up currencies and taxes depending on the data it receives.
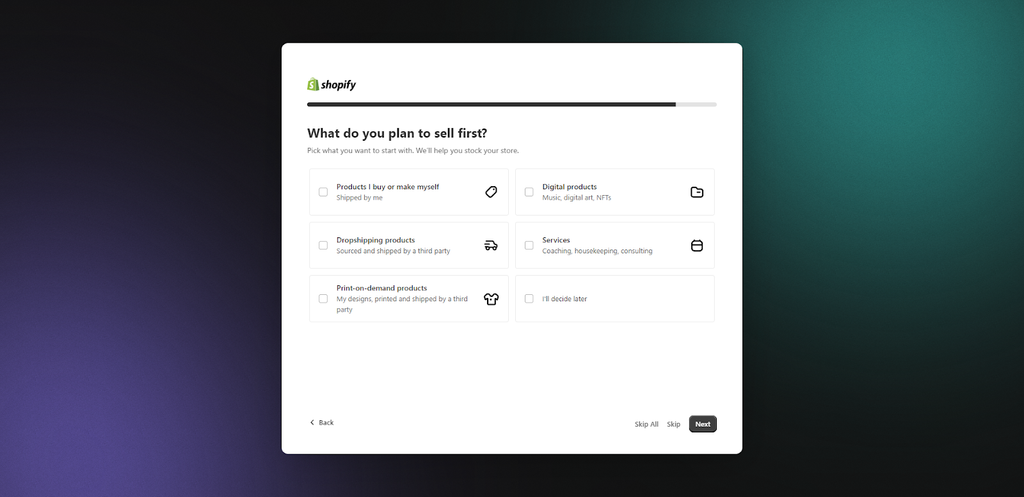
You can choose a name for your store later on.
A list of the requirements and our experience setting up a Shopify store can be found below.
- Business Concept: Determine your target market, your niche, and the features that set your service or product apart. Consider the issues your products resolve or the benefits they provide for customers.
- Store Name: Selecting a memorable and catchy store name is essential because it will be one of the first things customers notice about your brand and will stick with you and the business forever. Make sure your store name appeals to your target market and accurately represents your business idea.
- Brand Logo: Building brand recognition is greatly aided by your brand logo, which is a visual picture of your store.
- Imagery: To effectively showcase your products and build an aesthetically pleasing online store, you must use high-quality imagery.
Start a Free Trial
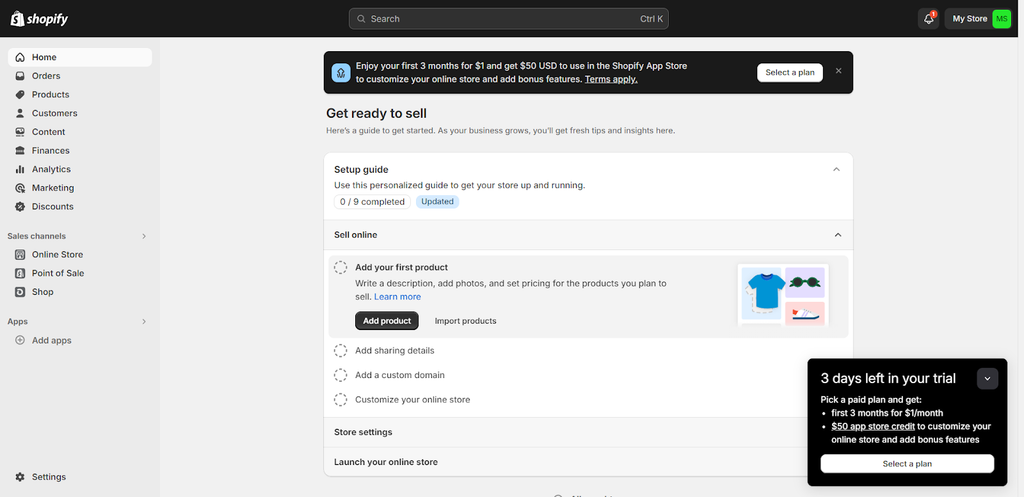
Starting a Shopify free trial is the next thing you must do before creating a store. Get 3 days free-trial then 1 month for $1 so you have nothing to lose and you should start it to see if Shopify is the best eCommerce platform for you.
A key benefit of Shopify's free trial is that in the case that you choose to switch to a paid plan, you won't lose any progress made on your store.
You can also pick a plan and get the first 3 months for $1/month as well as $50 app store credit.
4. Explore the Shopify admin dashboard
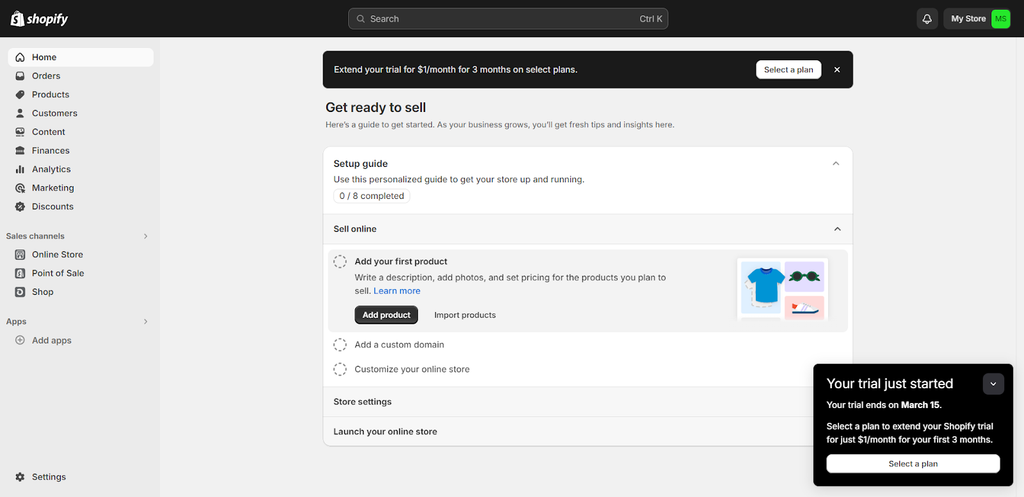
As you can see, you can add products, configure payments, shipping, and analytics, select a theme, and customize your store all from this page.
To use Shopify effectively, familiarize yourself with your dashboard first. The dashboard acts as your shop's "control center," where you can configure everything and monitor its performance.
5. Add your products
The products you sell will have a big influence on how your store looks so make sure you choose your line of products before investing time in designing a theme for it. It is not desirable to modify your store theme first only to find that your categories or product images don't match nicely.
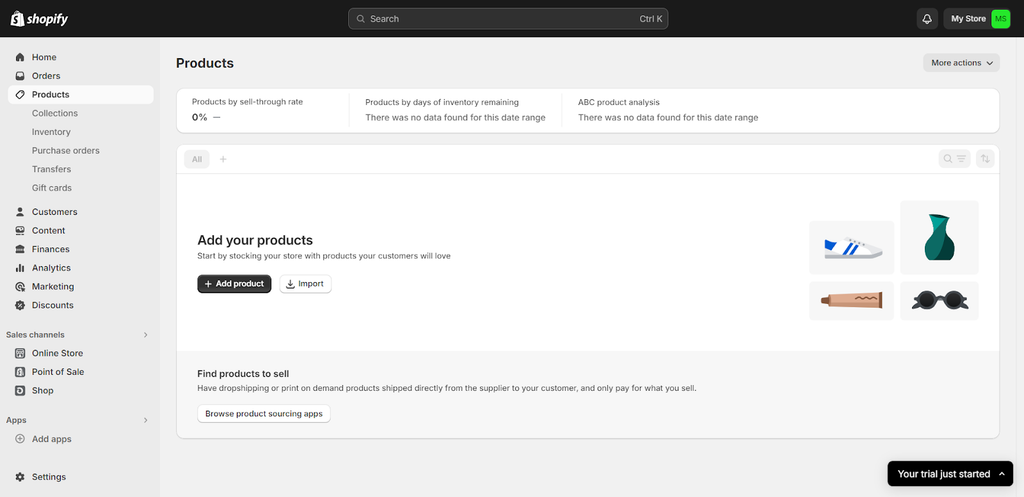
Go to Products -> Add your products in your Shopify dashboard to add new products to your store. You then need to include some product details.
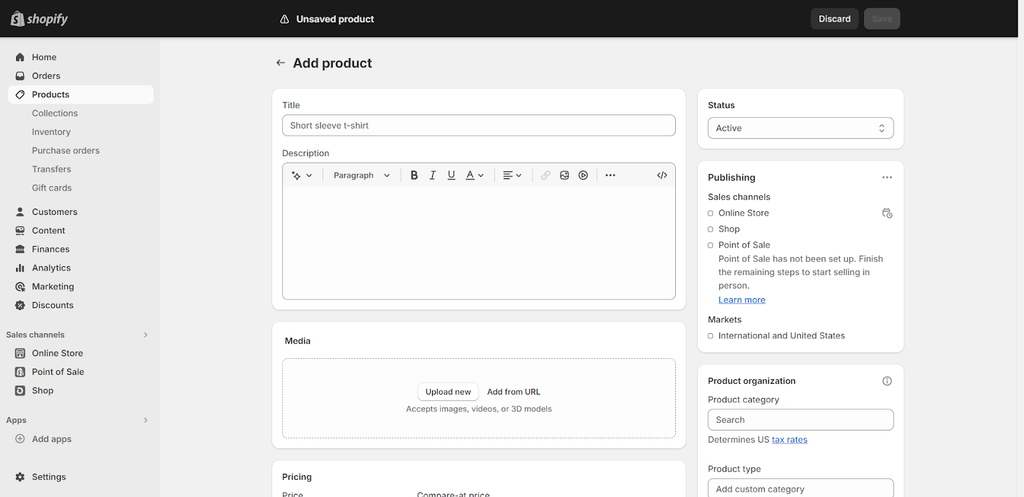
Product content: Title And Description, Media
One of the first things customers will notice when they explore your store or find your product on a search engine is its title. To ensure that readers understand what they're looking at and can quickly locate what they want in your catalog, keep the title brief, clear, and concise.
- Draw your customer personas
- Display what sets you apart
- Anticipate customer intentions and questions
- Make your descriptions easy to read
- Help customers see the solutions in your products

Source: Kulala
In this example, this ecommerce brand, the Kulala Sleep Lamp uses its product description to talk about the product’s benefits and how it was designed, while also maintaining the brand’s tone of voice:

You can display the richer details of your product by uploading any visual media, such as images, videos, or 3D models, in the media section of the product page. A few things to remember when uploading media are as follows:
- High-Quality Product Photos
- Maintain Consistent Aspect Ratio
- Utilize Modern Smartphone Cameras
- Alt Text for Accessibility
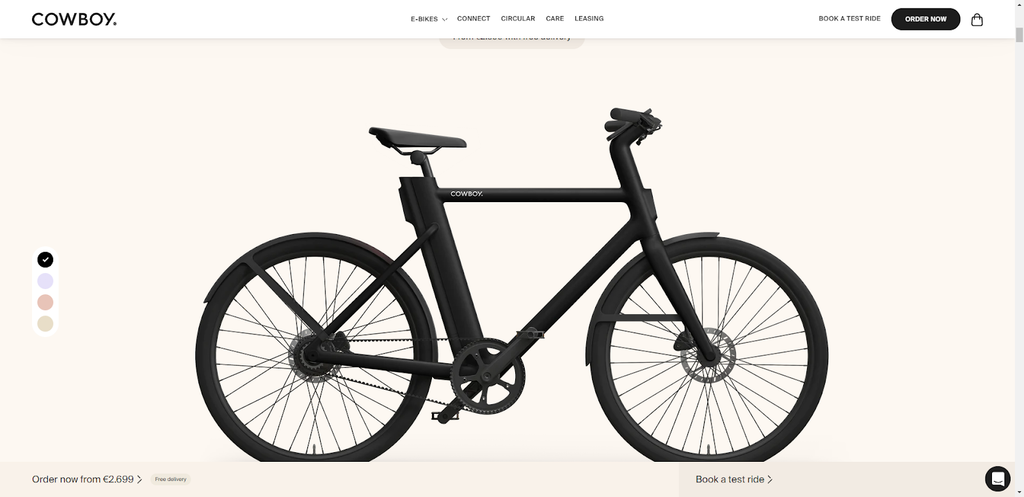
Source: Cowboy
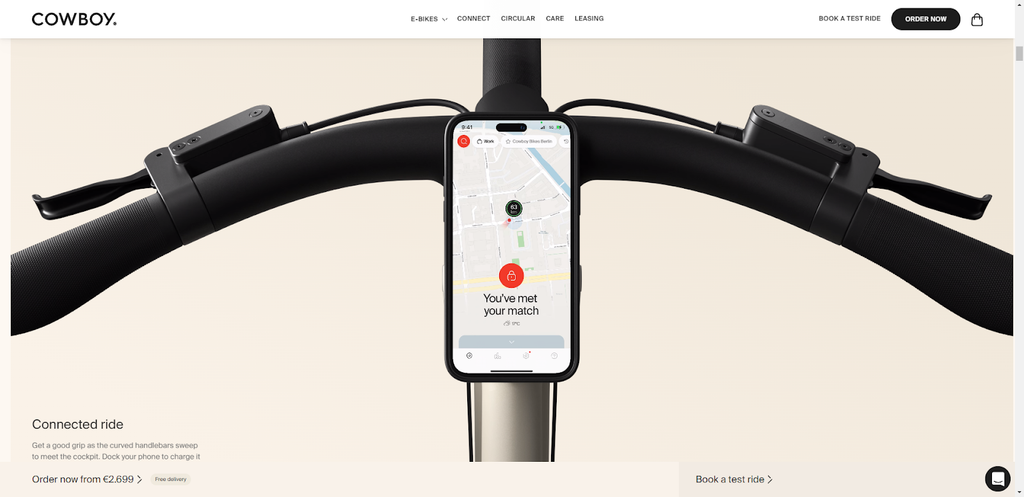
On its product pages, Cowboy e-bike brand uses several clean product shots on plain backgrounds to show every detail without distraction.
6. Pick and customize your theme
Choose A Theme
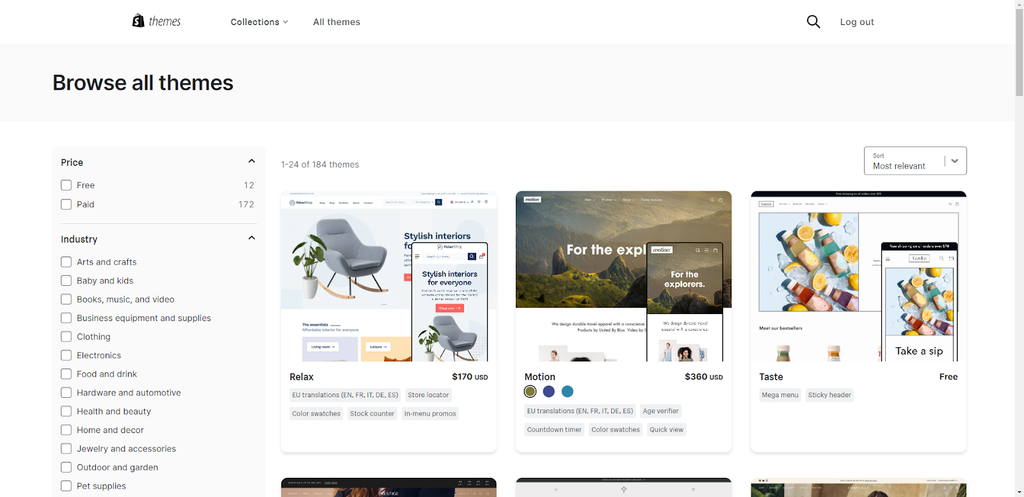
A crucial first step in starting a Shopify store is selecting a theme. Both free and paid themes with corresponding features and styles are available in the Shopify Theme Store. While some themes are better suited for businesses with single products, others are made for businesses with extensive catalogs.
- Tailored to Your Product Needs and Aesthetic: You can create an online store that perfectly complements your product offerings and desired visual aesthetics by choosing from a variety of themes and styles.
- Built-In Features and Functionality: You can save time and effort by choosing a theme with these built-in features because you won't have to rely as much on third-party programs or tools to accomplish the desired functionality.
- Leveraging Additional Apps: Don't worry if the theme you've chosen doesn't have every feature you need. There are a ton of paid and free apps available in the Shopify ecosystem that can increase the functionality of your store.
- Easy to Switch and Customize: Any progress you've made in creating your product pages won't be interrupted by changing your theme, making sure a smooth transition that keeps the consistency of your work.
7. Optimize your store’s settings
You can access all these options from your store’s Settings area.
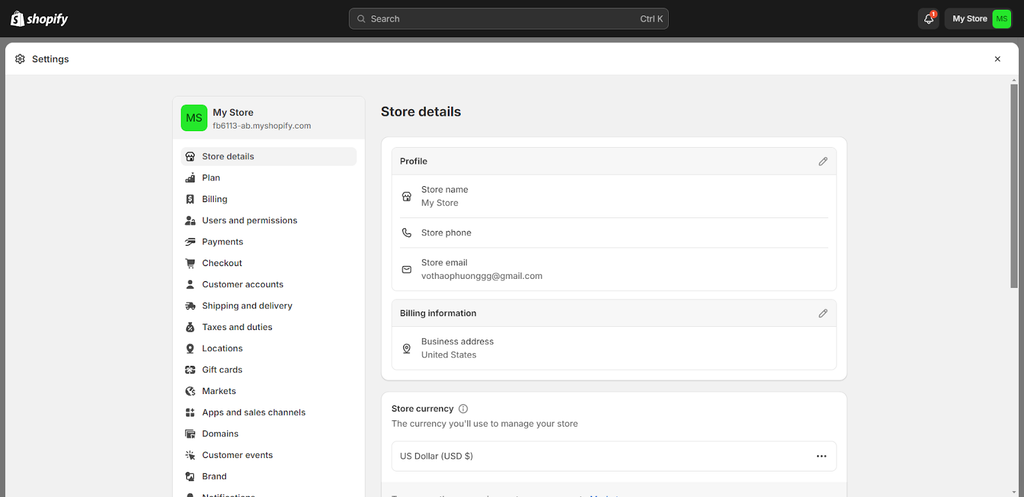
a) General – You can change your store address, email address, name, and more right here.
b) Locations – Locations assist you with order Shopify fulfillment network, inventory management, and product sales. Storefronts can be located in retail stores, warehouses, dropshippers, or anywhere else that deals with inventory, including inventory management apps.
c) Shipping settings – You must determine which delivery methods are most suitable to your Shopify stores before making a sale. After that, you can let customers select any of these options when they check out. On the Shipping page of your Shopify Admin, you will see the shipping zone and rates applicable to the areas and countries you ship to.
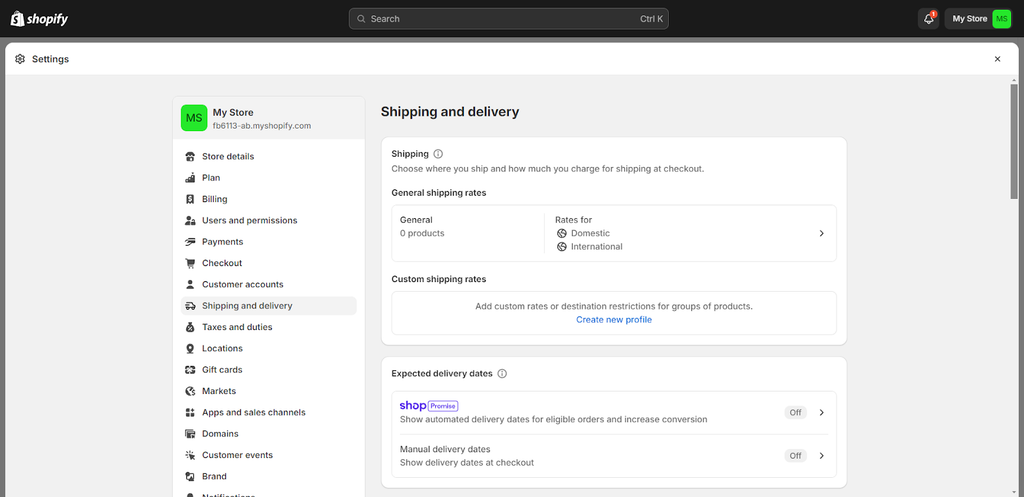
Additionally, Shopify provides shipping from US and Canadian locations. This enables you to purchase shipping labels that expedite delivery and show rates to your customers. The packages can be easily dropped off at any post office.
Your decision on shipping rates should take into consideration actual shipping costs, product weight, and packaging. If you purchase shipping labels of popular carriers in the USA and Canada through Shopify, you can cut down shipping costs by nearly half as compared to retail rates.
A common reason why customers leave their carts empty during checkout is unexpected shipping costs. You can address this by providing free shipping based on the product's price, weight, or coupon codes.
d) Checkout – Orders are accepted through the safe Shopify checkout process on the checkout page. Theme settings allow you to change the checkout page's look and design.
Allowing customers to create customer accounts will enable you to store and pre-fill password-protected information, like address, email, and order history, at the point of checkout.
e) Receiving Payments – You can provide your customers with a variety of payment options with Shopify.
You should consider your customers' and your own location when selecting payment gateways. When choosing your payment provider, you should also take transaction fees, accepted card types, and onsite vs offsite checkout into account.
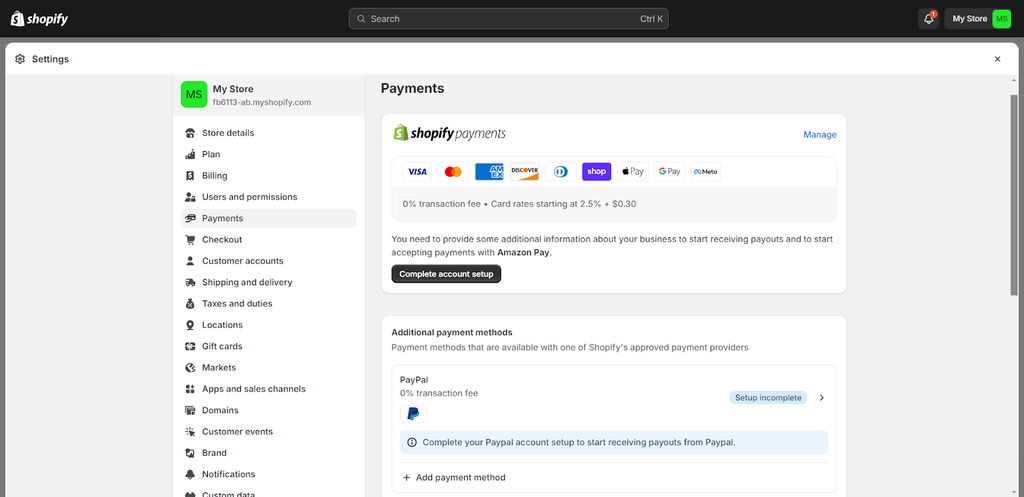
As for credit card payments, you can go with Shopify Payments or choose from a list of 100+ third-party providers.
PayPal is the default payment provider; other options include Apple Pay, Amazon Pay, and PayPal for non-credit card transactions. Certain payment providers also offer accelerated checkout buttons to make it easier for repeat customers to finish their purchases more quickly.
To choose the currency for your store, visit Settings → General → Standards and formats → Change formatting.
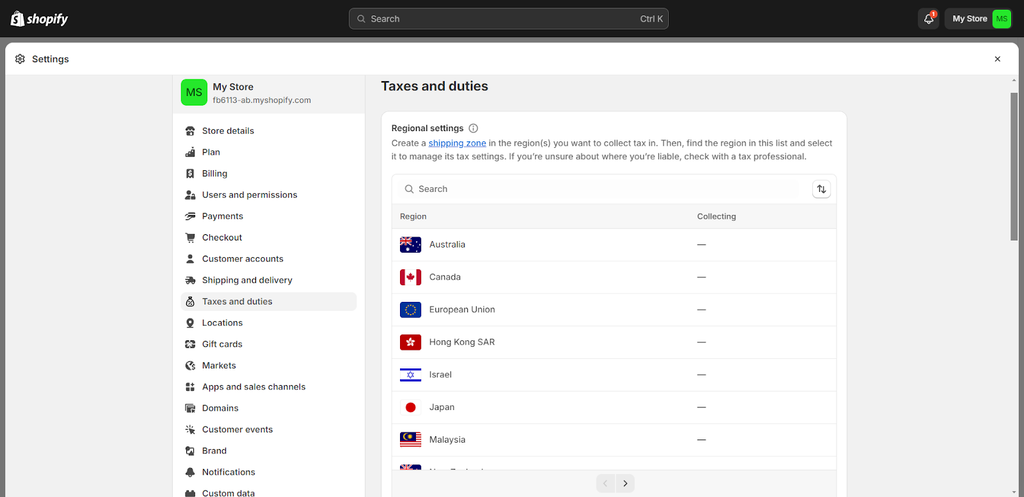
f) Taxes – Majority of countries have laws requiring you to keep track of sales taxes and send them back to the government. Shopify handles the majority of typical tax computations in numerous tax jurisdictions. Shopify uses default rates which you must verify or change.
8. Test your store
In this Shopify tutorial, testing your store before accepting orders is a good idea at this point. Verify that everything is operating as you had intended, including the checkout process and the settings for order processing, inventory, shipping, notifications, and taxes.
9. Add a custom domain name
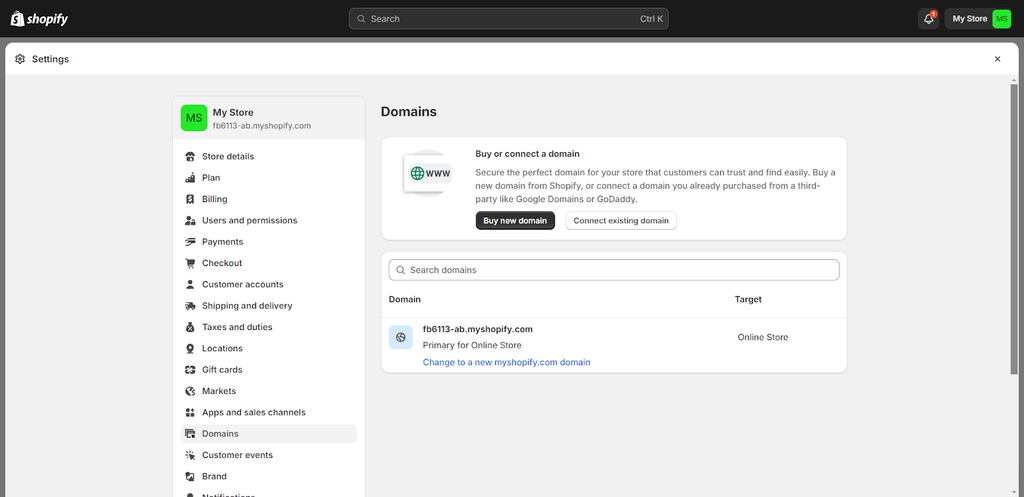
With just a few clicks, you can buy a domain through Shopify directly or transfer an existing domain from another registrar under Settings -> Domains in your admin panel.
Acquiring a domain is similar to placing a claim on the web. It's called a "web address" for this reason.
A fully branded URL that takes the place of the default URL, which was made using the store name you selected during setup, is called a custom domain.
10. Launch your online store
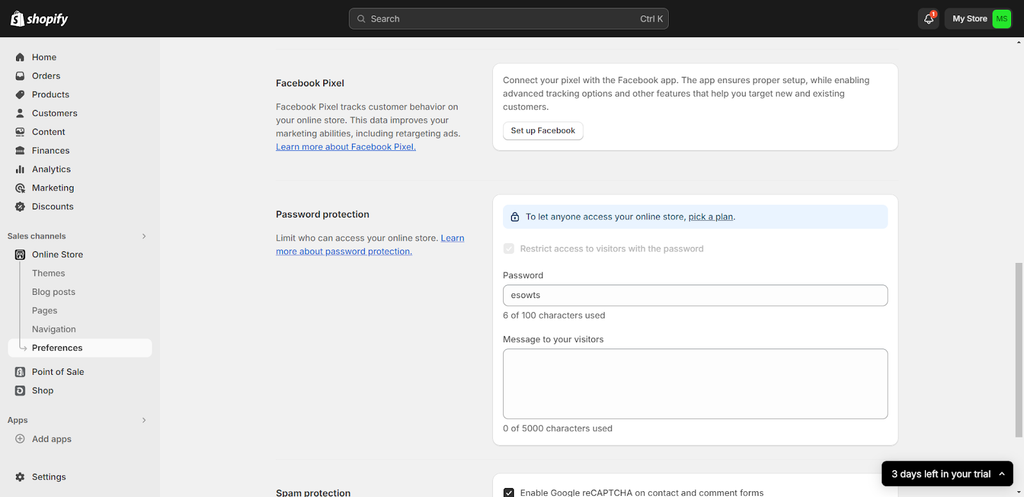
Navigate to Online Store -> Preferences to start selling. Once there, disable the need for a password by scrolling to the bottom of the page. Before you can use Shopify's services, you must choose a plan and make a payment, but once that is taken care of, you can get started!
Connect Shopify Apps

No matter how successful your store is now, you can find a variety of apps on the Shopify marketplace to make it better. Go to Applications in your admin panel to see what options are available.
You're sure to find an app in the Apps library that suits your needs, be it social media advertising, email list building, referral programs, monthly budget computation, or upselling/cross-selling.
Shopify's store offers a huge selection of Shopify plugins and apps. Now let's explore the Shopify App Store.
The preinstalled apps are visible when you navigate to the "Apps" area. Shopify merchants allow you to view the most popular apps as well. Check out what's there by selecting the category that most interests you.
Add Sales Channels
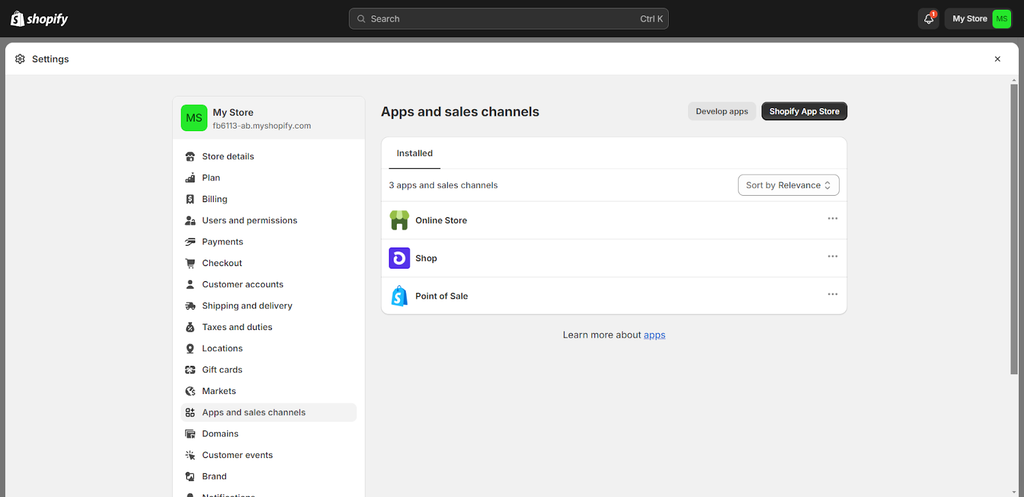
You can sell your products through a variety of channels in addition to your own online store. While not all sales channels will be appropriate for your particular industry, the following are some that are worth mentioning:
- Point of sale (POS): Many platforms offer point-of-sale solutions for accepting in-person payments and easily syncing physical retail sales with your online store and inventory.
- Social networks: You can open a store on TikTok, sell items on Facebook and Instagram, and do a lot more.
- Marketplaces: A lot of consumers begin their buying journeys on eBay, Amazon, Etsy, or Walmart marketplaces. These sales channels and your online store can be synchronized.
- Google: The most widely used search engine worldwide is Google. Promote your products on Google Shopping and list them for free under the Shopping tab.
11. Market your online store
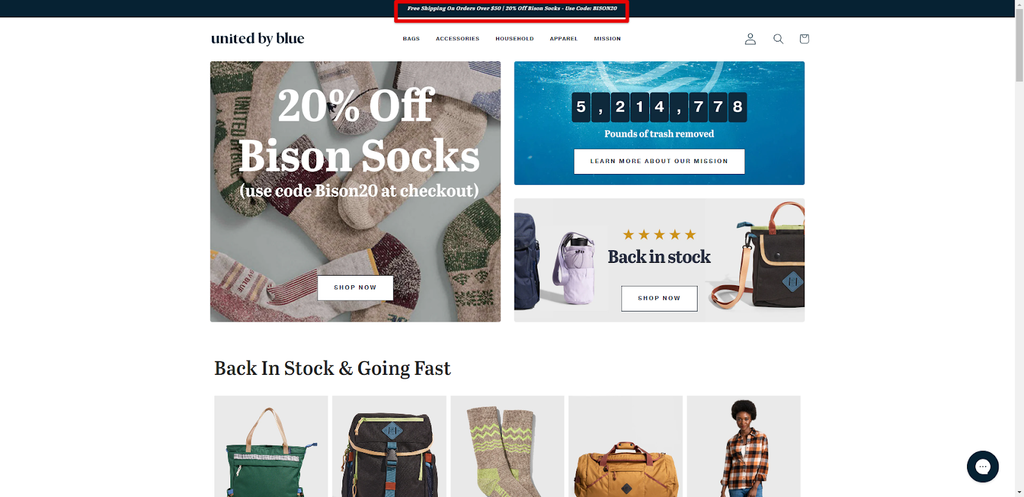
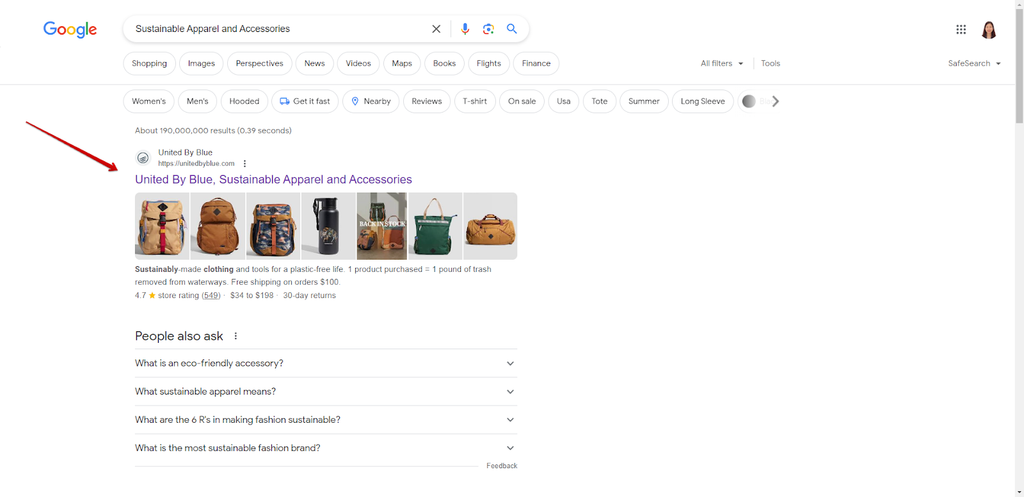
Every business has a different approach to marketing, but no matter what your plan is, it's critical to lay the groundwork to maximize the benefits of your efforts as you increase foot traffic to your store. Examine a few of the online store advertising elements with examples from United by Blue Shopify store:
- Create discount codes
- Social media marketing tools


- Optimize search engines
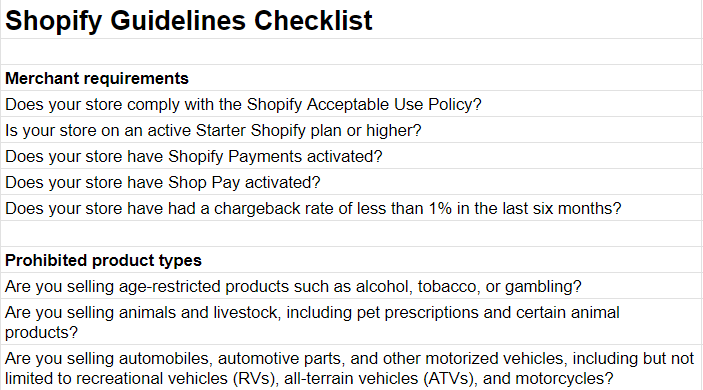
Shopify Guidelines Checklist
To be featured in the Shop app, make sure you review and comply with the merchant requirements and product restrictions.
✅ Check out the Shopify Checklist
Content moderation
Shop has implemented a moderation procedure to ensure that all content on your Shop Store complies with merchant guidelines.
Content that violates the Shop Content Policy may be reported by Shop app users.
Is Shopify Good?
The greatest e-commerce platform available right now is Shopify, especially if you want to expand your business. Its purpose is to assist users in creating their own scalable online store with hundreds of pre-installed apps and features. Products can be sold straight from your website, as well as through a variety of online stores and social media platforms.
Read more:
Conclusion
Following our simple, beginner-friendly instructions will make creating an online storefront a breeze. By creating a polished store, Shopify can assist your business in becoming successful with little cash and some time.
You're prepared to put your newfound knowledge to use now that you know how to launch an online store! Anything can be sold online, including merchandise, electronic items, and handmade products. As you expand, your online store will continue to be a work in progress. Create a successful online store by providing your target audience with the information and products they want to buy.






![27 Best Shopify General Stores + Complete Strategy Guide [2025]](http://pagefly.io/cdn/shop/articles/Best_Shopify_General_Stores_2f9d09f2-7c38-4da9-a495-e9f4898ddd68.jpg?v=1757271936&width=1640)

