
Are you aware of a growing eCommerce platform Shopify? The Shopify platform is one of the most well-known in eCommerce, and you've probably heard of it even if you didn't realize it. It is believed to have powered over 800,000 online shops and generated over $100 billion in sales since its launch.
The Shopify collections are fantastic to highlight the products you sell on the platform. It also eliminates the need for clients to hunt for your products and helps them to quickly find what they require.
Customers usually love checking at a specific product's website after clicking on a product image on the collection page while visiting Shopify stores. That is why merchants try to keep their merchandise organized and easily accessible to shoppers.
Let’s get started on the step-by-step guide on how to do so.

I. What Are Shopify Collections?
Shopify Collections are the platform's equivalent to category pages. They're a fantastic technique to group related items into a list that's easy to browse.
The order in which those categories appear will vary based on your target demographic and the products you sell, but they may contain items such as:
- Men's, women's, and children's clothing
- Seasonal commodities, like Christmas decorations
- Items of a particular size or color
- Products with a discount
After you've created a collection, it'll appear on your Shopify store as a page with a gallery of the items you've added.
II. Why Do You Need Shopify Collections?
Imagine you've been given complete freedom to construct your Shopify store from the ground up: the sky's the limit. Nothing is too enormous or too far-fetched. You don't even need to file a support request with your development team and wait six months for them to implement it.
So, how do you go about it?
You might work as a web designer or developer, or you might build an engaging online experience or develop the most appealing front end possible.
Perhaps you'd design a user-friendly website. You might alternatively do what your customers really want: create an easy-to-use website.
According to 91% of buyers, the most significant aspect of web design is that it allows them to quickly find what they're looking for.
Why would someone invest in you if just looking at your website causes tension headaches?
Shopify collections come in this situation.
Simply said, Shopify collections are one of the most effective ways to make your Shopify eCommerce store more user-friendly for visitors.
III. Types Of Shopify Collections
There are two types of Shopify collections:
- Automated Shopify collections.
- Manual Shopify collections.
Important note: Once you've created a Shopify collection type, you can't edit it.
Automated Collections
Automated collections is the most popular option. It has the potential to save you a tremendous amount of time and effort. Seasonal tags, such as summer or winter, can be used to magically assemble the relevant things in your seasonal collection.
There is, however, one little disadvantage to consider: certain commodities cannot be easily withdrawn from an automatic collection. You'll have to go in and remove a specific pair of shorts from your summer line if you don't want them to appear:
- The needs of the collection; or
- Details about the product
Automated collections, on the other hand, are excellent because they are automated. They can, however, be a little rigid at times.
Manual Collections
This is a collection of products that you have hand-picked for inclusion.
Regardless of how many new products you add to your site or what time of year it is, a manual collection will remain static once it is completed. Only by manually adding or removing items will you notice a difference.
Maintaining manual collection, on the other hand, clearly involves more effort on your behalf. They're usually best suited to small, well-curated collections.
If you invited an influencer to pick their favorite items from your store, their selections would be perfect for a manual collection.
IV. How To Add Collections To Shopify?
Shopify collections arrange your products logically, in a way that makes it easy for your consumers to navigate through your catalog and discover what they're searching for, and that is one of the most critical aspects of making a successful Shopify website. Setting up product groups takes only a few minutes but can significantly impact your online store. Continue reading to learn everything you need to know about how to add collections to a Shopify page.
Let’s start!
Step 1: Go to Products > Collections in your Shopify admin.

Step 2: Create a collection by clicking the Create button.

Step 3: Give the collection a name and a description.

Step 4: Click Automated in the Collection type section.
- To be included in the collection, choose whether products must match all conditions or any condition.
- Set the collection conditions using the drop-down lists.

Step 5: Save the file. The products that match the conditions are automatically added to the collection in the Products section that is presented.
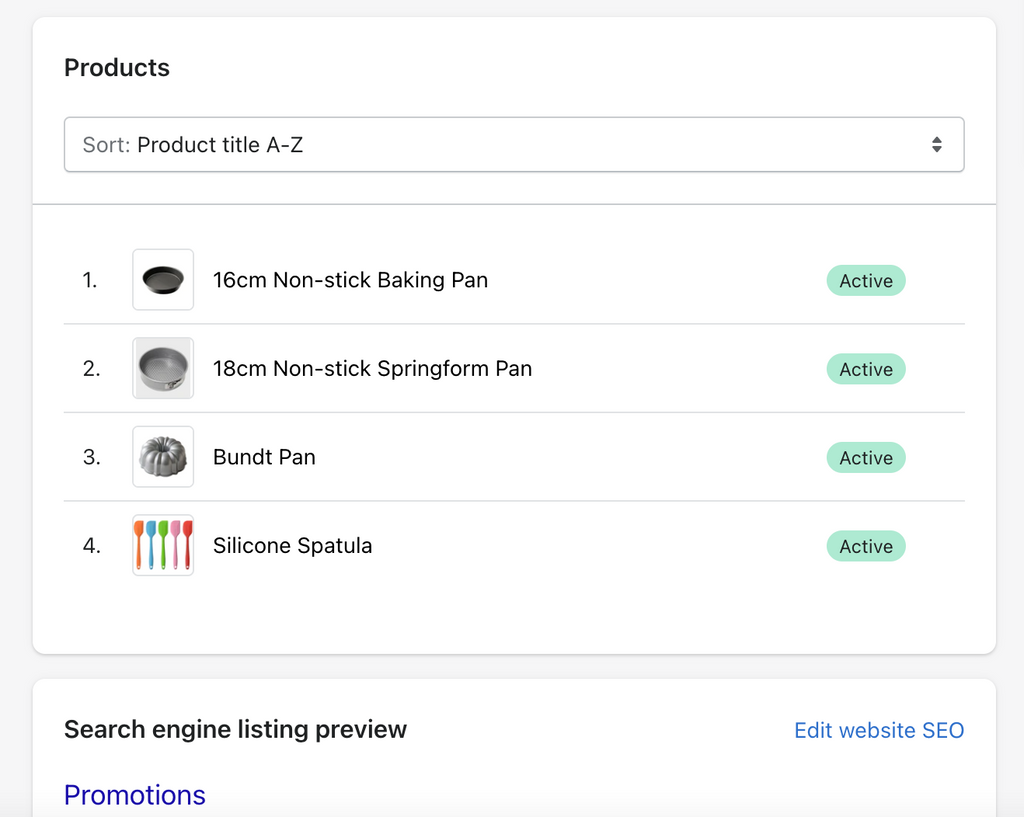
Step 6: Set the sort order where you'd like your store's products to be sorted. Change the sort order for the products in a collection for more information on sorting.

Step 7: Shopify gathers links to all of the products on the website and display below
Step 8: Select from your active sales channels where you want your collection to be offered in the Sales channels area.

Step 9: A glimpse of how the collection will appear in search results can be found in the Search engine listing preview section.

Click Edit website SEO if you want to change this information. Because the URL and handle are needed to link the collection to your online store, you can't change them.

Step 10: Save the file, and you'll be good to go!
V. How To Add Products To Shopify Collections?
Products are at the heart of your online store, but you'll add them to your Shopify store in a variety of ways depending on your business. You can import products via the dropshipping app, bulk import from a CSV file, or use the product form.
Here, Step-by-step instructions for adding products to your Shopify collections.
Let’s get started!

01. Upload product to Shopify
To begin uploading products to Shopify, click the "Add products" option on the dashboard.

02. Make a List of the Product's Specifications
You can start filling in the blanks on your product page. Several elements are included in the Shopify product setup details.
To help your consumers remember the product name, the title should be concise and memorable. Since the specifics will be provided in the description section, the product title does not have to encompass all of the information about the product. Also, keep the names of accessible things consistent. If you use the color in one product title, you should use it in others as well.

Keep in mind who your target market is and how this product can benefit them.
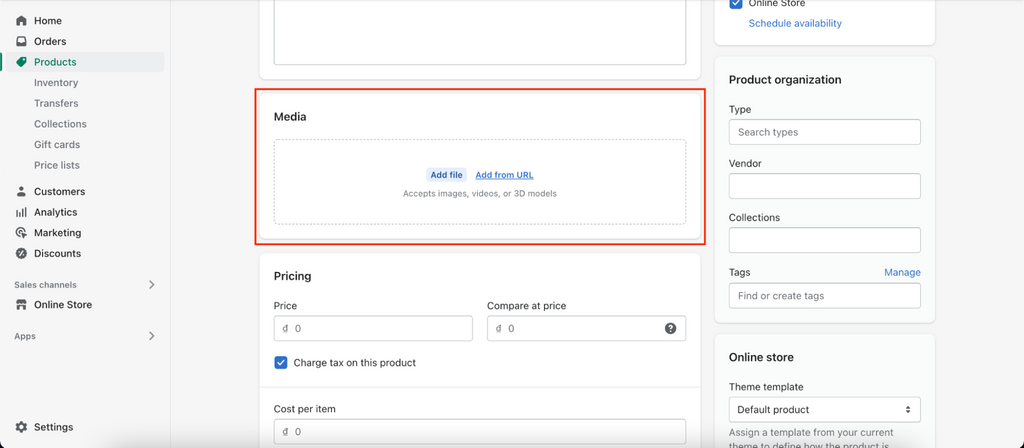
03. Add the Product Images and details
Customers' purchasing decisions are influenced by product images. Customers can picture what the product is like without touching it thanks to an effective product image.
For each product, you should include many photographs from various perspectives so that shoppers can get a complete picture of the item.
Get permission before downloading and putting any images if you aren't using your own photos.
The Shopify product photos should be named consistently, just like the product title. Use SEO keywords in your image so that customers may quickly navigate your store using search engines.
04. Publish Products and Check Them Out In The Store
Before selecting the "Save Product" button to enable Shopify product visibility, make a fast inspection of all the details for new goods added.
The "View on your website" option allows you to see a preview of your product so you may update it if there are any problems. Return to the first stage to make changes to the products.

Congratulations! You have now known how to add products to Shopify.
VI. How To Customize Collection Page With PageFly?
When you want to customize your Collection page more than just on Shopify’s default Collection page, that’s when PageFly comes in handy.
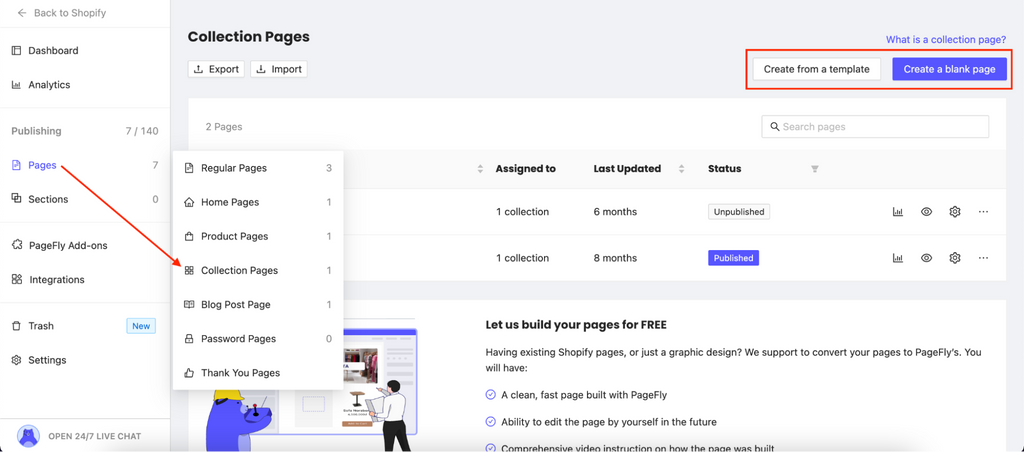
Step 1: Go to your PageFly app > Choose Collection Page. You will then have the options to choose and Create from a template or Create a blank page
Step 2: Assign the page to a Collection in your Shopify store.
After you've created a collection page, you'll need to assign one or more collections to it.
There are several options for fast heading to your collection page's assigned collection(s).
To enter the Page Assignment modal, first click the three dots symbol in the Page Editor.
For the collection page, you must choose one or more collections.

Step 3: Save and publish the page. Then you are good to go!
Related article: Use Your Shopify Collection Page To Collect Unique Visitors
Conclusion
That's all there is to it - you've completed this guide!
We hope it's been helpful in getting you up to speed and utilizing Shopify with confidence. Even better if it aided you in swiftly getting your store up and operating.
That's everything you need to know about how to add collections on Shopify and how to customize your Collection page using PageFly.
Experience the power of PageFly Landing Page Builder for FREE.