Shopify is a widely used and well-known eCommerce platform that has empowered thousands of entrepreneurs. What really stands out with this eCommerce solution is its ease of use. If you are a newbie and want to learn how to add products on Shopify, then we have got you covered. After all, adding your product with the necessary information, coupons, and customizations is key to giving your customers the most optimal experience.
Creating and managing your store on Shopify is easier than you think! In this guide, we will take you through the process of how to add products to your Shopify store in detail so you can set up your first store and handle the product management system like a pro!
💡Do you want a video guide on how to add products to Shopify? We got it, watch it below.
How To Add A Product On Shopify: Step-By-Step Guide
As someone who wants to run an online store, learning how to add products on Shopify is one of the things that you need to do.
And here’s the thing, although adding products to your Shopify store is basically an easy task, there are proper ways to do it.
In this guide, we won’t just show you the steps on how to add products on Shopify, but we’ll also drop some tips as you go through the steps. Let’s get started.
Step 1: Access The Product Menu
If it’s your first time adding a product on Shopify, your products menu will be empty. But since our demo store already has some products in it, you’ll see them below. Just disregard those.
Either way, the process will be the same.
So the first step on how to add products on Shopify is to locate the product menu from your Shopify admin and click the “Add product” button.
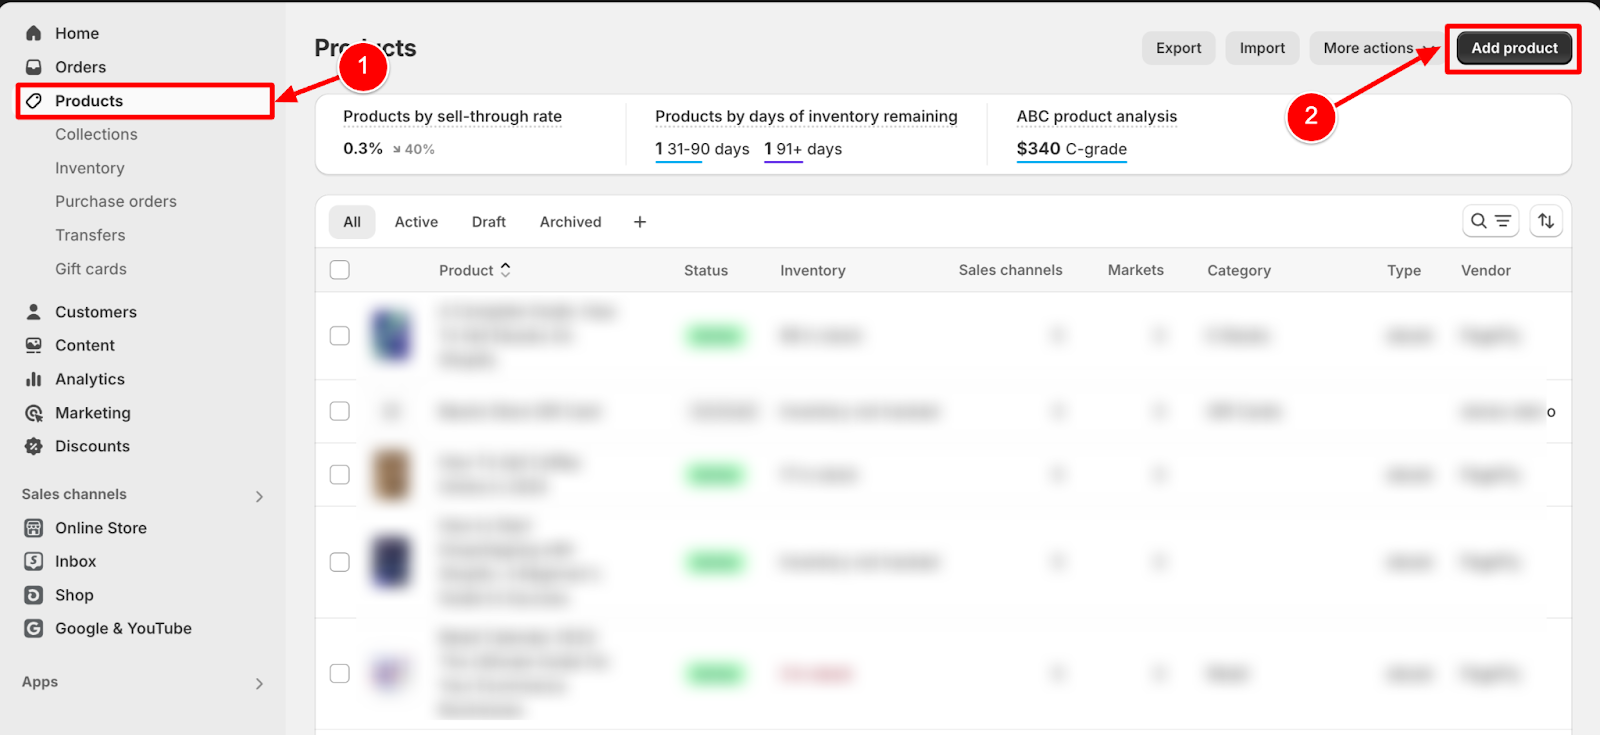
You will then be redirected to a product creation page where you’ll need to fill out every detail of the product for easier inventory management in the future as your product list grows.
Step 2: Fill out the product page
The product page contains a lot of spaces that you need to fill with information. Do not skip any of these areas as these are crucial to better inventory management.

Write your product title
First one, insert the title of your product. You can use generic product titles in naming your products. But if you want to establish a distinct brand, make sure to have unique names for your products for that elevated product perception.
Write a compelling product description
Fill the description field with your product copy. It could be a long-form description that details the product specifications, or a marketing oriented copy with calls-to-action enticing the customer to purchase it. We suggest spending enough time in writing your product descriptions as your potential customers will rely on these when deciding whether to purchase or not.
Upload product images
Upload photos of your products. When adding product images, make sure that these are of high-quality. Aim for studio-quality shots with uniform looks to establish a nice, branded look.
Categorize your product
Choose your product category. Shopify has some category templates pre-loaded for easier management. Choose the right category for your product because this is important for tax purposes. If you’re selling unique products, consult a tax professional to ensure how you would categorize it. If the categories don’t fit your product, select Uncategorized or contact Shopify support for help.
Fill out the product organization
Fill out the proper product organization attributes in the Product Organization box.
- Input the product type
- Select the vendor (since this is your first store, select your store from the options)
- Choose which collection page your product will be included
💡Watch this video to learn how to create a collection page:
- Under tags, input descriptive words that best describe your products. Or if you have a system of tagging products, apply it here. We highly suggest creating a tagging system because tags will help you automatically sort your products into collections.
Step 3: Indicate The Pricing
The third step on how to add products on Shopify
Pricing your products properly is the key to landing sales. Having too high a price could repel potential customers. On the other hand, pricing your products too low could give customers a perception that your products might be cheap.
As such, make sure to study how to price your products properly.

Within the pricing box, indicate the price of your product. This will be the retail price that your customers would see upon checkout.
The compare-at price should be higher than your retail price as this will show that your product has been marked down from a higher price.
Under cost per item, indicate your acquisition cost for that product (or the cost of goods). This will help your Shopify store automatically compute your profits.
After filling out the price and cost per item, the profit and margin will be automatically computed for you.
Lastly, tick the charge tax on this product box if your product is not tax-exempt.
Step 4: Fix The Inventory Details
In the inventory box, fill out the necessary information to help your Shopify store keep track of all the products that you have in stock.

Under the inventory will be stocked at section, choose where your inventories will originate when shipping. If you have a single location, choose that option. Otherwise, if you have multiple locations, choose that option.
Tick the track quantity box to make sure that Shopify keeps track of your stocks.
Under the quantity section, select the location where your product will originate. If you don’t have locations set yet, you can do that by going to settings > location > add location.
Read this guide for more detailed instruction: Shopify Location Help Center Guide.
We suggest ticking off the continue selling when out of stock to prohibit checkouts on out-of-stock products. On the other hand, if you accept pre-orders, you can activate this function.
Lastly, tick the this product has a SKU or barcode. This will reveal two boxes where you can type your product SKU and barcode. These two functions will help in your Shopify inventory management. Make sure that you have a system in creating SKU and barcodes.
Step 5: Specify The Shipping Details
Inserting the right shipping details will help your store automatically compute your shipping costs.

Unless you’re selling digital products on your Shopify store, you should have the this is a physical product box ticked to specify shipping details.
Insert the approximate weight of your products so the shipping carrier could compute how much to charge your for the shipping. Or if the customers pay for shipping, so they can know upon checkout how much they should pay for shipping.
Under country/region of origin, select where your product warehouse is located. After that, input the Harmonized System (HS) code for that specific country.
Step 6: Indicate The Variants
Variants are used for when a certain product has several variations. Such as if you’re selling a t-shirt that has several sizes, the variants will be the sizes.
If your product don’t have variations, skip this step. Otherwise, follow the instructions below.

Under option name, insert the name of the variant. In the example above, the variant name will be Sizes.
Under option values, this is where you will input the available sizes for your t-shirt, such as small, medium, large, etc. Insert all the available variants for your products.
After adding the variants, scroll down to specify the prices and availability for each of these variants.

Whatever variant that you add will be added here. Each variant will have its corresponding price and availability boxes. Fill out those details for inventory management. Make sure that each variant has its corresponding image so that when a customer selects a variant when shopping, an image will appear in your Shopify product page.
After filling out these variants, your customers will be able to choose the products that are applicable to them when they are in your product page.

Step 7: Write The Search Engine Listing
The penultimate step on how to add a product on Shopify is the search engine listing. This is an important step as it will help with the visibility of your store when customers search for products in Google.

Ideally, the page title for this product will be your product title. Take note that the page title will automatically be added to the end of the URL handle box. This will be the specific address of your product page.
In the meta description box, add a copy that invites potential customers to click on the link towards your store. This could be a call to action or simply a description of your product.
Make sure to naturally add SEO keywords in your product description.
Step 8: Publish Your Product
The final step on how to add a product on Shopify is to publish. When you publish your product, it goes live on your Shopify store and the customers can purchase it.

Before publishing it, select the active option in the status section to make it visible on your website. However, if you’re not yet ready to publish it, select draft.
Under publishing, select the applicable sales channel. This is where your product will be published. Assuming that this is the first time that you’re selling it online, the only option available to you will be online store.
Markets will be the audience that will see your products. If you just created your online store, the markets available to you will be country and international.
After that, click the save button located in the bottom-left corner of the page.
And there you have it, you now know how to add products to your Shopify store. After hitting the save button, your product is ready for purchase!
More Tips On How To Add Products To Shopify
Of course we won’t be sending you off without leaving some tips to make adding products to your Shopify easier.
Here’s some tips on how to add products on Shopify – courtesy of Shopify Magic – Shopify’s handy AI tool.
Tip #1: Use Shopify Magic To Write Product Description
This button here is called the Shopify Magic button. When your press this button, you will be presented with a couple of options where you can prompt AI in writing a product description.

Using Shopify Magic is pretty simple. Just type some descriptive words about your product in the space provided. After that select a tone (we chose relaxed) and click Generate.
And just like that, you now have a product description.

If you’re not satisfied with the output, you can click generate again and the AI will produce a different copy. You can also switch to a different tone for a different style. When you’re satisfied with it, click keep and it will be transferred to the product description field.
Tip #2: Use Shopify Magic To Create Studio Quality Images
Yes, you can use Shopify Magic to alter your product images such as removing and replacing their backgrounds for that elevated look. And you can do all that without leaving your Shopify admin or using another paid app.
Remember the product images that you uploaded? Simply select one from those images and Shopify will launch it in its image editor.

You can use this image editor to change the background color of your image. Simply click the color background menu and you can select from a variety of solid colors to add.
But where the real magic happens is when you click replace background. The key here is in the prompt. You can go wild with your imagination here so you can produce exciting results.
Just take a look at the example below.

As you can see, from its previous pastel-colored background, we’ve transported our subject to the streets of New York.
In replacing a background using Shopify AI, make sure to describe the subject properly so the AI can properly isolate it. And in describing your ideal background, use commas to separate each element in the background.
Lastly, start off with a high-quality image so Shopify AI can properly identify your subject. This will also help you produce better results where the subject matches the background.
There you have it! You no longer just know how to add products to your Shopify store, you also know how to take advantage of AI to elevate your experience.
Let's say you have a set of new products hitting your store that you want your customers to know about. But they aren't ready for sale yet. How do you go about this?
How To Add Coming Soon Product On Shopify
Before we end this article we want to leave with one more Shopify hack to maximize your sales.
Let's say you have a set of new products hitting your store that you want your customers to know about. But they aren't ready for sale yet.
How do you go about this?
Well, you need to know how to add coming soon product on Shopify. When learning how to add products to Shopify, you’ll find that you can mark items as “Coming soon” to create anticipation and inform your customers of future availability. This tactic is commonly used in online stores to keep customers informed while maintaining excitement for new product launches.
Case in point, take a look at Fashion Nova:

They are great for inculcating anticipation amongst customers, which is a powerful marketing strategy. The best part is that you can have "Coming soon" products on your Shopify store, too!
But before that, let's understand why this feature is important.
- "Coming soon" products, along with a "Notify me" button, can help you understand the demand and allow you to make informed inventory decisions based on customer interest.
- Teasing upcoming products on social media can lead to increased shares and engagement. Customers excited about the prospect of a new product are likely to share the news with their network, expanding your brand's reach organically.
Although Shopify doesn't have any inbuilt feature to enable this, you can still enable this feature in two ways.
Using your Shopify theme

Source: Shopify App Store
Most themes such as Flex, Turbo, Retina or Parallax would have a separate feature for this. In that case, all you need to do is go to Shopify Admin > Products > Collections. There, you can create a new collection called "Coming Soon."

In the illustration above, you can see that creating a “Coming Soon” collection page is very easy. Do note that before you can save the collection page, you need to fill out the page details.
After inputting all the needed information, you can now click “Save” and the page will be published on your online store.
Using Shopify apps
Another way on how to add coming soon product on Shopify is by using apps. Luckily, you can find plenty of these in the Shopify app store.
Simply type “coming soon” in the search bar and you’ll find a list of apps that you can use.

One of the most promising reasons to use Shopify is the Shopify app. You can find an app for anything and everything in the Shopify Apps store. Simply search for "Coming soon" on the product page, and you will be able to find several apps with different features to enable your store.
Knowing how to add a product on Shopify can be enhanced by integrating these apps, which streamline the setup and customization process for your store’s products.
Conclusion
Learning how to add products on Shopify is one skill that you should master. And as you now know, doing it not so hard. Make sure to follow the steps provided above to ensure that your on the right track.
Also, don’t forget to take advantage of Shopify Magic to make your work more efficient.
There you have it. Our work here is done. It’s now your turn to chase that ecommerce success you’ve been craving. Best of luck with your new business!
How To Add Product On Shopify FAQ
Adding a product for the first time in your Shopify store is easy:
- Go to your Shopify admin.
- Click the Products menu and then click Add product.
- Enter the Title and Description of your product.
- Insert all the necessary information such as size and weight for easier shipping calculation.
- Insert the product category and product tags so you can automatically sort your products in your store.
- After filling out all the necessary information, click Save, and your product will be live on your Shopify store.
Yes. In fact, Shopify is the best ecommerce platform that you can use for dropshipping because there are purpose-made dropshipping apps available for Shopify. Some of these apps include:
- DSers-AliExpress
- CJDropshipping
- Spocket
- SupDropshipping
- Printify
Product categories are tags that are assigned to individual products. They are used to determine tax responsibilities and exemptions associated with a specific product. These product categories are pre-defined by Shopify’s Standard Product taxonomy.