Whether you are considering Shopify data migration or exploring how to migrate website to Shopify, this guide will help you navigate the process smoothly.
💡We meticulously evaluate Shopify themes and apps based on our hands-on experience. Read more about our comprehensive review process and methodology.
Migration for Shopify
Migration for Shopify, known as re-platforming, is the process of transferring information, data, content, or integration from your old online store to the new online store on Shopify. This Shopify migration process involves Shopify data migration and understanding how to migrate website to Shopify effectively. Migrating to Shopify ensures that all essential elements of your previous platform are seamlessly integrated into your new Shopify store.
Why Should You Migrate to Shopify for Your Online Store?
Reliability: It is imperative for enterprises to carefully select a platform upon which they can place complete trust. Shopify offers a dependable solution, equipped with exceedingly efficient servers capable of efficiently managing numerous requests concurrently.
Easy to use: Shopify is widely recognized as the most user-friendly platform for constructing and selling online stores. This platform enables merchants to commence online sales without requiring any technical expertise. By utilizing the drag-and-drop editor, merchants can effortlessly construct their online stores and incorporate products for sale through the platform. This ease of use is one of the reasons why many businesses opt for Shopify migration. When you migrate website to Shopify, you take advantage of its intuitive interface and comprehensive tools.
Professional Themes Library: Shopify provides a large number of professional themes and Templates that help you create your store well-building and professional, encouraging visitors to make purchase decisions. It includes free themes and paid options for you to try or explore more with Shopify.
Large quantities Shopify Apps: Besides searching for useful information through the Shopify site, you can get more features, free themes, paid themes, and helpful apps from the Shopify App Store. In this app store, merchants can find thousands of other free themes and paid apps for different purposes; customization, marketing, product sourcing, and accounting are a few. You can also find 3rd Party Integration Apps in the Shopify Store that can help you migrate to Shopify and build your online business better.
Third-Party Integrations: Shopify is a platform that is amenable to integration and facilitates the connection of third-party integrations, including payment gateways, CRM, and ERP. This feature enhances the efficiency of backend operations for merchants.There are many third-party integration apps for you to choose from to improve your Shopify store.
Robust Security: Shopify is indisputably one of the most secure current e-commerce platforms. It is equipped with a pre-installed SSL certificate for the stores hosted on it and consistently implements updates to safeguard against vulnerabilities. Additionally, the platform has obtained PCI DSS certification, providing customers with the assurance of secure online payment transactions.

What data can you transfer to your new Shopify store?

Product Data: You can transfer product data (product name, complete description, product images, product prices, linked UR, product meta title and description), unique variants,... etc. in reports. It’s available with both individual products and group products.
Order Data: Transfer all pertinent order information, including the order identification number, order status, date of order creation, and product details of the products ordered. There are total quantity, respective prices, cost, subtotal, applicable discounts, taxes, delivery fees, accompanying order comments, as well as the customer's name, delivery address, and billing address.
Customer Data: Customer Data customers migrated from your existing store including first name, middle name, last name, addresses, contact details, order history, etc.
Pages Content: You can migrate the content of your pages on the site search side of your store like the home page, contact us pages, about us pages, blogs page, and other pages for site search.
Other Data: Shopify migration data also includesother data such as reviews, discounts, and coupons.
Can You Transfer a WordPress Site to Shopify?
Indeed, it is feasible for WordPress users when migrating to Shopify to transfer all of their WordPress content and data to a Shopify domain. This can be accomplished through a manual migration which means utilizing CSF files, or you may opt for an automated approach by employing a migration platform.

Image source: heycarson
Prepare before migrating to Shopify
The Investment: It will be necessary to maintain the operation of your current website during the transition process. You need to pay for your current CMS besides your hosting costs, domain name fees, and other site maintenance fees. You can likely end most of these ongoing subscriptions within a month or so of the transfer. About Shopify payments, you can also have to pay for Shopify Plan. you can save money by prepaying for the year, which brings it down to $29 per month for Basic Plan.
The time needed: Less than a week, it can transfer within a few days depending on your website size.
How to Migrate Website to Shopify in 11 Steps
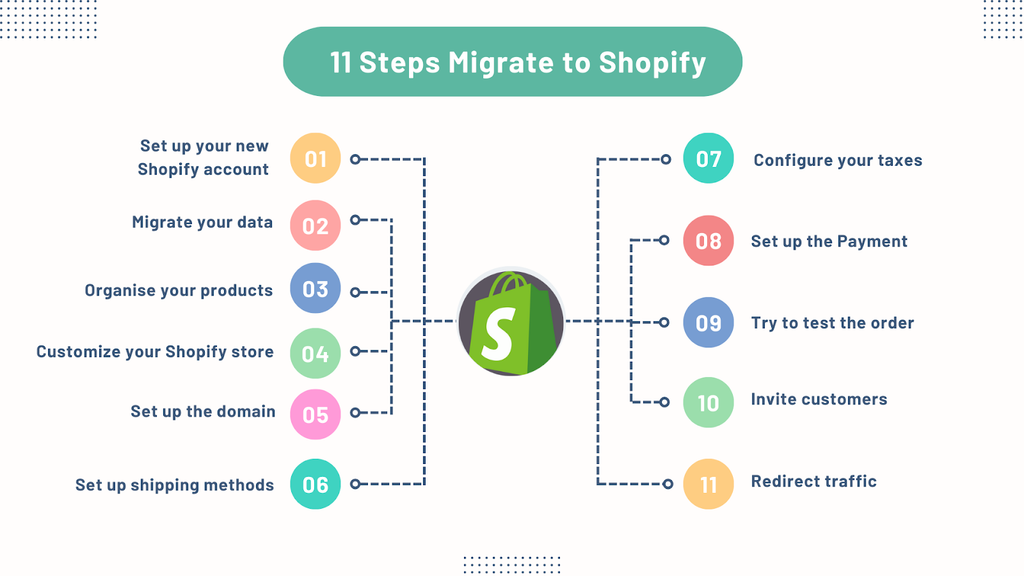
Step 1: Set up your new Shopify account
The first thing you need to do is create your new Shopify account. Follow the steps below or skip them all.

Choose where you currently selling through

Then you Choose the option for other questions as your information.

You can set up all of your administrative settings, staff accounts, billing information, and basic details by the way go to the settings tab on the Shopify dashboard going to the store details then editing your information.

Step 2: Migrate your data from your old site or online store to your new site at Shopify
The migration process entails duplicating your previous website onto the preferred eCommerce platform. Your existing website often encompasses a multitude of data, including images, blogs, customer information, and transaction records. Depending on the scale of your enterprise, it is imperative to determine the specific data to be transferred. Various alternatives exist for migrating the data including in this table:
Data | Migration Options |
Products | CSV file, Product API, Shopify App Store |
Customers | CSV file, Customer API, Shopify App Store |
Historical orders | Order API, Transaction API, Shopify App Store |
Gift cards, certificates, store credits | GiftCard API, Shopify App store |
Blogs | Blog API, Blog Article API, Shopify App Store |
Pages (shipping policy, contact, and other web pages) | Page API, Shopify App Store |
Product reviews | Shopify Product reviews app, Shopify App Store |
Select a suitable option with your data type. You should transfer the old website’s customer data, in the sequence of Products > Customers > Orders to access your customers’ complete history to your migrated store to Shopify. Store.
Example import your product data: Click on products in the Shopify dashboard => import by CSV (This CSV file you download from your store) => add file CSV => Upload and preview.

Step 3: Organize your products
Step to verify your products after migration:
In this step, you need to recheck your product information because sometimes the migration can have trouble that makes wrong information or variants.

You can group your products into categories with the collections feature:
Go to the Collections tab in the Shopify dashboard => Create collections
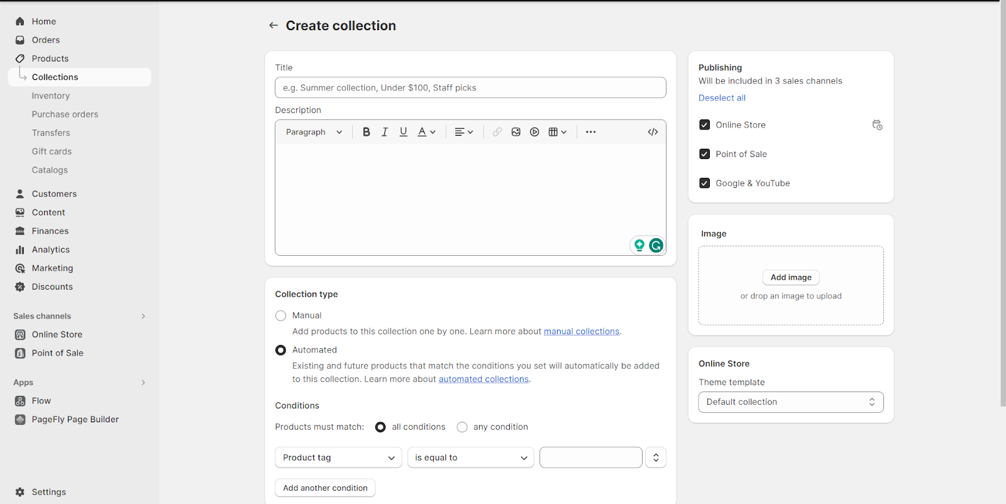
There are 2 options for you for collection types: manual and automated. Manual that you can add your product one by one. In the other type, automated you can group existing and future products into a group with some specific conditions
Step 4: Customize your Shopify store
You can use Free themes provided by Shopify when you begin. If you want to find more themes you can go to the Shopify themes store. It has varieties quantities of free themes and paid themes for you to choose from.
To add a theme for your online store:
With Shopify Theme Store

- You can add a free default theme from within the admin.
- You can buy a paid theme from the Theme Store.
- There are many types of themes you can choose from in the Shopify Themes Store. With free themes, you can publish your store immediately after you have edited your store. But with paid themes, you need to pay for it if you want to publish. Each theme will display the price in the Shopify Themes store. You can check its price and preview it before deciding to buy it.
Step 5: Set up the domain
You can get a new domain in Shopify or purchase a domain from registrar services.

Step 6: Set up shipping methods
Open the settings tab on the Shopify dashboard => Shipping and delivery

- Add your shipping address to get accurate shipping rates based on your location.
- Create shipping zones to enable shipping to different regions, states, and countries.
Read more: Etsy to Shopify: 5 Key Reasons to Make the Switch for Your Online Business
In Shipping => General shipping rates => Create zone

- Please configure the dimensions of your shipment if you intend to utilize carrier-calculated shipping rates. Numerous carriers employ volumetric weight, which takes into account the height, weight, and depth of a package, to determine the shipping charges
- Set up shipping rates for the shipping zones that you've created.

- Before making a decision you can check some options to sell or search some reviews of shipping departments. After that, you can make a plan and choose a suitable one. Check your service and decide whether Shopify shipping department or you have a shipping policy by yourself.

Step 7: Configure your taxes
It is essential to establish tax regulations for your products based on your location. Once taxes have been applied to your products, it is important to maintain accurate records. If you have applied taxes based on a specific region or state, the sales tax and rates for that area will likely change over time. Failing to keep track of these changes can result in miscalculations and potential legal issues.
Setting => Tax and duties => manage sales tax collection.

Shopify will automatically apply tax rates depending on the shipping zone
To keep track of your tax rate you can use some accounting applications: Quickbooks, Xero, and Sage,... on the Shopify App Store
Step 8: Set up the Payment
Ensuring the ability of payment providers to receive payments from customers is unequivocally a paramount concern for any E-commerce enterprise. Two viable alternatives for payment providers are available for consideration. Firstly, the utilization of Shopify Payments for integrated processing and payment providers. Secondly, the employment of a third-party payment provider that is endorsed by Shopify.
Active Shopify payment: Setting => payment => active Shopify payment

Add payment methods: Setting => Payment => Supported payment methods: add payment methods

Step 9: Try to test the order
It is recommended that you conduct a few transactions to ensure the proper functioning of the system. Performing a trial purchase will enable you to comprehend the purchasing process that your customers undergo while procuring your merchandise.
Some different types of transactions you can test:
- Completing a successful and a failed transaction
- Refunding and canceling an order
- Fulfilling or partially fulfilling an order
- Archiving a successful order

Add an item to your cart and check out

Fill in your information and check the shipping method and payment
Step 10: Invite customers to create accounts in your new store
It is important to note that during the process of importing all customer data to the Shopify store, customer passwords are not transferred. Therefore, it is necessary to extend an invitation to customers to create an account on the migrated Shopify store. This invitation can be sent through various means such as email, text message, or social media platforms including Facebook, Twitter, or WhatsApp.

Image Source: TycoonStory
For those with a large customer database, the Shopify App Store offers a variety of applications that can be utilized to generate and send invitation links to customers. Additionally, those migrating to Shopify Plus can take advantage of the Bulk Account Inviter app to facilitate the invitation process.
You can also use some Customer Account App to improve your Account Page with a tailored-made account portal, multi-functional customer dashboard, Loyalty and Rewards program, Wishlist, Custom registration form,..etc, to increase the lifetime value of your customers and drive repeat sales
Customer Accounts Concierge

Rating: 5/5 (236+ Reviews)
Launched: December 1, 2021
Languages: English, Spanish, Portuguese (Brazil), French, Italian, and German
Categories: Loyalty and rewards, Customer accounts - Other
Works with Rivo, Seal, Smile, Bon, Loop, Recharge, Appstle, Klaviyo, Return Prime, Parcel Panel, Aftership, 17 Track, Wishify, Wishlist Hero, Wishlist Plus, Paywhirl, Vify, Orderify
Attractive Features:
- Loyalty program, Loyalty points, Rewards program
- Customer registration form, email verification, account approval
- Wish list integrated directly into the customer portal
- Social login - Facebook, Google, Twitter, Amazon, LinkedIn, Apple
- 26+ integrations with CRM app tools: rewards, subscriptions, order management…
Customer Accounts Hub

Rating: 5/5 (73+ Reviews)
Launched: November 29, 2021
Languages: English
Categories: Accounts and login, Customer accounts - Other
Works with Sufio, Vify, Wishlist Hero, 17 Track, AfterShip, Appstle, Bon, Customer Fields, Growave, SendOwl, Klaviyo, Paywhirl, Parcel Panel, Recharge, Rivo, Return Prime, Seal, Smile
Attractive Features:
- Natively load any page in your accounts and add custom menu links & integrations
- Capture critical data for marketing by adding custom fields to your profiles
- Send targeted emails & SMS via Klaviyo using our profile custom fields feature
- 69 Shopify App integrations available to further enhance your account features
- Plus - Reorder, Recently Viewed, Order History, Profile & Password Editor & more
Step 11: Redirect traffic transfer customers to your new Shopify store
Steps to URL redirects:
- Log into your old store, eCommerce store, e-commerce site, or current e-commerce platform, and find the URL redirects section in the account setting.
- The location of the URL redirects option varies by platform. If you cannot find it on-site search, use the help option of the current platform.
- When you find it, enter the old URL in the From section and the new Shopify URL structure
Online store => Navigation => URL redirects.

- Now, repeat the process for all the pages you want to redirect.
- You can also check out our step-by-step tutorial migration from Wix to Shopify for more details.
Shopify Migration Service

According to Shopify, If you want to Migrate your data, besides the way you copy and paste from your old website you also can use:
- Use existing migration apps from the Shopify App Store
- Create (or hire a partner to create) an app that uses the Admin API
So that migration apps or partners will provide services to help you migrate your data (Shopify Migration Service).
Should you use Shopify Migration Service?
If you want the Migration to do well and fast, you don’t have any experience so you can use Shopify Migration Service through Migration Apps from the Shopify App Store or Hire an Expert to help you migrate to Shopify or migrate your store to Shopify yourself.
Top Legit Shopify Migration Service Suppliers
There are many Migration Service suppliers that can help you migrate to Shopify. In this blog, I will introduce to you three legit suppliers from the Shopify Apps Store
1. LitExtension Store Migration

Rating: 4.7/5 (260+ Reviews)
Launched: November 27, 2019
Languages: English
Categories: Store data importers
Works with: Magento, WooCommerce, BigCommerce, PrestaShop, WIX, CSV/Excel Files
Attractive Features:
- Migrate from more than 140 eCommerce platforms to Shopify
- Bulk import data using Excel, Google Sheets, CSV files or database files
- 3-step setup, no technical skill required, 24/7 customer support
- Additional options: 301 Redirects, SEO URLs migration, etc.
- Post migration: Unlimited Recent Migration, Smart Update, and Re-migration
2. Matrixify

Rating: 4.8/5 (493+ reviews)
Launched: July 7, 2017
Languages: English
Categories: Bulk editor, Store data importers
Works with Shopify Flow, Google Shopping, Google Sheets, Custom Format Integrations, FTP/SFTP, Google Drive, Dropbox
Attractive Features:
- Import and Export data using Excel, Google Sheets, or CSV files.
- Migrate from Magento, WordPress/WooCommerce, BigCommerce, Lightspeed, and others.
- Backup and restore your data.
- Schedule and auto-repeat Export and Import jobs.
- Monitor and control Export and Import jobs as they happen, see job history.
3. Cart2Cart Store Migration App

Rating: 3.9/5 (245+ Reviews)
Launched: November 12, 2014
Languages: English
Categories: Store data importers
Works with Magento, PrestaShop, Woocommerce, OpenCart, BigCommerce, Wix
Attractive Features:
- Store Migration App supports all popular eCommerce platforms for migration.
- Test the service in action to see how your data will look on the new platform.
- The App speeds up the transfer & allows you to focus on business objectives.
- The App imports the widest list of data compared with other tools of its kind.
- The App guarantees secure and accurate data migration to Shopify.
Conclusion
After reading this Blog, You can learn basic information about migration for Shopify, the potential of Shopify migration with an e-commerce platform, what data can you Migrate from your store to Shopify, and get to know step-by-step how to prepare and migrate your website to Shopify. Besides migrating to Shopify by yourself you can use Shopify Migration Service from some legit Suppliers I have suggested. Thank you for reading and see you in our next blogs.
You might want to read: How to Migrate Shopify to Shopify: The Complete Guide [2024]





![27 Best Shopify General Stores + Complete Strategy Guide [2025]](http://pagefly.io/cdn/shop/articles/Best_Shopify_General_Stores_2f9d09f2-7c38-4da9-a495-e9f4898ddd68.jpg?v=1757271936&width=1640)

