An online store will eventually need to expand its area of operations. This expansion involves adding stores and warehouses for optimized growth.
In the case of online businesses with locations around the globe, setting up Shopify Locations can prove tremendously helpful to their global online operations.
Having Shopify Locations will not only make managing inventory a breeze but also hasten shipping times and provide better service to online customers.
This guide will go through how to add Shopify locations to your store and fully utilize them to your advantage. Let’s dive in!
What are Shopify Locations?

Source: Wikimedia Commons
Shopify Locations allow you to oversee and manage your business’s various locations from a single hub, which is part of how Shopify works to simplify business management. This includes routing orders, tracking inventory, processing returns, and offering local delivery or pick-up.
Each Shopify Location represents a particular store or warehouse. You may have a Shopify Location in New York, New Delhi, Tokyo, or wherever else your company stocks inventory and does business.
Shopify Multiple Locations: The Benefits of Setting Up Multiple Locations
The benefits of setting up Shopify locations include:
- Easier inventory management for multi-location stores, or even for a single or one product Shopify store. Shopify’s robust inventory management system enables businesses to manage stock across multiple locations seamlessly.
- Quicker order fulfillment. Shopify optimizes order fulfillment by sending orders to warehouses nearest to the shipping destination. This results in quicker order fulfillment and shorter customer waiting times.
- Improved buyer experience. Location features such as local delivery and pick-up widen a merchant’s sales opportunities, effectively catering to a new market. These options, in addition to shorter shipping wait times, boost the buyer experience.
How to Set Up and Use Shopify Locations
We’ve condensed the entire Shopify location process, from setup to implementation, into an easy-to-follow three-step plan.
These steps include preparing a location to sync with Shopify, registering locations with Shopify, and integrating the locations into your day-to-day business operations.
Step #1: Prepare a Location to Sync with Shopify
You’ll need to prepare each location to sync with your Shopify account’s actions (e.g., order routing, inventory management, etc.) before setting them up from Shopify settings.
That way, whether you’re routing orders or managing inventory, the process is streamlined and organized with the operations of each physical Shopify location.
We’ve enumerated three different methods for this first step—adding location staff to the plan, setting up custom fulfillment services, and setting up email notifications.
Method #1: Add Location Staff to your Shopify Account

Source: Centre for Ageing Better on Unsplash
You may give warehouse staff seats in your Shopify account.
That way, staff from each Shopify location can directly make changes to each location’s stock and fulfill orders themselves.
Note: Only Shopify, Advanced, and Plus plans allow staff accounts. You’ll get 5, 15, and unlimited staff accounts for these plans, respectively. Shopify Starter and Basic plans DO NOT grant staff accounts, so only the owner may use the Shopify account for these plans.
To add staff, go to Shopify’s Settings - Users and Permissions.
Click Add Staff.
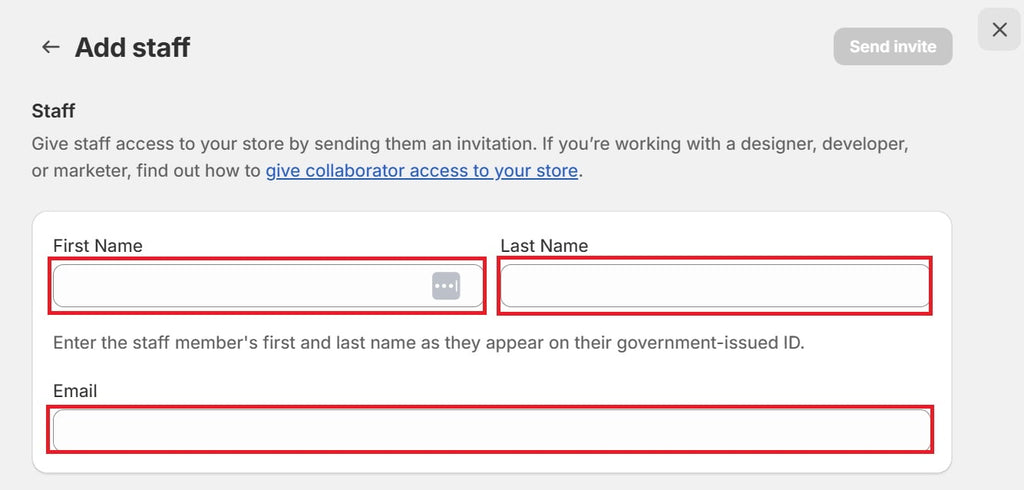
Fill in their First Name, Last Name, and their Email. They will use this email to log in to their Shopify seat.
Tick the permissions you want to grant them.
You wouldn’t want warehouse staff making changes to the website or tinkering with the theme code. We suggest giving them the following permissions:
- Orders
- View
- Fulfill and ship
- Products
- Inventory - Manage
Ideally, store staff should have access to the Point of Sale in addition to the above permissions. This is considering that store staff deal with face-to-face, on-location sales. Giving store staff access to the POS will sync sales and inventory data from your physical stores with your Shopify account.
You may edit these permissions later if you change your mind.
Click Send invite once you’re done granting permissions.
Method #2: Set Up Custom Fulfillment Services
Instead of registering your warehouses as Shopify Locations, you may register them instead as custom fulfillment services.
The benefit of this is you don’t consume your allotted locations (The Basic, Shopify, and Advanced plans have a location limit of 10).

Source: Freepik
Setting this up will send automated emails to your warehouses whenever you receive an order.
Before setting up custom fulfillment services, you’ll need an email from each of your warehouses. Keep these emails saved.
Note: A Shopify product can only be assigned to one custom fulfillment service. Keep this in mind when using this method. You might register each warehouse as its own fulfillment service on Shopify. Note that no two “fulfillment services” can stock the same Shopify product.
Now, to set up custom fulfillment services:

- Go to Shopify’s Settings - Shipping and delivery.
- Under Custom order fulfillment, click on + Add fulfillment service.
- Fill out the Name and Email then click Save.
Great! You added a fulfillment service on Shopify.
Now assign a product to this fulfillment service.
- From the Shopify admin, go to Products.
- Click on a Shopify Product you want to assign to a fulfillment service

- Scroll down to the Inventory section
- If the product has variants, you’ll need to select a variant and then scroll down to Inventory.
- From the “Inventory will be stocked at” dropdown, select the name of the fulfillment service you created earlier.
- Save your changes.
- Do this for every Shopify product you want to stock at your ‘fulfillment services’ (which, in this case, are your physical warehouses).
Whenever an order containing the product you’ve assigned to a fulfillment service comes through, you’ll see the option to ‘Request fulfillment’ in the order fulfillment section from Orders.
Clicking ‘Request fulfillment’ will immediately send an email to the warehouse for them to fulfill.
Note that this means order fulfillment will be in that warehouse’s hands. But if anything goes wrong, the customer will approach your customer service, not the warehouse.
Method #3: Set Up Email Notifications

You may set up email notifications to notify staff about new orders and requested returns. This is an excellent alternative if you don’t have staff accounts or have run out of them.
Email notifications are an excellent option for Basic users since the Basic plan doesn’t allow for staff accounts.
To set up Shopify tracking and email notifications for warehouse and store staff,
- Go to Settings - Notifications.
- Select Staff Notifications.
- Click on + Add Recipient.

- Input the email of the Shopify location staff you’d want to be receiving email notifications. Ensure this is an active email that alert staff would stay on top of.
- In the ‘Receive notifications for’ dropdown, select Online Orders.
- Finalize by clicking Add recipient.
Great! Now, you’ll need to set up an internal order fulfillment system with the warehouse, training them to monitor email notifications.
Note: Unlike the first method, ‘Add Location Staff to your Shopify Account,’ staff cannot manage warehouse inventory or fulfill orders themselves. All they’ll have are email notifications that alert them on when to ship out orders and process returns.
Step #2: Set Up Shopify Warehouse Locations

Source: Wikimedia Commons
After you’ve synced your physical locations with your Shopify account, you may add them as Shopify locations from Shopify Settings.
“Shopify warehouse locations,” if you will.
That way, Shopify will automatically route orders to each of these registered locations depending on 1) the ordering customer’s shipping address and 2) availability of stock in each registered location.
Note: The rest of this guide will only be compatible with Methods #1 and #3 from the previous step unless stated otherwise.
- From the main Shopify dashboard, go to Settings - Locations.
- Click on Add Location.

- Fill in a Name and an Address for a corresponding store or warehouse.
- Make sure ‘Fulfill online orders from this location’ is ticked.
- Click Save to add the new Shopify location.
Do this for every store and warehouse your online business utilizes.
Once that’s done, Shopify will now recognize your warehouses’ locations.
If you’ve followed Steps #1 and #2 correctly, your warehouses should now be primed to receive routed orders and synced activities.
Step #3: Integrate your Shopify Locations into your Operations
After you’ve set up your Shopify locations and synced them with your physical warehouses, you may now assign select inventory to those locations, set up pick-up and delivery, and fulfill orders through those locations.
How to Assign Inventory to Locations

Source: Wikimedia Commons
Setting Shopify Inventory Location for each of your products lets you track inventory across store locations. Companies with exclusive products for different geographic markets can benefit from this utility.
Shopify lets you see warehouse stock from a single, unified dashboard. Note that this doesn’t completely replace dedicated warehouse management systems, especially if you have a massive catalog.
Nonetheless, updating inventory quantity will help the system route orders to warehouses that have available stock.
It also helps you keep track of inventory across all your locations.
To do that, first, you’ll need to edit each Shopify Product’s locations.
- From the main dashboard, click on Products.
- Select a Product.
- Scroll down to Inventory and click on Edit locations.

- Tick on the locations that stock inventory of the product and hit Save.
New rows will appear, each corresponding to a Shopify location. You and your staff may now update the inventory for the warehouse and store locations.

There are four columns you’ll want to take note of — onhand, available, committed, and unavailable. In most cases, you’ll only need to update the ‘on hand’ column.
The easiest way to update inventory involves:
- Underneath the ‘on hand’ column, click on the dropdown next to the number
- In the ‘New’ field, input the correct quantity for the respective Shopify product.
- Select a reason for the adjustment from the ‘Reason’ dropdown
- Do this for every Shopify location.
Note that Shopify will automatically update the quantity as customers order from your online shop. But in cases where you restock inventory outside of the Shopify platform (e.g., shipment from a supplier), you’ll have to adjust your inventory accordingly using the bullet points above.
Make sure your warehouse staff is trained on this process as well. This will make inventory management much easier.
Pro tip: From the Shopify admin, navigate to Products - Inventory for a better overview of your inventory.
How to Fulfill Orders from Shopify Locations

Source: Redcharlie on Unsplash
Your Shopify locations may ship and fulfill orders for your Shopify store.
Not only does this mean a faster order arrival for the customer, but also a more efficient order fulfillment process.
Depending on how you set up and integrate your Shopify locations with your order fulfillment process, you’ll reduce workload and headaches for your team.

Source: Wikimedia Commons
By default, Shopify will automatically assign orders to locations based on proximity and available inventory. Provided that you ticked on ‘Fulfill online orders from this location’ for each Shopify location you’ve added in Step #2.
The order routing and fulfillment configuration, at this point, should be properly set up already. No further tweaking required.
But if you wish, you may tinker with the order routing settings.
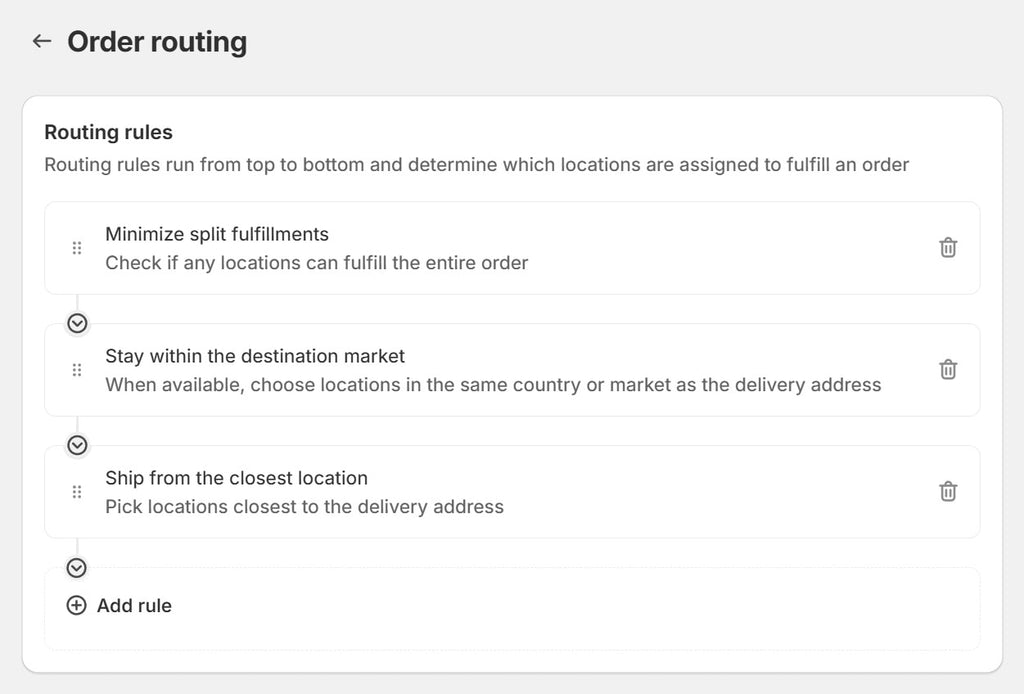
To do that,
- Go to Settings - Shipping and delivery.
- Scroll down to the ‘Order routing’ section.
- Click on the ‘3 routing rules active’ box.
- You may move the rules around based on the order you want Shopify to follow them.
- Click Save.
You can fulfill online orders like you normally would from Orders.

Pro tip: Organize the orders by location by adding a Destination column. That way, your warehouse staff will immediately see which orders are under their fulfillment. To do that, click on Edit Columns (the three-column icon).
Go to Orders from the Shopify admin panel.
Scroll horizontally and look for the Destination column. Drag it into immediate view and toggle on visibility.
Once that’s done, you’re set to fulfill orders. Bulleted below is the step-by-step for order fulfillment.
- Click on the Order you wish to fulfill.
- Notice the 'Location' indicated on the order. This corresponds to the Shopify Location that will fulfill the order.
- Click on Fulfill item.
- If you’ve followed Method #2 in Step #1, you’ll see ‘Request fulfillment’ instead.

- Click on Print packing slip. You’ll need to print and attach the packing slip to the parcel.
- After you ship out the item, input a tracking number and a shipping carrier. This is optional but it will help improve customer satisfaction.
- Finalize by clicking on Fulfill item.
Now wait for the customer to receive their order. Also, be sure to train warehouse staff on order fulfillment.
How to Set Up Pickup and Delivery with Shopify Locations

Source: Freepik
In Shopify, pickup and delivery let merchants offer immediate and direct service to a nearby market.
Having pickup allows customers to go directly to a location (e.g., store, warehouse) and claim their order from there.
Local delivery, on the other hand, lets merchants deliver orders within a serviceable area.
Both pickup and local delivery unlock a business’ opportunities to cater to the immediate (and cost-efficient) market.
Setting these up provides quicker service, especially to nearby patrons. To do that,
- Go to Settings - Shipping and delivery.
- Scroll down and you’ll see a ‘Local delivery’ and ‘Pickup in store’ section. Let’s start with the latter.
- Click Set up next to ‘Pickup in store.’

- Select a location and tick on ‘This location offers in-store pickup’
- Choose an expected pickup time and fill out the pickup instructions.
- Click Save and do this for every location that you’d want to offer pickup from.
Make sure the pickup warehouses have a proper, functioning pickup system. That way, you won’t frustrate customers who come to pick up their order.
Setting up local delivery follows the same process. But you’d want to ensure your warehouses have a cost-efficient means of delivering orders first.
If you do, follow these next steps:
- Navigate to Settings - Shipping and delivery - Local delivery.
- Select a location and tick on This location offers local delivery.

- Set your delivery zones. You may choose between PIN codes or a delivery radius.
- Click the three dots, then Edit to set a delivery zone, prices, and input delivery information.
- Click Save once you’re done.
- You may click + Add Zone to add another delivery zone.
Customers within these zones can opt for local delivery at checkout.
If they do, they’ll be required to place a contact number and delivery instructions for the courier.
Conclusion
Locations are a potent feature for your Shopify store. They allow you to manage inventory quantity across your many locations and fulfill orders from said locations. These benefits, in turn, provide an overall faster and more reliable service to online consumers.
So empower your growing store now with Shopify locations and make your global operations a breeze!
Shopify Locations FAQ
Shopify Locations are physical or operational sites where you store inventory for your store. These can include warehouses, retail outlets, or any space designated for stocking items. They allow you to track and manage inventory in multiple places and support order fulfillment from different geographic locations.
To add a location on Shopify, go to Settings and select Locations. Click on "Add Location", complete the necessary information, and then click "Save". This will add a new inventory and fulfillment location for your store.
In Settings under Locations, select Add Location and ensure that the option "Fulfill online orders from this location" is checked when entering location details. Click Save to complete. Repeat this for each additional location you'd like to add to manage multiple fulfillment centers or inventory locations.




![27 Best Shopify General Stores + Complete Strategy Guide [2025]](http://pagefly.io/cdn/shop/articles/Best_Shopify_General_Stores_2f9d09f2-7c38-4da9-a495-e9f4898ddd68.jpg?v=1757271936&width=1640)

