


You rent your checkout; you own everything before it. Here is what each Shopify plan lets you change at checkout, what the August 26, 2026 auto-upgrade did to your store, and where the conversion work actually lives.
The Shopify checkout page is Shopify-hosted software, not a theme template. You cannot open the code, you cannot move the fields, and what you can change is decided by your plan, not by your developer.
Two things have changed since most guides on this topic were written. The checkout.liquid era is fully over, and the August 26, 2026 deadline for non-Plus stores to upgrade their Thank you and Order status pages has passed. Shopify's help center now states that stores which had not upgraded by that date were upgraded automatically. If you never touched that setting, your post-purchase pages changed without you.
So this guide does three jobs. It shows the exact customization ceiling on Basic, Grow, Advanced and Plus. It gives you a post-upgrade checklist to confirm nothing important was lost. And it makes the case, with Baymard's abandonment data, that you rent your checkout and own everything before it, which is where most of the abandonment is created in the first place. For the end-to-end flow, start with our Shopify checkout overview.
Key takeaways
- You rent your checkout; you own everything before it. Checkout is configured in the checkout and accounts editor (Settings → Checkout), never in the theme editor.
- Every plan gets branding. Logo, color palette, fonts, one-page or three-page layout, order-summary background, and app blocks on the Thank you and Order status pages (up to 3 apps per area).
- Plus unlocks structure. App blocks on the Information, Shipping and Payment steps, custom Shopify Functions apps and the Checkout Branding API are Plus features. Plus starts at $2,300/month.
- August 26, 2026 has passed. Non-Plus stores that had not upgraded their Thank you and Order status pages were upgraded automatically. Script-based tracking on those pages needs checking now.
- Of Baymard's eight fixable abandonment reasons, only two are checkout settings. Account forcing (18%) and a long checkout (17%). The other six, led by extra costs at 40%, are answered on product, cart and landing pages you fully control.
What is the Shopify checkout page?
The Shopify checkout page is the Shopify-hosted, PCI-compliant set of screens where a shopper enters contact, shipping and payment details and places an order. It does not live in your theme files. Shopify runs it on your behalf, which is why the list of things you can change is short and tied to your plan.
That is the whole distinction. Your homepage, product pages and landing pages are theme files, so you can rebuild them any way you like. Checkout is rented space: you can repaint the walls, and Shopify decides where the walls go.
You configure it in the checkout and accounts editor, opened from Settings → Checkout → Configurations → Edit. Shopify's help describes it as one place to manage checkout, order status, thank you and customer account pages, separate from the theme editor. Depending on your layout setting it shows either a single Checkout page (the default, covered in our guide to Shopify one-page checkout) or three pages named Information, Shipping and Payment, plus the Thank you page and the customer-account Order status, Orders, Profile and Sign-in pages.
At a glance, on every plan you can change: logo, colors, fonts, layout, order-summary background, checkout wording, and the blocks that appear on the Thank you and Order status pages. On every plan you cannot: edit checkout code, add or remove fields on the payment step, or upload your own font file. Plus moves the line for apps and logic, not for code.
If you are still choosing a tier, our breakdown of Shopify pricing plans maps each one to what it includes beyond checkout.
What you can customize by plan
Here is the plan-by-plan reality, sourced row by row from Shopify's help center. US prices from shopify.com/pricing on September 7, 2026, billed monthly: Basic $39, Grow $105, Advanced $399, Plus from $2,300. Yearly billing brings the first three down to $29, $79 and $299 per month.
| Customization | Basic ($39/mo) | Grow ($105/mo) | Advanced ($399/mo) | Plus (from $2,300/mo) |
|---|---|---|---|---|
| Logo, logo width and alignment (Checkout style) | Yes | Yes | Yes | Yes |
| Color palette: header, main area, buttons, accents | Yes | Yes | Yes | Yes |
| Typography, chosen from Shopify's font list | Yes | Yes | Yes | Yes |
| Order-summary background color or image | Yes | Yes | Yes | Yes |
| Header or Main background image | No (removed Feb 5, 2026) | No | No | No |
| One-page or three-page layout (One-page checkout) | Yes | Yes | Yes | Yes |
| Checkout wording and translations (theme content editor) | Yes | Yes | Yes | Yes |
| App blocks on Thank you and Order status pages, up to 3 apps per area (Checkout app availability) | Yes | Yes | Yes | Yes |
| Web pixel apps (GA4, Meta, ad platforms) | Yes | Yes | Yes | Yes |
| Post-purchase upsell apps | Yes | Yes | Yes | Yes |
| Public apps built with Shopify Functions | Yes | Yes | Yes | Yes |
| Checkout Blocks (free Shopify app) | Restricted | Restricted | Restricted | Full |
| Market-specific checkout customization (Checkout editor → Markets) | No | No | Yes | Yes |
| App blocks on Information, Shipping and Payment steps | No | No | No | Yes |
| Custom apps built with Shopify Functions | No | No | No | Yes |
| Checkout Branding API (deep style control) | No | No | No | Yes |
checkout.liquid code editing (shopify.dev) | No | No | No | No (sunset) |
Three things this table settles.
Branding is universal; structure is not. A solo founder on Basic gets exactly the same logo, color, font and layout controls as an enterprise on Plus. What Basic does not get is the ability to add anything to the payment step. Shopify's pricing page lists "Fully customizable checkout" as a Plus line item and marks the other tiers "Limited". That is the plan gate, stated plainly. Our Shopify Plus pricing guide covers what else the $2,300 buys.
Advanced buys you geography, not depth. The only checkout capability that appears at Advanced and not below is market-specific customization: adapting checkout and account pages per market. For a mid-market brand selling into several regions, that is the meaningful mid-tier unlock. It does not give you custom fields.
The code route is closed at every price. Shopify's developer docs state that checkout.liquid is unsupported for the Information, Shipping and Payment steps, and that it, additional scripts and script tags were sunset for the Thank you and Order status pages on August 28, 2025. Shopify Scripts reached end of life on June 30, 2026; the replacement is Shopify Functions. Any guide that tells you to open the code editor and paste into checkout.liquid is out of date.
What changed after the August 26, 2026 auto-upgrade
For two years, the Thank you and Order status pages were the one part of checkout that non-Plus merchants could still touch with pasted scripts. That ended on August 26, 2026. Shopify's non-Plus upgrade page now uses the past tense: it was the deadline, and "stores that weren't upgraded by that date were upgraded automatically."
Here is the full timeline in one place.
| Date | What happened | Who it affected |
|---|---|---|
| Aug 28, 2025 | Thank you and Order status pages sunset checkout.liquid, additional scripts and script tags. The additional scripts box became view-only for everyone. | Plus (deadline); all plans (view-only) |
| Feb 5, 2026 | Header and Main background images removed from the checkout editor. Existing images can be removed, not replaced. | All plans |
| Jun 30, 2026 | Shopify Scripts reached end of life; Shopify Functions is the replacement. | Stores still running Scripts |
| Aug 26, 2026 | Non-Plus deadline for Thank you and Order status pages. Stores not upgraded by then were upgraded automatically. | Basic, Grow, Advanced |
What an automatic upgrade means in practice. The new pages are built from sections and app blocks. Anything that lived only in the old additional scripts box, such as a pasted Google Ads conversion tag, a Meta pixel snippet or an affiliate postback, no longer runs from that box. If you migrated in time, you already rebuilt those as web pixels or app blocks. If you did not, assume your post-purchase tracking has a gap that started on August 26.
Post-upgrade checklist. Work through this once, in order. It takes about an hour for a typical store.
- Audit the Order status page. Go to Settings → Checkout and open the live configuration. Select the Order status page and compare what you see with what was on it before: tracking widgets, review requests, referral offers, support links.
- Re-create tracking as web pixels. Any conversion tag that used to be pasted into additional scripts should now be a web pixel: use the platform's own app pixel where one exists, or a custom pixel for the rest. Then place a test order and confirm the purchase event fires.
- Re-add app blocks. Apps you already use for post-purchase upsells, order tracking or reviews may offer Thank you or Order status blocks. Open the Apps sidebar in the editor and add them; the limit is 3 apps per area.
- Check the Thank you page content. Confirm the order summary, shipping method and any custom messaging still read correctly, and that the customer-account sign-in prompt matches how you actually use accounts. Our Shopify Thank you page guide lists what belongs there.
- Verify Shop Pay and layout settings. Load your real storefront, add a product and open checkout on a phone. Confirm the layout you chose is the one shoppers see and that accelerated payment buttons appear where you expect. If you are unsure which wallets to offer, see Shopify payment gateways.
Shopify changes checkout several times a year; our running log of new Shopify features catches the next one before it lands on your store.
How to customize the checkout page
Everything below works on every Shopify plan, Basic included. Budget 20 minutes.
- Open the checkout and accounts editor. Go to Settings → Checkout, then click Edit next to the configuration you want to change. You can edit a draft configuration as well as the live one, which is the safer choice for a redesign you are not ready to ship.
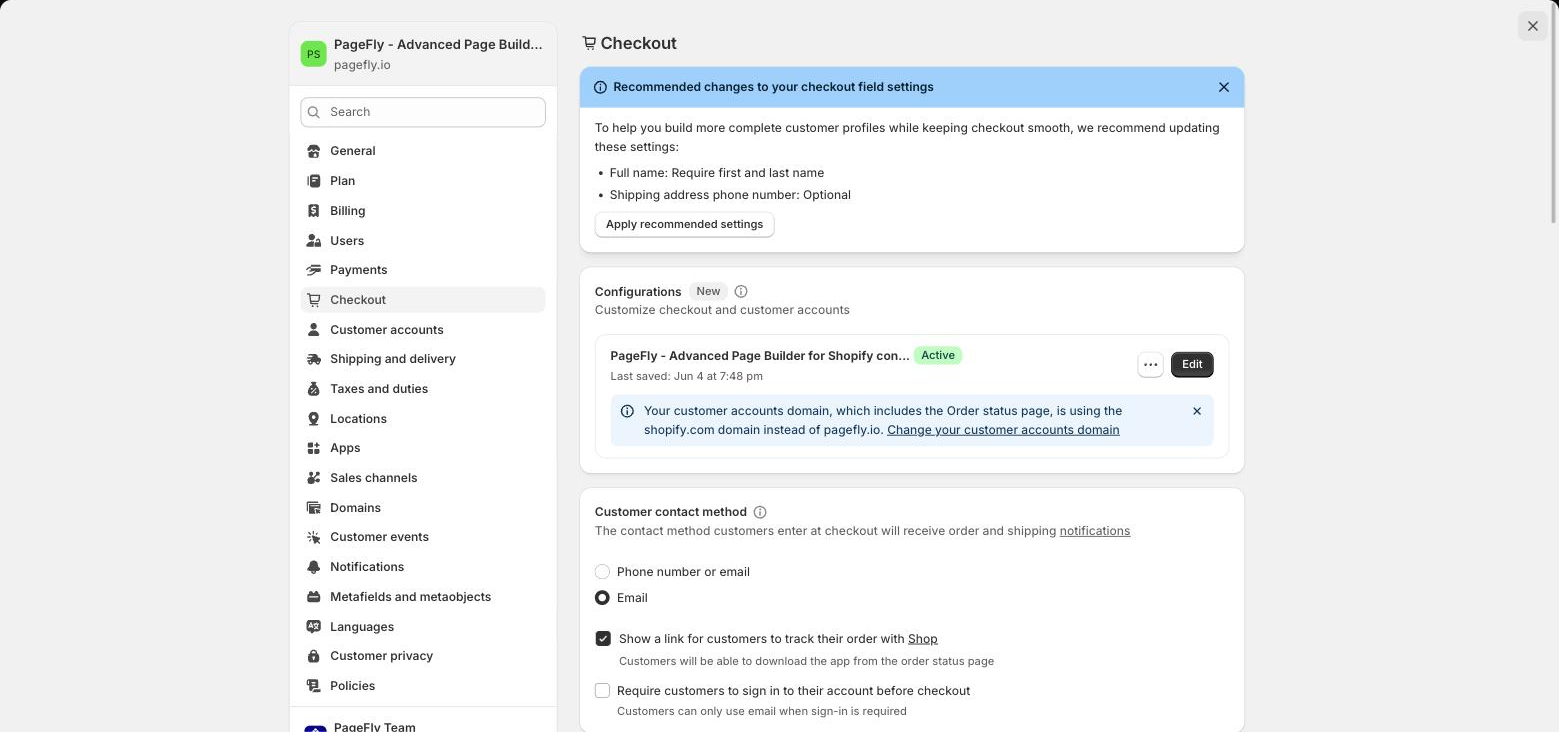
Step 1 — Settings → Checkout lists your checkout configurations; Edit opens the checkout and accounts editor. - Build a color palette first. Click the Settings (gear) icon, find Color palette, click + and add your brand colors. Palette colors update everywhere they are used, so you never hunt for a hex code twice.
- Add your logo. In Logo, click the Image field, choose Select from library, then set Width in pixels and Alignment. A checkout that suddenly looks like a generic Shopify page is the fastest trust-killer on this list.
- Set the header and main colors. Under Header, set Background and Accent (accent drives the cart icon and header links). Under Main, set the content-area Color. Since February 5, 2026 there is no background image option here on any plan.
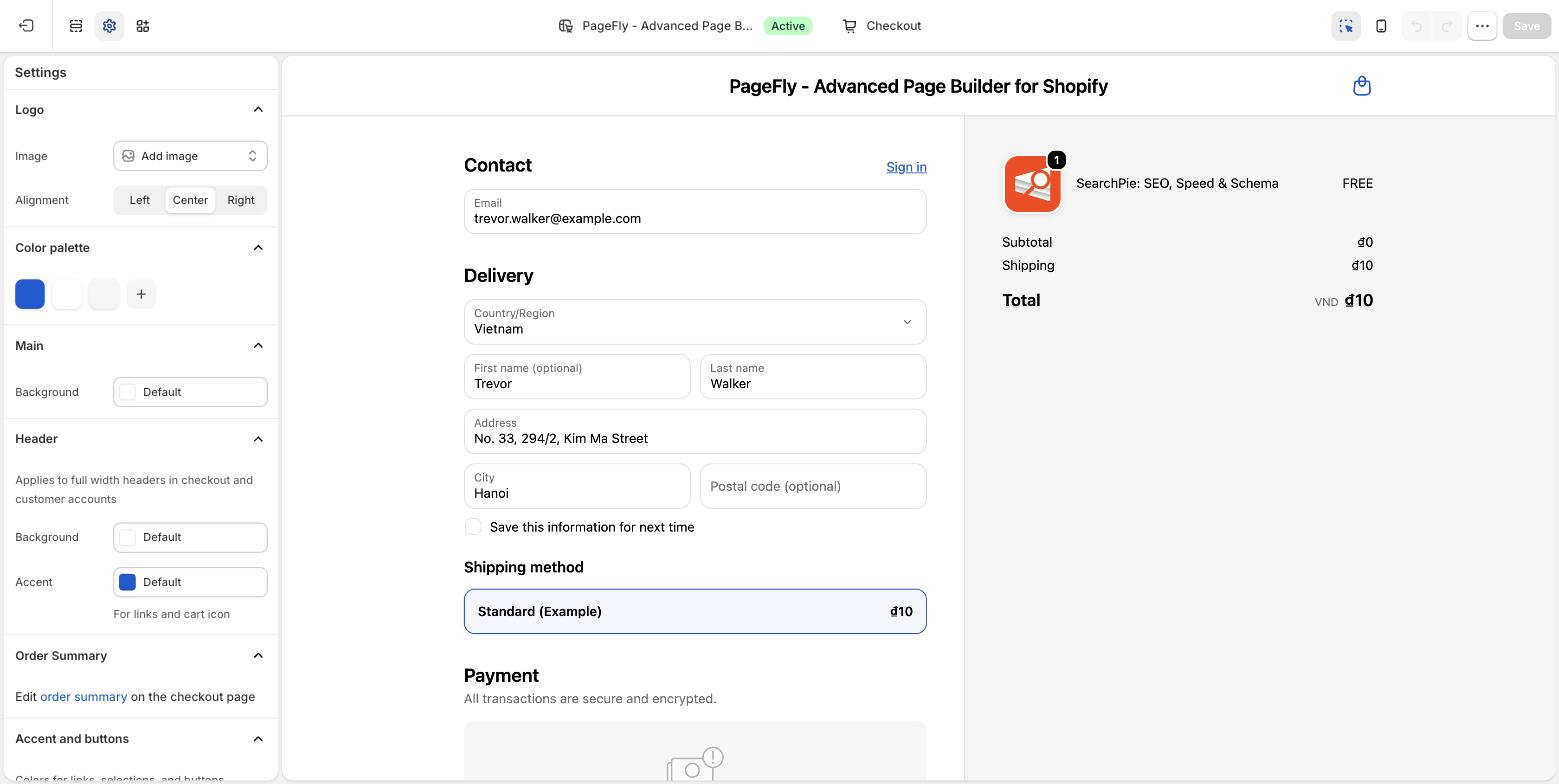
Step 4 — The editor's Settings panel: logo, color palette, header and main colors, with the live preview on the right. - Choose your typography. In Typography, pick a Headings and a Body font. You are choosing from Shopify's list, not uploading a font file.
- Style the order summary and input fields. Under Order summary, set a Background color or image (this area still accepts an image). Under Input fields, choose Transparent or White and pick an Error color. Keep contrast high; this is a form, not a hero section.
- Pick your layout. In Checkout layout, choose One-page (default) or Three-page. The preview does not update live for this setting, so save and open your real storefront checkout to confirm it.
- Customize the Thank you and Order status pages. Use the page selector in the top bar, then open the Apps sidebar and click + next to the block you want. Both pages accept app blocks on every plan, up to 3 apps per highlighted area.
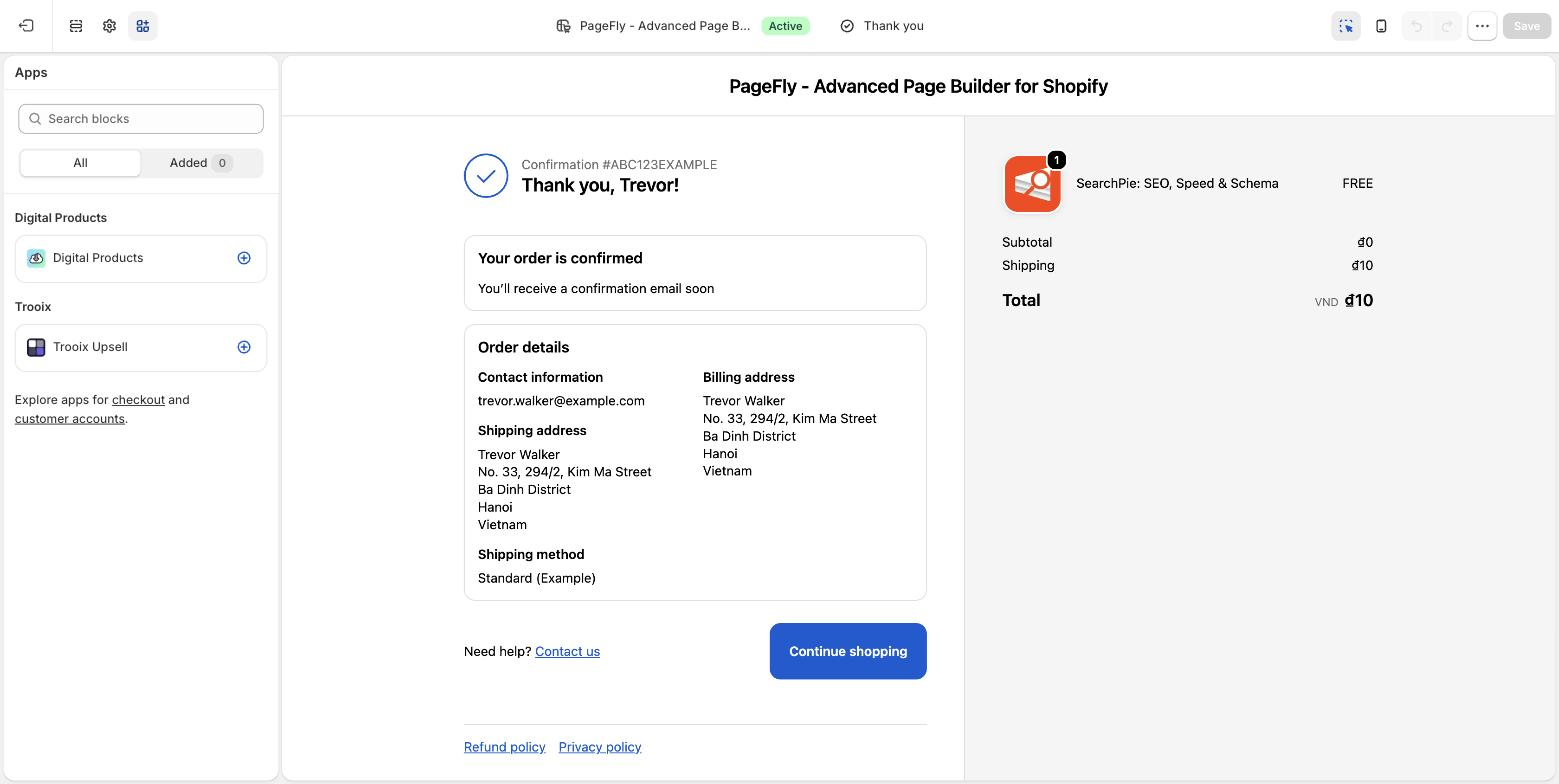
Step 8 — On the Thank you page, the Apps sidebar lists the app blocks you can add; the limit is 3 apps per area. - Rewrite the wording. Checkout copy lives in the theme content editor, not the checkout editor; look for the Checkout & system section. Switching to one-page checkout adds new strings, so re-check translations after a layout change.
- Preview on mobile, then save. Click the mobile icon to check the small-screen layout, use Preview Shop Pay if it is active, then Save. The editor is a simulation, so you cannot place a test order inside it; do that on the live storefront.
One gotcha: some of this branding also flows through to your customer account pages, so check those after a big color change.
Plus-only options
If you hit a wall in the steps above, the wall is the plan. Here is what changes on Plus, specifically.
- App blocks on the Information, Shipping and Payment steps. This is the big one. Checkout UI extension apps can only be placed on those steps on Plus. That is where custom fields, gift-message inputs, delivery-date pickers, age gates, B2B purchase-order fields and in-checkout upsells live. Our roundup of Shopify checkout apps notes which ones need Plus.
- Custom apps built with Shopify Functions. Public Functions apps work on every plan; a Function you commission yourself only runs at checkout on Plus. That covers bespoke discount, shipping and payment-method logic.
- The Checkout Branding API. Programmatic style control beyond the editor's dropdowns, including custom input-field colors that appear in the editor once set through the API.
- Checkout Blocks without restrictions. The free Shopify app runs on lower plans with feature restrictions; on Plus you get all of it.
The honest test for whether that is worth $2,300 a month: can you name a specific buyer objection that can only be answered inside checkout? Venus et Fleur could. Shopify's case study on the luxury flower brand describes a custom checkout calendar that lets customers pick a delivery date, which the brand says reduced abandoned checkouts and increased the likelihood of purchase by over 12%. A same-day gifting business needs a date picker at the payment step; most stores have no equivalent.
The counter-examples are just as instructive. Emma Kula, co-founder and chief product officer at Stellar Eats: "One page checkout is a game changer for reducing friction—especially with shipping automatically calculated right in front of you. We leverage a free shipping threshold to help push them to convert, and really appreciate that they become aware of it at a critical moment in the buyer's journey with one-page checkout." That is a layout setting and a shipping message, both available on Basic.
And Everlane puts it more bluntly: "Our hope is that customers don't even think about the checkout experience." The goal is an invisible checkout, not a branded one. For most merchants that is the right instinct, and it needs no upgrade.
Where the conversion levers really are
Now the part that changes what you do on Monday morning. You rent your checkout; you own everything before it. The data says "everything before it" is where the abandonment is created.
The Baymard Institute maintains a list of 50 cart-abandonment studies, last updated September 22, 2025. The average documented rate is 70.22%. When Baymard asked US shoppers why they abandoned, 42% said they were "just browsing / not ready to buy", which no page fixes. Set that group aside and here is what remains, with each reason sorted into the one place it is actually solved.
| Reason for abandoning | Share | Checkout setting or pre-checkout page? | Where to fix it |
|---|---|---|---|
| Extra costs too high (shipping, tax, fees) | 40% | Pre-checkout page | Product page and cart: shipping threshold, duties note |
| Delivery was too slow | 20% | Pre-checkout page | Product page: delivery window, not "fast shipping" |
| Didn't trust the site with card details | 19% | Pre-checkout page | Product and landing pages: reviews, guarantees, payment badges |
| Site wanted me to create an account | 18% | Checkout setting | Settings → Checkout: allow guest checkout |
| Too long / complicated checkout | 17% | Checkout setting | Settings → Checkout: one-page layout, optional fields off |
| Website had errors / crashed | 17% | Pre-checkout page | Theme and app performance |
| Returns policy wasn't satisfactory | 13% | Pre-checkout page | Product page: returns policy near add-to-cart |
| Couldn't see total cost up-front | 12% | Pre-checkout page | Cart: running total with shipping estimate |
Read the third column. Two of the eight fixable reasons are checkout settings, and both are toggles rather than custom code: allow guest checkout, and use the shorter layout. The other six, adding up to the largest shares, are messages that have to land before the shopper clicks "Check out." That is the proof behind the line: the checkout is rented, but the pages that decide whether someone reaches it are yours.
Christian Holst, research director and co-founder of Baymard Institute, puts the ceiling on the checkout side: the average site can lift conversion by 35.26% through design improvements to the checkout process. Note the word: design, meaning flow and field count, not branding. On Shopify, most of that flow is already fixed for you, which pushes the remaining opportunity upstream.
So here is the practical redirect. Take the six upstream reasons and answer each one on the pages you fully control.
- Put the real landed cost on the product page. A shipping-threshold bar and a plain-language duties note remove the 40% reason before the cart. Our Shopify shipping guide covers how to set the rates, and these Shopify product page examples show brands displaying them well.
- State delivery windows, not adjectives. "Arrives Thursday" beats "fast shipping" every time.
- Move trust signals above the add-to-cart button. Reviews, guarantees, payment logos and the returns policy belong next to the price. Our guide to Shopify trust badges shows which ones actually help.
- Match the landing page to the ad that sent them. Paid traffic that lands on a generic page abandons at the cart, not the checkout.
- Show the total before checkout loads. The 12% who could not see the total are answered by a Shopify cart drawer with subtotal, shipping threshold and estimated total in view.
- Recover the ones you still lose. A good abandoned cart flow is the safety net under all of the above.
This is where a page builder earns its place, and where we should be precise about what PageFly does. PageFly builds product pages, landing pages, collection pages, homepages and the cart drawer, and it can place a Dynamic Checkout button on those pages. It does not edit the checkout, Thank you or Order status pages; nothing outside Shopify's own editor and Plus apps can. Every reason in the "pre-checkout page" rows above, though, is a PageFly page.
If you want a head start, the PageFly template library includes product, landing and collection layouts with shipping bars, trust sections and reviews already in place. If you would rather have the abandonment reasons audited on your own store first, PageFly's CRO service does exactly that.
For the design work itself, our guides to the Shopify landing page and the Shopify collection page cover the two pages most paid traffic hits first.
Unsure which page a campaign should land on? Landing page vs homepage settles it, and the Shopify homepage guide covers what organic visitors see first.
Next steps
- This week: run the five-step post-upgrade checklist above, especially the web pixel test order. A tracking gap that started on August 26 gets more expensive every day it stays open.
- This month: spend 20 minutes in the checkout editor on branding and layout, then stop. Apart from guest checkout and one-page layout, there is nothing else in there that moves conversion on a non-Plus plan.
- This quarter: take the six pre-checkout reasons from the Baymard table and fix them one page at a time, starting with landed cost on the product page. Measure each change against your baseline before moving to the next.
Last verified against Shopify's official documentation on September 7, 2026.
Shopify Checkout Page FAQ
Yes, within limits. On Basic, Grow and Advanced you can change the logo, color palette, fonts, one-page or three-page layout, order-summary background, checkout wording, and add app blocks to the Thank you and Order status pages. You cannot edit checkout code or add fields and apps to the Information, Shipping or Payment steps; those need Shopify Plus.
Go to Settings → Checkout in your Shopify admin and click Edit next to a configuration. The checkout and accounts editor opens with a Settings (gear) panel for logo, colors, typography, order summary, input fields and layout. Use the page selector to switch to the Thank you or Order status page and click Add block to place app blocks. Save, then test on your live storefront.
No. Shopify's developer docs state that checkout.liquid is unsupported for the Information, Shipping and Payment steps, and it was sunset for the Thank you and Order status pages on August 28, 2025. Every checkout customization now runs through Checkout Extensibility: the checkout editor for branding, app blocks and web pixels for content and tracking, and Shopify Functions for custom logic.
August 26, 2026 was Shopify's deadline for non-Plus stores to upgrade their Thank you and Order status pages to the new versions. Shopify's help center says stores that were not upgraded by that date were upgraded automatically. If you had tracking or app scripts pasted into the old additional scripts box, check that they were rebuilt as web pixels or app blocks, because the old box no longer runs code.
Shopify manages checkout versions for you. Under Settings → Checkout you see your live configuration and can create draft configurations to edit safely before publishing. The old legacy Thank you and Order status pages have been retired for all plans, so there is no longer a version choice to make; every store is on the extensible pages built from sections and app blocks.
Only on Shopify Plus. Apps built with checkout UI extensions can be placed on the Information, Shipping and Payment steps on Plus, and that is where custom fields, gift messages, delivery-date pickers and age gates live. On other plans, collect the information on the product page before checkout or on the Thank you page after it, which accepts app blocks on every plan.
Match your brand's logo, colors and fonts so the checkout does not feel like a different site, keep input-field contrast high, and use the one-page layout unless testing shows otherwise. Shopify's case study with Everlane sums up the goal: shoppers should not have to think about the checkout at all. Beyond that, design effort pays off more on the product and cart pages that lead into checkout.
On your product, cart and landing pages. In Baymard Institute's abandonment survey, the largest fixable reasons are extra costs (40%), slow delivery (20%) and low trust (19%), all of which are messages that must land before the shopper reaches checkout. Only two reasons, forced accounts (18%) and a long checkout (17%), are checkout settings, and both are simple toggles on every plan.